
1
Introduction to ClientBase
What is ClientBase Online?
ClientBase is a tool for selling travel. It’s an easy-to-use marketing database system developed
specifically for travel agents. The program gives you flexibility in maintaining the marketing and
travel demographic components of your clientele. Not just another software program, ClientBase
represents an evolving solution to your customer relationship management (CRM) needs an automated
reservation card feature.
ClientBase Main Screen
The first screen to appear after logging on is the main screen. To become better acquainted with
the ClientBase features, it may be helpful to think of the screen as being divided into six sections:
1. Browser Items
2. File Manager
3. Toolbar
4. Navigation Bar
5. Search (Query) Filters
6. Search (Query) Results
Meet the Browser Items
Located at the top of the screen are your browser’s Items.
Depending on how your Internet Explorer is set up, these items look different. They usually include a
browser File Menu, Toolbar, and an Address area.

2
Meet the File Managers (Profiles & Activities)
The File Managers consists of Profiles and Activities.
Profiles provide quick access to vital information about your clients (Leisure or Corporate), Service Provider,
Vendor, Agent and
Other profiles (non-travel related entities, such as the electric company or landlord). From this area locate,
add, or modify profile records.
Activities allow you to easily manage activity data (Notes, Reminders and Mailers) and provides
query filters and results listed by Activity.
Profiles
When clicking Profiles, search (or query) filters entered by default appear or select a link which
contains a stored set of query fields (Global or Personal Saved Searches) from the drop-down
menus. You can also use a simple or advanced search to enter a custom search. (To view all
profiles, click Find.)
The Global Saved Searches represent a set of search filters and column arrangements that have
been saved and named. With a single click of the mouse from these drop-down menus, these links
automatically complete search filters and display results after clicking Find. The Personal Saved Searches
represent folders that have been saved by you and can only be seen and utilized on your own login.
To retrieve a specific profile, click View next to the entry or the action menu icon (gear). This icon is
displayed to the right of View and is listed for each record in the query. It has been designed to allow you to
perform a variety of actions for that one record without having to open the record first – saving you a few
extra clicks of the mouse. Click the icon and the following options appear:
From Profiles Search Results for Selected Profile:
Edit (Leisure, Corporate, Vendor, Agent or Other): Takes you directly to the Edit Additional Info section of
the selected profile for modifying without having to first view the profile and selecting Edit Additional Info.
Delete: Delete a profile. The system first prompts with the message, Delete this Profile? Yes or No.

3
If Yes is selected, then the system checks to see if any Invoices, Payments, Activities or Inventory exist for
the profile. If not, then the profile is deleted. If Invoices, Payments, Activities or Inventory exist for the profile,
the system prompts that these records must be deleted before the profile can be deleted.
Note: Profiles can be set to Inactive as an alternative to deleting.
View Activities: Take you directly to the activities tab for the selected profile without having to open the
profile first.
Merge to PNR: Activates Merge to PNR for the selected profile without having to open the profile
first.
Merge to Document: Activates Merge to Document Template for the selected profile.
Merge to E-mail: Activates Merge to E-mail for the selected profile.
New Note: Activates Note creation screen for the selected profile.
New Mailer: Activates Mailer creation screen for the selected profile.
New Reminder: Activates Reminder creation screen for the selected profile.
A new profile can be created at any time in Profiles or Activities clicking on the Profile icon in the toolbar, and
selecting the desired profile type (Leisure, Corporate, Service Provider, Vendor, Agent or Other).
Create a New Profile

4
Activities
When opening Activities, search filters are entered by default or you may select a link which contains a
stored set of search fields (Global or Personal Saved Searches) from the drop-down menus. You can also
use the simple or advanced filters to enter a custom search. (Clicking Find displays all activities.)
Create a new Note, Mailer or Reminder
The Global Saved Searches represent a set of search filters and column arrangements that have been
saved and named. With a single click of the mouse from these drop-down menus, these links automatically
complete search filters and display results after clicking Find. The Personal Saved Searches represent
folders that have been saved by you and can only be seen and utilized on your own login.
To retrieve a specific activity, click View next to the entry or the action menu icon (gear).
Edit takes you directly into the activity, or Go to Profile takes you directly into the profile for which the activity
was created. A new activity can be created at any time in Profiles or Activities by clicking the Note, Mailer or
Reminder icon on the toolbar.
Meet the Toolbar
The toolbar is made up of links to frequently used features. Directly above the toolbar is the Login
Name information that identifies what ClientBase user is presently logged in.
MERGE to ICON
Merge to Doc: Launch a Document Template (setup by default) from the results of a query into
Wordpad, MS Word, Open Office, etc. to view, edit and print the document with all fields merged.
You can also Merge to Doc inside a client profile. Please see section on Putting Your Profiles to
Work for You for exact directions on how this is done.
Merge to E-mail: Launch an E-mail from the results of a query. Please see section Putting Your
Profiles to Work for You for exact directions on how this is done.
Merge to File: Export the results of a query for use in other applications such as MS Word, Excel, etc. to run
labels or reports, and print from your local workstation. Arrange and sort columns as desired before printing.

5
Merge to Printer: Print the results of the query from the Profile.
PROFILE ICON: Create a new Leisure, Corporate, Service Provider, Vendor, Agent or Other profile.
NOTE ICON: Create a note from the results of a query. Please see section An In-Depth Look at
Activities for exact directions on how this is done.
MAILER ICON: Create a mailer from the results of a query. Please see section An In-Depth Look
at Activities for exact directions on how this is done.
REMINDER ICON: Create a reminder from the results of a query. Please see section An In-Depth Look at
Activities for exact directions on how this is done.
TOOLS ICON:
Page History: The page history area "remembers" the last places you have
navigated to in the program. To quickly hop back into a recently visited
area, simple click on that link.
Settings: Access the ability to customize Agency Settings, Branch Settings,
and User Logins.
Import: Import data into ClientBase in the form of an ASCII (.txt) file.
Directions are in section entitled Set Up to Use ClientBase.
My Login: By going to Tools|My Login, each user has the ability to update
their own default settings including Query Folder Defaults, Profile Defaults,
Communication Defaults, PNR Import Settings, E-mail Settings, as well as
User Name, Title, E-mail and Login Password.
User Settings: Only the User Name, Title, E-mail and Password can be changed from this area.
Query Folder Defaults: Each file manager (Profile and Activity) comes with a default set of folders, which
represent a stored set of search filters. In addition to the default folders, your
agency and agents can create their own custom folders. This area of the user login allows you to
identify which folder should be opened by default (within each manager) when first signing into
ClientBase. Choose from the drop-down menu the types of transactions you want to see when first entering
ClientBase with this login.
Profile Defaults: Each profile type is made up of several links information. Under Profile Defaults, select
which link fist appears when viewing each type of profile. For example, you may to see marketing information
first thing, every time they retrieve a leisure client profile. If so, click the down arrow next to Leisure and
select Marketing. You can select any link for any profile type.
Communication Defaults: The agency is no longer confined to its four walls. With so many outside agents
and employees working from distant locations, customers come with many different area codes and even
from different countries. Agent users have the opportunity to save default phone information as part of their
log in. Note: If this screen is left blank, then information that is listed under Agency Settings (Global Defaults)
is used.
6
PNR Import - If you are using PNR Import, you may be asked to use this area. See An In-Depth
Look at PNR import for more details.
E-mail Settings
ClientBase uses the SMTP (Simple Messaging Text Protocol) to send e-mails. Complete the User
Login SMTP Settings obtained from the entity responsible for maintaining your mail server (ISP).
IMPORTANT: Inquire if your ISP SMTP allows remote relaying services with authentication.
ClientBase does not yet support the SSL platform.
From E-Mail Address: Enter the e-mail address for the user login you are setting up. The address entered
here appears as the from address for all e-mails sent from this user. If you wish to change this address
frequently, do so at the e-mail level when you are sending it out.
In the From E-Mail field, if you type joyce@trams.com and a message is sent, you see the From
field saying joyce@trams.com. Some people prefer it to look like this instead, Joyce Smith. To
have it appear like this, type Joyce Smith<joyce@trams.com> instead of just joyce@trams.com. You can
also use your company name or department name; for example, Travel With the
Stars<sales@TWTS.com> or Star Travel Marketing<sales@TWTS.com>.
Outgoing Mail Server (SMTP): Enter the outgoing mail server name determined in your steps
above. Examples: mail.domainname.com, smtp.domainname.com, or gomail.wspan.com).
Port: This setting defines the TCP/IP port which your e-mail application listens on for incoming mail. If left
blank, this setting uses port 25 by default, which is the Internet standard for receiving SMTP mail. In some
situations, you may have chosen to move the SMTP service to another port. Perhaps you already have a
service on port 25, and you do not want the services to conflict over the port assignment. In such a case,
enter the port ClientBase should use.
Authentication Type: Set to Default, a setting used to authenticate your connection to the SMTP
mail server by forcing a USER name and password.
None: If your agency is hosting your own e-mail server and the network login has been configured to handle
the authentication to the SMTP Server automatically, set this field to None.
E-Mail Account Login and Password: Use when Login Type is set to Default. Enter your E-Mail
account login and password here.
Click Save.
HELP: Provides on-line program topics that explain different areas of the program.
ABOUT: Clicking About provides you with further details on the ClientBase configuration including
Application Version, Database Type (IB or Oracle) and version, Agency Serial #, Expiration Date and Max #
of Simultaneous Users, and Private Label Version.
LOG OUT ICON: Returns user to the Sign In area.
Meet the Navigation Bar
The Navigation Bar provides a means to jump to various profiles in the search results screen by
using First, Previous, Next and Last. To obtain a number of entries in the results of a search, click
Count. Also on this bar are Select Columns, Sort by Columns, and Saved Searches.

7
Select Columns
Click Select Columns to choose columns displayed in the search results screen.
To change a column, move the highlighted column over to the other side by using the > or < arrow. By using
the shift key and mouse, select as many consecutive entries as you want to move; by using the control key
and your mouse, select non-consecutive entries to move. Use the >> or << arrows to move all columns at
one time over to the other side. Use the up and down arrow buttons to order your selections. Click OK to
save, and Cancel to abort.
Sort by Columns
Click Sort by Columns to sort columns in the search results screen. Sort up to 3 columns in
ascending or descending order, and click OK to save, or Cancel to abort.
Saved Searches
Click Saved Searches to View an existing Global or Personal saved search. If you have been
granted permission, you are also able to Replace, Rename, or Delete a saved query or create a new brand
new one. See Using the Profile Manager to Manage Your Profiles for more details.
Meet the Search Filters
Your database holds a wealth of information on your customers - marketing activities,
communication and address information, family/employee preferences, and more. This information is of little
value unless you can quickly and easily access the data you need. The search (query) feature provides
filters to quickly sift through your data to match your required search criteria.
You have the ability to do simple or complex searches based on the selected query filters.
Simple Search
Quickly locate a profile or a group of profiles by simply completing one or two search filters in the
simple search area. The drop-down field to the left identifies what you want to search by, and the
blank field to the right provides an area to type in search data. If you choose to use both fields, then the
criteria is strung together with an "and", not an "or", and only those profiles that meet both query fields are
displayed as a match. For example, if you are looking for an leisure client named Gary Schaefer, set the first

8
field to Profile Type, and select Leisure, then set the second field to Last Name and enter “sch” (the first few
letters of the client’s last name). Click Find.
All leisure clients with the last name starting with "sch" appear in the results area.
Advanced Search
Advanced Search provides additional filters that allow you to more narrowly define what you are
looking for. Search filters are selected by clicking Go to Advanced Search, then Enter Data to Search by, and
completing as many of the search fields as desired in the General Info, Marketing, Activities,
Family/Employee or More Field links. Each field selected is strung together with an “and” that more narrowly
defines the search. For example, you have just received a hot cruise special to Europe and want to get a
number of all past and potential cruise clients interested in Europe and living in the 90045 zip code to see if
you should do a mailing. Select Leisure under Profile Type ;“90045” in the Zip Code field; “Europe” and
"Cruise" under Marketing categories and click OK. You have selected the filters to search your database for
all leisure clients who expressed an interest in cruising and want to go to Europe and live in the 90045 zip
code area. When you click OK, all clients in the database meeting the search criteria are displayed on the
results screen .
Advanced Query Links
Note: Always reset when running a fresh query!
Meet the Search Results
The Search Results Screen displays only those records that meet the search criteria you entered in the
search filters. In Profiles, all results are identified by type of Profile: Leisure, Corporate, Service Provider,
Vendor, Agent, or Other. In this example, the query filters were entered from Profiles and set to Profile Type
of Leisure, and a few letters of the Last Name, sch. After clicking Find, the search results displays all leisure
clients in the database whose last name begin with sch. To select a record appearing within the results

9
screen, click View to go to the profile, or click the action menu icon (gear) to activate the following items for
this profile only: Edit, View Activities, Merge to PNR, Merge to Document, Merge to E-mail, create a Note,
Mailer or Reminder.

10
Client Profiles
After reviewing this document you should be able to setting up, maintaining and using client
profiles.
Types of Client Profiles
There are two types of client profiles in ClientBase - Leisure and Corporate. A Leisure profile is
created for each leisure client’s household. A client profile holds any number of family members.
For example, an agency created an leisure profile for Mr. & Mrs. John Smith. The family members
are John, the primary contact; Karen, his wife; James, his son; and Jesse, his daughter, and are
included as part of the Smith profile under the link, Family Members. Whenever anyone in the
household calls the agency to travel, John’s profile is accessed and used to confirm or add vital
information for any family member.
Corporate profiles are created for each of your commercial clients. Each profile may contain any
number of employees who are company travelers. These are listed in the client profile under the
Employee link. Many times a traveler listed under a corporate profile also has an leisure profile in
your database as well, since customer needs are different for leisure and corporate travel.
Anatomy of a Profile
A client profile in ClientBase stores an unlimited amount of information about your customers. To
organize all this information and make it easily accessible to all users, each profile is made up of these key
areas, Header Info, Toolbar, Indicator Icons, and Information Links.
TOOLBAR
INFORMATION
LINKS
INDICATOR
ICONS
Header Information
The header conveniently displays pertinent information including the current mailing address,
communication entries captured for this profile, E-mail and Website addresses, Interface ID, Primary
Agent assigned to this profile and the date it was created. By confirming the accuracy of this
information and adding any new details each time a customer calls, the user ensures that the client
data (and agency marketing data) is always up-to-date.

11
Toolbar
The toolbar contains links to features - Merge to ( Doc, E-mail), Merge to PNR, Merge to Live
Connect, Note, Mailer, and Reminder. Merge to Doc enables you to launch a Document Template
from the results of a query into Wordpad, MS Word, Open Office, etc. to view, edit and print the
document with all fields merged. Merge to E-mail launches an e-mail message for the profile you
are in. Merge to PNR enables you to pass client data to your reservation system's PNR. You can
also create a Note, Mailer, or Reminder from the toolbar for the profile you are in, or link to another
profile by using the three dots next to Profile field.
Under Tools, Page History shows a trail of the past areas in ClientBase that have been navigated to
in the program, as well as a link to each manager. To jump to any previous area in this history,
simply click on its hyperlink. Settings allow users, if they have been granted permission to do so, to
customize certain areas of the program. My Login enables each user to update their own default
settings including Query Folder Defaults, Profile Defaults, Communication Defaults, PNR Import Settings, E-
mail Settings as well as User Name, Title, E-mail and Login Password. Click Help to access useful
information about program features.
Click Log Out to leave the program or log in as a different user.
For complete instructions on Merge to Doc, Merge to E-mail, Merge to PNR, and Merge to File (if applicable),
please see chapter, Putting Profiles to Work for You.
Detailed Review of Information Links
Each client profile contains the following information links: General Info, Remarks, Marketing,
Family Members/Employees, Activities, Cards, Travel History, Groups,
Attachments, PNR Entries, and More Fields.
General Info Link
The General Information link displays the primary client data for this household or business.
The following fields are in the General Information link:
ADDRESS RECORDS
A client profile can include unlimited addresses which may be designated as: Primary, Bill To, Ship
To, Secondary Address and Alternate Address. Only one address though may be designated as
Primary, one as Bill To, and one as Ship To. When creating a new address, click Add Address, fill
in correct address details and choose the address type(s).
This area contains the following fields:
Address:
Address Line 1: Enter first line of address.
Address Line 2: Enter second line of address.
Apt/Suite: Enter apartment or suite number.
Zip/City/State/Country: Enter the zip code, city, state, and country of the address. (If the Database
Administrator has set up the Zip Code field in the Windows version of ClientBase, when you enter a
Zip Code, the default City, State and Country populates automatically. On the Edit screen of an
address record, the Zip Code field is now positioned in front of the City and State to facilitate this
feature.)
Description: Enter description if desired.

12
Address Type
Primary/Bill To/Ship To/Alternate: One address record can represent multiple Address Types.
Click to select.
Secondary: The Secondary Address choice also offers a date option. This is particularly useful
because it allows entry of a specific time frame your client may be residing at the Secondary
Address. After clicking Secondary Address, select the From and Through months from the dropdown
menu.
Save/Cancel: Click Save to accept new information or Cancel.
To modify an entry, click Edit next to the address you wish to alter, make changes, and click Save.
To remove an entry, click Edit next to the address you wish to remove, and click Delete.
COMMUNICATIONS
The standardized format for unlimited telephone, fax, E-mail and web entries in ClientBase provides
a platform upon which this information can be easily accessed. When creating a communication,
click on Add Communication, fill in correct communication details, and click Save.
This area contains the following fields:
Passenger: From the drop-down menu choose what passenger this communication entry is
connected with (if applicable).
Type: Use drop-down menu to select Phone, Fax, E-mail or Web.
Profile’s Primary: Indicate if this is the primary phone number, fax, E-mail, or Web address, since
only one entry per communication type may be designated as Primary.
Value: You need only type the 7 digits of the Fax number or Phone number if in your area code, as
ClientBase version adds a default country code and area code to the number when saved. For
numbers outside your area code, type in the 10 digit area code and number (no other typing is
necessary). For E-mail and Web entries, type these exactly as you want it to appear.
Description: Choose a description if desired from drop-down menu. These options were setup by
the database administrator in the Windows version of ClientBase.
Save/Cancel: Click Save to accept new information or Cancel.
As alternative methods of communicating with customers continue to expand (e.g. cell phones,
beepers, additional E-mails, etc.), you may find your phone tables growing increasingly lengthy for
customer profiles. You have the ability to maintain an unlimited number of communication entries.
To modify an entry, click Edit next to the communication you wish to alter, make changes, and click
Save. To remove an entry, click Edit next to the communication you wish to remove, and click
Delete.
SPECIAL DATES
These fields are particularly useful to record unique dates for each specific customer. Imagine the
marketing possibilities, when several months before an anniversary, birthday or vacation time, your
agency suggests as a gift, a trip reflecting the client’s preferences. To add unlimited special dates click on
Add Special Date, fill in special date details, and click Save.

13
This area contains the following fields:
Type: Select from drop-down menu. These types were setup by the database administrator in the
Windows version of ClientBase.
Date: Select month from drop-down menu, type day and year.
Comment: Type a comment if desired.
Save/Cancel: Click Save to accept new information or Cancel.
You have the ability to maintain an unlimited number of Special Dates. To modify an entry, click Edit
next to the special date you wish to alter, make changes, and click Save. To remove an entry, click
Edit next to the special date you wish to remove, and click Delete.
ADDITIONAL INFO
These fields provide general information about the profile. To edit fields in this area, click Edit, make
changes, and click Save.
General Information
Company: In a Corporate Profile, enter the name. Any printed reports or labels can include the
Company name entered in the General Info link.
Last Name: Enter the last name of primary contact in household or business. Any printed reports
or labels can include the First and Last Name entered in the General Info link.
First Name: Enter the first name of the primary contact in this field.
M.I.: Enter the middle initial of the primary contact in the field.
Courtesy Title: Mr., Mrs., Mr. & Mrs., Ms., Dr. are all examples of courtesy titles. The drop-down
menu allows you to select from a lengthy standardized list. This courtesy title is printed on mailing
labels or on letters in the Document Templates (currently only now in the Windows version of
ClientBase. This field is customized by the database administrator.
Additional Info
Interface ID: Important! This field allows the interfacing of records generated from the CRS (Front
Office) to the agency accounting system (Back Office). If your agency's system requires that this
field exist (for example, TRAMS Back Office does) then create an Interface ID as directed by the
agency and complete this box.

14
Primary Agent: This field defaults to the login agent at the time the profile is created. It can be
modified to represent the appropriate agent considered primary to the customer (by clicking on the
drop-down menu), or left blank.
Salutation: The name used to greet the customer. For example, if Mr. Henry Wilkenson likes to be
called “Hank,” enter Hank in this field. If Mrs. Emily Anderson likes to be called “Mrs. Anderson,
enter Mrs. Anderson in this field. Or, if you have a couple and want to include both names when
addressing letters, enter Hank and Emily, or Mr. & Mrs. Anderson.
Branch No.: For agencies with multiple branches, select from a drop-down menu the branch where
this profile is created, or with which you want the profile associated. Branches are setup by the
database administrator in the Windows version of ClientBase.
Referred By: By using the drop-down menu, select how this client was referred to your agency.
Statistic reporting can be obtained from ClientBase to get a bird’s eye view of how new customers
are learning of your agency. What a great way to evaluate the effectiveness of your advertising.
This field is user-definable by the database administrator in the Windows version of ClientBase.
Web ID/Web Password: If your agency is interested in using your website to collect and update
customer information, these fields may become important, as most systems require a Web ID and
Password to provide access to this type of customer information.
Profile Status
Create User/Create Date: These fields default to the system date and the user logged in at the time
the profile is created. Both of these fields can be modified. Agencies use the Create Date field to
query for new customers so that “Welcome to the Agency Letters” and travel surveys can be mailed.
These fields are also used to query for management reports reflecting user productivity in creating
new client profiles.
Profile Status: Indicate whether a customer profile is Inactive from the drop-down menu. By default
all profiles start with an Active status. An Inactive status is included so that you can flag a customer
as inactive without having to delete the profile. When querying the ClientBase database, only
profiles marked as Active are included in the search. Locate Inactive Profiles by using Level 2
Query.
Save/Cancel: Click Save to accept new information or Cancel.
Remarks Link
The Remarks link provides a full-page view of the unlimited remarks and provides tremendous
flexibility for entering comments in each customer profile. To add or edit a remark, click Edit Text,
add text or make edits, and click Save or Cancel. The great thing about remarks is that the first few
lines can be viewed from anywhere in the profile.
Marketing Link

15
The Marketing link provides the means of tracking client interests and travel preferences, while
arming agents with key information to use during the qualifying process of selling leisure travel.
Marketing tables are powerful links to clients with common travel interests when planning a direct
mail campaign or planning group travel. Reports showing the travel preferences of your customers
are extremely valuable in matching up customers and their interests with travel specials.
To add or modify the client’s marketing preferences, click Edit. Check or uncheck any marketing
codes (setup by the database administrator in the Windows version of ClientBase), and click Save
or Cancel. These Marketing tables and codes are “global,” meaning the same codes are available
for use in every profile for every user. Remember that customer’s needs often change. Removing,
or editing marketing information when no longer valid is as important as entering new information.
Family Members/Employees Link
The Family/Employee Members link is designed for entering detailed information on specific
individuals who are part of a particular household or business. The link is called Family Members
when working with an Leisure profile, and Employees when working with a Corporate profile.
This page is
shown
in Summary
View.
To get a full
view of
all Family
Members|E
mployee
s details,
click Detail
View.
Add a new family member/employee by clicking Add Family Member. Let’s take a look at how to
organize information for each family member/employee by going through each field of the Add/
Modify screen.
Passenger/Employee
Relationship: By choosing from a drop-down menu, these user-definable items setup by the
database administrator in the Windows version of ClientBase can be inserted. By identifying the
traveler as a daughter or son in Leisure Profiles; Sales Rep or V.P. in Corporate Profiles, agents
have an advantage when talking to a customer and can personalize their service.
Last Name: Enter the legal last name of family member/employee.
First Name: Enter the legal first name of the Family Member/Employee in this field. This provides
you with the correct information for booking purposes.
M. I.: Enter a middle initial.
Courtesy Title: Mr., Mrs., Mr. & Mrs., Ms., Dr. are all examples of courtesy titles. The drop-down
menu allows you to select from a customized list (setup by System database administrator). This
courtesy title can printed on mail labels and letters.
16
Birthdate Date (mm dd, yyyy): Enter traveler’s birthdate including Month, Day and Year, or any
combination of those date fields. (If agent knows only month, enter it, then query the database by month, and
send out your birthday cards!) Notice the read only field to the Family/Employee record called Age. This field
is auto calculated base on the entries in the birthdate fields. This field requires at least a year be entered into
the birthdate entry and calculates based on the following logic:
- If Year but no Month and Day, Jan 1st of year is used to calculate Age.
- If Month and Year but no Day, 1st of the month is used to calculate Age.
- If Day and Year but no Month, Jan and day is used to calculate Age.
- If no year then the Age field is left blank.
Passports Passport Number #1 & #2: For up to 2 passports, enter traveler’s passport number.
Expiration: Enter traveler’s passport expiration date in date format listed below; or double-click on
the date from the drop-down calendar. This is the field to query on to send out letters alerting
customers that passports are about to expire.
Date Fields Formats
Complete a date field using any one of the following formats:
1) mmddyy or mmddyyyy (separators are not required); i.e., 021405
2) ddmmmyy or ddmmmyyyy
3) 0 (for current month, day and year date)
4) mm (defaults to current day and year)
5) mmdd (defaults to current year)
6) mm-dd-yy, mm/dd/yy, mm.dd.yy (-, / and . are valid separators)
7) m-d-yy, m/d/yy, m.d.yy
Country of Origin: Enter the passport Country of Origin from the drop-down menu.
Remarks: Enter unlimited free-flowing information pertaining to this traveller.
Airline Prefs: For each traveller, enter Class of Service, Seat Preference, and Meal Preferences
from convenient checklists. Enter special options from a drop-down menu setup by the Database
Administrator. Preferences entered here can even be used within CRS rules, formatted as remarks,
and sent to the PNR when this passenger is travelling.
Car Prefs: For each traveller, enter car type preferences from convenient checklist. Enter special
options from a drop-down menu setup by Database Administrator. Preferences entered here can
even be used within CRS rules, formatted as remarks, and sent to the PNR when this passenger is
travelling.
Cruise Prefs: For each traveller, enter dining preferences and ship size from drop-down menus
setup by Database Administrator.
Hotel Prefs: For each traveller, enter room location, bedding type and special needs from dropdown
menus setup by Database Administrator. Preferences entered here can even be used within
CRS rules, formatted as remarks and sent to the PNR when this passenger is travelling.
Tour Prefs: For each traveller, enter escorted preferences from a drop-down menu setup by the
Database Administrator.
General Prefs: For the traveller who smokes, check the appropriate box. In the special services
box, free-flow any special requests.
To modify or enhance a family member/employee, click View in front of the family member/employee
name, and then Edit. Click Edit, then Delete to remove a family member/employee.
Save/Cancel: Click Save to accept new information or Cancel to leave area without saving
Changes
17
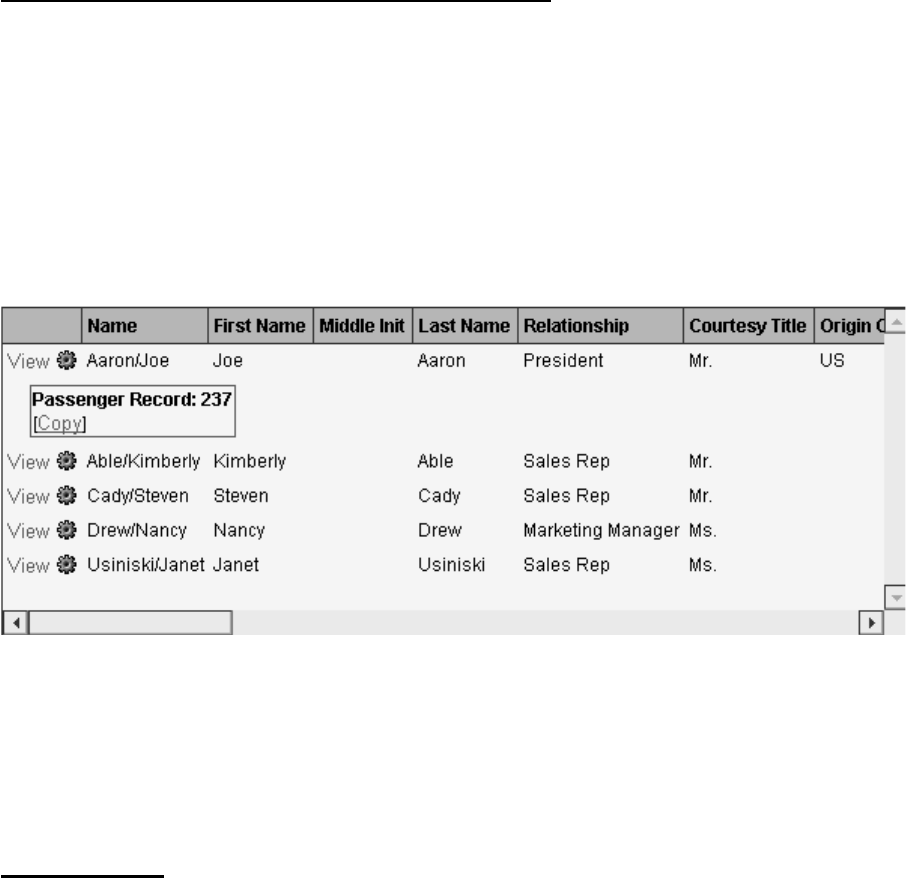
Copy Family Member/Employee Record to Another Profile
In ClientBase, you have the ability to copy a family member or employee record from one profile and
paste it into another profile. All data captured within the family member/employee record is pasted
including: Relationship, Title, First Name, Middle Initial, Last Name, Birth Date, Communication
Entries, Passport Entries, Remarks, Cards, Air-Car-Cruise-Hotel-Tour-General Preferences and all
PNR Entries. This feature allows a user to take all passenger related entries and copy them into
another profile without having to re-enter (e.g. copying a corporate traveler into a leisure profile or
visa versa).
To Copy a Family Member/Employee Record:
1) Retrieve the desired profile containing the family member/employee record to copy.
2) Click the Family/Employee link and from the passenger listing, click the action gear next to the
appropriate family/employee record
3) Click Copy, to copy the employee details to the Windows clipboard.
4) Close the profile, before copying anything else to the Windows clipboard, retrieve or create the
profile to copy to.
5) Click the Family/Employee link. (Delete the blank default Family/Employee that has been created
if applicable.)
6) Click Paste Family/Employee.
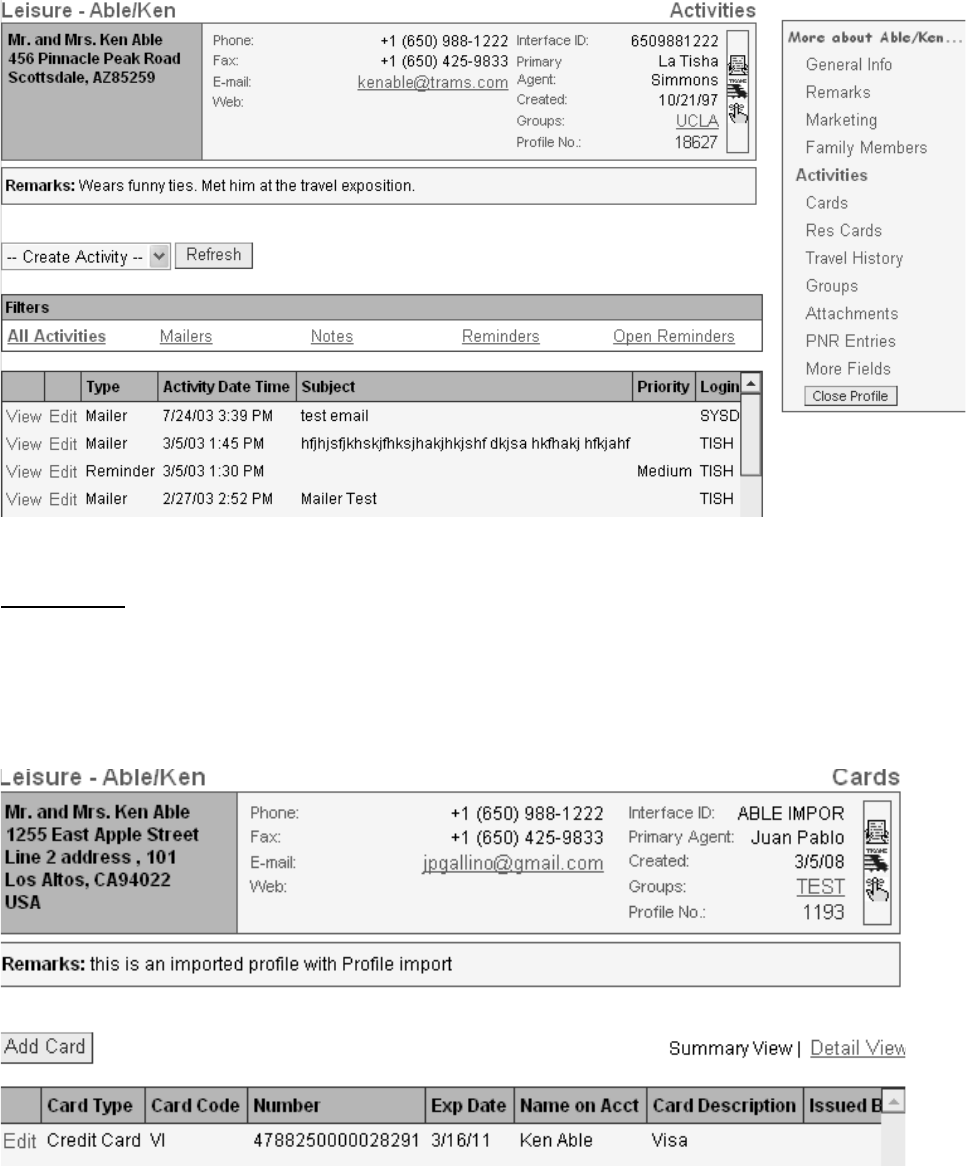
Activities Link
This link displays a complete history of all contacts associated with this specific client. Included are
Notes (record of interaction with client), Reminders (record of scheduled past and future activities)
and Mailers (record detailing mailings sent to this client).
To add a new Note, Reminder or Mailer, click on the drop-down menu item Create Activity. To
modify or enhance a Note, Reminder or Mailer click Edit next to the item. Click Edit|Delete to
remove any item.
Notice the filter buttons located directly above the Activities results screen. This allows for quick
sorting of the results appearing in this link. By default ALL Activities are displayed, but options for
viewing just Mailers, Notes, Reminders, or Open Reminders are available. Also, there is a Summary
View and Detail View of activities in the listing.
18
Sort Activities by clicking Mailers,Notes,Reminders,or Open Reminders
Cards Link
Keep track of customer’s credit cards, travel clubs, frequent flyer numbers, expiration dates and
more in your customer profile. This area summarizes every card for every passenger. (Actually a
good tip is to enter or modify cards here rather than in the Family Member/Employee link as it is
quicker.) To add a new card, click Add Card. To modify or enhance an existing card, click Edit next
to the item. Click Edit|Delete to remove a card. Also, there is a Summary View and Detail View of
Cards in the listing.
DIRECTIONS FOR ENTERING/EDITING CARDS:
Frequent Flyer, Credit Cards, Passport #’s, etc.
Name: From the drop-down menu, enter the passenger for whom this card is associated. If the card
is associated with all profile travelers, leave blank.

19
Card Type: From the drop-down menu, choose the type of card, Car Program, Frequent Flyer,
Hotel Program, or Other.
Card: From the drop-down, select the card, AT-Air Travel Card, AX-American Express, DSDiscover
Card, MC-MasterCard, or VI-Visa.
Card Number: Enter the card number.
Expiration: Free flow date of expiration in date format listed below, or click on the 3 dots to access
calendar from which to double-click on an expiration date.
Date Fields Formats
Complete a date field using any one of the following formats:
1) mmddyy or mmddyyyy (separators are not required); i.e., 021405
2) ddmmmyy or ddmmmyyyy
3) 0 (for current month, day and year date)
4) mm (defaults to current day and year)
5) mmdd (defaults to current year)
6) mm-dd-yy, mm/dd/yy, mm.dd.yy (-, / and . are valid separators)
7) m-d-yy, m/d/yy, m.d.yy
Name on Card: Enter the name on the card.
Issued By: Free flow card issued by information.
Remarks: Enter free flow remarks for this card here for reference.
More Details
Approx. Miles: Enter free flow approximate miles here for reference.
Card Limit: Enter free flow card limit information here for reference.
Save/Delete/Cancel: Click Save to accept new information, Delete to remove this card entirely if in
edit mode, or Cancel leave area without saving changes.
Travel History Link
The Travel History link is a read-only screen which displays a list of issued invoices for this client
providing easy access to the client's past travel history, number of invoices issued, sum total of
bookings, average booking amount and the total commission.

20
Filters
Sort: Select the way you want data sorted by using the drop-down menu to select Issue Date,
Depart Date, Travel Category, Passenger Name, First Inside Agent, Invoice #, Invoice Type, Invoice
Status, Ticket#, or Ticket Confirm #.
Issue Date: Enter the from and to Issue Date by clicking on the drop-down menu to access a
calendar and double-clicking on the desired date, or free flowing the date using date format listed
below.
Date Fields Formats
Complete a date field using any one of the following formats:
1) mmddyy or mmddyyyy (separators are not required); i.e., 021405
2) ddmmmyy or ddmmmyyyy
3) 0 (for current month, day and year date)
4) mm (defaults to current day and year)
5) mmdd (defaults to current year)
6) mm-dd-yy, mm/dd/yy, mm.dd.yy (-, / and . are valid separators)
7) m-d-yy, m/d/yy, m.d.yy
Tvl Cat.: Filter the results per travel category by checking/unchecking the travel category buttons,
Air, Hotel, Car, Cruise, Tour, Rail, Transport, Insurance, Service Fee, or Other.
Click Search to display desired query, and notice a Summary View or Detail View of the listing is
available for your convenience.
Attachments Link
To enhance the amount and type of information accessible in a ClientBase profile, a feature is
included in all profile types allowing you to point to other files available on your local or network drive.
These files are referred to as Attachments.
To access an attachment at the client level, click the Attachment link.
To add a new Attachment click Add Attachment, and Browse for Attachment to identity the File Path
of the file. The File Path includes the drive where the file is located, any directories or subdirectories,
and the name of the file. Choose to compress the file by clicking in the Compression
box. Enter a brief description of the attachment, if desired. Click Save.
To view a saved Attachment, highlight the attachment, and click Open next to the attachment.
ClientBase uses Windows Associations to view the file type, load the appropriate software, and
retrieve the specified file. Every file has an extension (e.g., .doc, .jpg, .bmp, .html, etc.) must be

21
associated with a specific Windows software program such as Word, Paint Shop Pro, Internet
Explorer, etc. to be viewed. Although this association is created automatically by Windows when
various software programs are installed, if a workstation does not have a software program
associated with the type of file an Attachment is pointing to, then the file cannot be viewed from the
Attachment created in ClientBase.
Since a copy of the file has been stored within the ClientBase database when it is opened at a
workstation, it is loaded temporarily into a temp directory. If any changes are made to the original
file or the temporary file, the attachment in ClientBase must be re-directed to the new file, or the old
file will still be displayed. This is done by using Edit and browsing for the updated file. Once this is
done, the copy of the file saved in the ClientBase database will be updated.
Click Edit, then Delete, next to the attachment to remove it.
PNR Entries Link
ClientBase PNR entry tables are included at the Branch, Profile, Agent, and Passenger/Employee.
As a ClientBase user, you may presently create these entries at the profile and agent level only.
PNR entries setup at the branch level, as well as any number of PNR Rules (simply a way of
designating how certain fields of information captured in a profile should be formatted when sent to
a PNR) are setup by the administrator in the Windows version of ClientBase.
Store any number of miscellaneous PNR Entries to include when using the Merge to PNR feature
for this client. Any PNR entries captured here at the profile level is included regardless of which
family member/employee is travelling.
CRS: Choose your CRS system from the drop-down menu.
Description of Entry: Enter a free-flow “Description” field.
Always Move: By selecting True from the drop-down menu, the entry always moves when you do
a merge to CRS. If False is selected, moving the entry is optional.
Display on Screen: When True is selected, the entry automatically displays on the front screen
when Merging to the PNR. If False is selected, the entry is displayed on the Additional Entries link.

22
Within each PNR Entry or PNR Rule that is set to Always Move, an option is included called "Display
on Screen". The PNR Selection Screen is the screen that appears when you use the Merge to PNR
feature and allows you to select the specific profile data to be included and sent to the current PNR.
For PNR entries that should always move regardless of the profile or PNR, this "Display on Screen"
can be set to False, so that the Selection Screen is less complicated for the agent to review. Any of
these entries that have not been designated to display on the selection screen can be viewed, if
desired, by clicking the "Additional Entries Link" in the Merge to PNR feature.
PNR Entry: Enter the PNR entry the way you would in your reservation system and then Save.
For more information on moving data from ClientBase to your GDS PNR, please refer to chapter
entitled, Putting Profiles to Work for you.
More Fields Link
If you want to track it, and ClientBase doesn’t ask for it, here is where your database administrator
created customized fields of information. Items like Social Security Numbers, client UDID’s and
other miscellaneous information that you want to track, can be captured in these fields.
To tag a profile with a More Field, click Edit, and from the drop-down menus next to the More Field
Categories, select the More Field item you want to use. Then click Save. To untag a More Field
Item, simply highlight the item and click Delete on the keyboard.
Note: If you enter into the free flow area and there is a partial match within the drop-down choices,
if you click the drop-down list, you are taken to that match first. Also, if you make a partial entry into
the free flow area and it matches one of the items in the drop-down list, upon tabbing out, the field
is completed automatically.
Profiles Search
When Profiles is first opened, either select a link which contains a stored set of search fields (Global
or Personal Saved Searches) from the drop-down menus, or use the simple search or advanced
search area to enter a custom search. (Clicking Find produces a list of all profiles.)
The Global Saved Searches or Personal Saved Searches are accessible to anyone for general
viewing. They include Leisure Clients, Corporate Clients, Vendors, Agents, Other, All Profiles,
Service Providers, and any links with a customized set of query filters that were setup and saved.
By clicking on any of these links, you see the completed filters used for this stored search, and a
listing on the results screen of all profiles meeting the criteria of the selected searches. You can also
locate profiles by using the simple search area or the advanced search area.
Date Fields
Complete a date field using any one of the following formats:
1) mmddyy or mmddyyyy (separators are not required)
2) ddmmmyy or ddmmmyyyy
3) 0 (for current month, day and year date)
4) mm (defaults to current day and year)
5) mmdd (defaults to current year)
6) mm-dd-yy, mm/dd/yy, mm.dd.yy (-, / and . are valid separators)
7) m-d-yy, m/d/yy, m.d.yy
Simple Search Filters
The simple search area allows you to quickly locate a profile or a group of profiles by completing one
or two filters.

23
The drop-down menu fields identify what you want to search by and are completed by selecting from
the following: Profile Type, Profile Name, Company, Last Name, Family/Traveler Name, Phone,
FAX, E-mail, Web, Family/Traveler Phone, Interface ID, City, State, and Zip Code.
The blank fields allow you to type in what you want to search for and are completed by choosing
from the drop-down, or typing in free-flow information. To prevent spelling errors, it is suggested
that you type no more than 3 or 4 characters in the free-flowing fields.
If both fields are used in this search, then the results match both criteria, not either/or. This means
the search filters are strung together with an “and” not an “or”. After completing or changing data in
the filters, click Find. The system automatically sifts through the database and displays the matching
profiles in the results screen.
For example, you are looking for a leisure client, Hazel Tiggs. Set the first field to Profile Type and
pick Leisure from the drop-down menu in the field to the right. (Additional Profile Types are
Corporate, Service Provider, Agent, Vendor and Other.) Then set the second field to Profile Name,
type in “tig” and click Find. Hazel’s profile appears in the results screen, and can be entered by
clicking View. If any other profiles start with "tig", these would appear in the results screen as well.
Search Results Screen
After you have completed a search, the Results Screen not only provides a count and list of search
results, but also easy access to a specific profile. To receive a count of the query results, click Count.
To retrieve a specific profile, click View next to the entry or the action menu icon (gear).
This icon is displayed to the right of View and is listed for each record in the query. It has been
designed to allow you to perform a variety of actions for that one record without having to open the
record first - saving you a few extra clicks of the mouse.
Click the icon and the following options appear:
From the Profile Search Results:
Edit (Leisure, Corporate, Vendor, Agent or Other): Takes you directly to the Edit Additional Info
section of the selected profile for modifying without having to first view the profile and selecting Edit
Additional Info.
View Activities: Take you directly to the activities tab for the selected profile without having to open
the profile first.
Merge to PNR: Activates Merge to PNR for the selected profile without having to open the profile
first.
Merge to Document: Activates Merge to Document Template for the selected profile.
Merge to E-mail: Activates Merge to E-mail for the selected profile.
New Note: Activates Note creation screen for the selected profile.

24
New Mailer: Activates Mailer creation screen for the selected profile.
New Reminder: Activates Reminder creation screen for the selected profile.
Merge to PNR
Using the Merge to PNR Feature
1) Open a PNR on your computer. You may start checking availability and actually have a
reservation ready in the PNR, but when it is time to add client name and address information, toggle
into ClientBase. (Some agencies like to start in ClientBase, Merge to PNR, and then toggle into the
PNR to check availability, and create reservation.)
2) Search to find the client’s profile. To Merge to PNR from the Results Screen, click the action
menu icon (gear) in Profile Manager, and Merge to PNR
(If the client’s profile is not in the system, create one.) If you are inside the profile, update any
address, phone and E-mail information, and click the CRS icon in the toolbar.
3) First time users select the platform to use to send profile information to the GDS, and download
the platform applet. The very first time you use the Merge to the PNR feature, you are presented
with a screen from which to pick this platform one time only:
Unless you are using Worldspan or Sabre Webtop which use the Windows Clipboard, you are using
an API (Application Protocol Interface). Select the appropriate platform and click Next. For users
selecting an API platform, an applet is downloaded on your computer so that PNR data can integrate
with your workstation:
Important Note: Make sure to check off Always trust content from TRAMS, Inc. That way you won’t
see this dialog every time you do a Merge to PNR. In the future whenever you delete cookies or
files from your Internet Explorer, you will be asked again to download this applet.
4) After you have downloaded the applet (for API platform users only), you are prompted with a
series of checkboxes in the PNR Builder Selection Screen. Scroll down to select everything you

25
need including passengers and credit card/frequent flyer information. The gray area recaps
(previews) entries which have been setup by the database administrator to always move into the
PNR. Select the information you want to move to a PNR by scrolling down and checking or
unchecking any optional entries. Click Cancel to abort the Merge to PNR process, Refresh to see
an edited version of the gray recap screen at the top of the selection screen, or Preview.
5) Clicking Preview takes you to a PNR screen where you can edit and get a full-page preview of
any entries you have approved. The screen displays all information in the exact format that it will
land into your current PNR. Information on this screen can be modified, but does not permanently
update your ClientBase profile.
6) Pressing Finish does the following depending on your CRS:
Sabre for Windows, MySabre, Amadeus Plus Scripts (APS), Vista, and Apollo/Galileo Users:
When clicking Finish, the previewed information is pasted into your current PNR. If this occurs
successfully, a confirming message appears. Use your normal Windows command (<Alt+Tab>) to
toggle into your CRS, hit Display All and view the updated PNR.
Additional Entries Link
Within each PNR Entry or PNR Rule that is set to Always Move, an option is included called "Display
on Selection Screen". The PNR Selection Screen is the screen that appears when you use the
Merge to PNR feature and allows you to select the specific profile data to be included and sent to
the current PNR. For PNR entries that should always move regardless of the profile or PNR, this
Display on Selection Screen can be unchecked so that the Selection Screen is less complicated for
the agent to review. Any of these entries that have not been designated to display on the selection
screen can be viewed, if desired, by clicking Additional Entries.
