
TRAINING GUIDE
ArcGIS Enterprise
Administration
Part 2

ArcGIS Enterprise Administration - Part 2
This session touches on key elements of maintaining enterprise geodatabases that help drive ArcGIS for
Server services as well as backup techniques.
Table of Contents
Maintenance ................................................................................................................ 2
Geodatabase Administration Tools .................................................................................. 2
Create Role .............................................................................................................. 4
Create Role within ArcCatalog .................................................................................... 4
Change/Add Privileges ............................................................................................... 10
Analyze and Index .................................................................................................... 12
Compression ........................................................................................................... 13
What is Compression? ............................................................................................. 13
Spatial and Attribute Indexes ...................................................................................... 16
Spatial Indexes ..................................................................................................... 16
Attribute Indexes .................................................................................................. 17
Tune SQL Server space for Geodatabases ........................................................................ 19
Enterprise Geodatabase Backups ............................................................................... 21
Security Scan Report ................................................................................................. 22
Backups ................................................................................................................. 24
Enterprise Geodatabase Backups ............................................................................... 24
Example Script for After Full Backup ........................................................................... 34
Backup ArcGIS for Server Site ................................................................................... 35
Restore ArcGIS for Server Site ................................................................................... 36
Automate Replica Synchronization using Python ............................................................. 36
Options .................................................................................................................... 44
Versioning .............................................................................................................. 44
What are A and D tables? ......................................................................................... 44
When Does Versioning Make Sense? ............................................................................. 44
How to Create a Version .......................................................................................... 45
Replica .................................................................................................................. 47
Apply Schema Changes to Replica .............................................................................. 49

2
ArcGIS Enterprise Administration - Part 2
Maintenance
Geodatabase Administration Tools
You can use the ArcCatalog interface for administrating users in the Enterprise Geodatabase.
1. Go to ArcCatalog and connect to a Geodatabase as an administrator with Dbo privileges. Once
connected, right click on the connection and choose administration.
2. In the administration menu, you will see four choices. Compress is now integrated within the
administration menu. Also, you can add users and create/manage roles in your enterprise
Geodatabase without touching SQL Server. Roles will allow you to give permissions to the role
without having to give permissions to each user. Think of a role as a group.

3
ArcGIS Enterprise Administration - Part 2
3. Click on Add User. You have two choices, operating system authentication or sql server
authentication which gives an arbitrary login and password not related to windows but related
to sql server only. You have the choice of adding the user to a role.
4. Go to Administer Geodatabase on the administration menu, the Geodatabase Administration
dialog will appear. You can create versions, check connections and locks.

4
ArcGIS Enterprise Administration - Part 2
Create Role
There are two different ways you can create roles. One way is to create an SDE role and assign users
to the roles. The other way is to create Active Directory groups, add active directory groups to SQL
Server allowing for Active Directory groups to act like roles. The great thing is that Active Directory is
then managed by your IT user administration system without needing to manage all the users through
SQL Server. We will show both ways below.
Create Role within ArcCatalog
1. Right click on the database connection and go to Create and Manage Roles. You can access this
from ArcToolbox Data Management Tools as well.

5
ArcGIS Enterprise Administration - Part 2
2. The create role dialog will appear. You can grant or revoke users from roles from this
interface.
3. Create Active Directory Groups for the Enterprise Geodatabase

6
ArcGIS Enterprise Administration - Part 2
4. Open the Active Directory Users and Computers dialog from your domain controller and add a
group by right clicking on users and select new group. Add a name such as GISView. The
default settings are fine. Click ok.
5. Double click on the new group and add members within the members tab.
6. Add the member and click ok.

7
ArcGIS Enterprise Administration - Part 2
7. Open SQL Server Management Studio and add new group to SQL Server by going to the TOC of
the instance connection and expand security. Right click on the Login folder and select new
login.

8
ArcGIS Enterprise Administration - Part 2
8. Click on Search and make sure you are connecting to your domain as the location and add
groups as a selectable item from Object Types. Click ok when you’ve found the group. In this
example, we’re using test\GISView. Make sure the default database is selected to something
other than master. Since these users are going to a view only group, we’re assigning the group
to the replica as the default database.

9
ArcGIS Enterprise Administration - Part 2
9. In the TOC of the Login – New dialog, click on user mapping. Check the boxes next to the
databases you want the group to be assigned to. Just keep database role membership for
<database> set to public. We’ll let the Enterprise Geodatabase control privileges. Click ok.

10
ArcGIS Enterprise Administration - Part 2
Change/Add Privileges
In the previous exercise, we created two types of role scenarios. One is using the enterprise
Geodatabase tools to create a role with multiple users which can be revoked per user. The other is
allowing Active Directory Groups to be assigned like roles. Now, we are going to assign privileges to
those roles.
1. Go to ArcCatalog database connection as administrator and right click on the data you want to
add privileges to. Remember, you can multiply select one object at a time (Feature Datasets,
Feature Classes, and Tables). In this example, we’ll be adding the active directory group we
created. Select Privileges.
2. Click on the user/role you would like to add. Click ok.

11
ArcGIS Enterprise Administration - Part 2
3. Since the GIS View group is read-only, only keep the select box checked. Click ok.

12
ArcGIS Enterprise Administration - Part 2
Analyze and Index
Analyze and index is something that you want to do on a regular basis if you creating and adding
features to your database. This will allow for better faster access to your database. Make sure ArcGIS
for Server services are stopped before rebuilding indexes.
Go to your database connection and select on the objects you want to analyze and rebuilt
index. Right click on the select items and go to manage/analyze. There is no feel good
complete dialog given so let the wheel turn until complete.

13
ArcGIS Enterprise Administration - Part 2
Compression
What is Compression?
Is a process of moving rows of data from the delta (add and delete) tables to the base tables of the
feature classes. This is a versioning performance process.
If your data is in default and you have the data versioned, you should compress.
Performance and Data Integrity Tip: Analyze statistics and rebuilt indexes before and
after compression
Data Integrity Tip: Compress at least once a week
Data Integrity Tip: Compress after large loads of data or major changes in data
There are several ways to compress your database. Below are the different ways to compress your
database.
1. Using Python
a. Open ArcToolbox and go to data management tools/Geodatabase
Administration/Compress
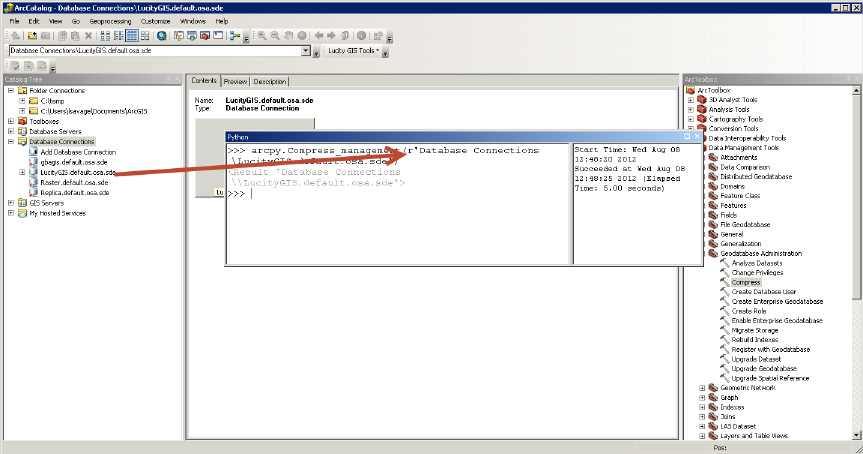
b. Open the Python dialog by going to the Geoprocessing Menu and left click on Python
c. A dialog window will open for Python. Left click on the Compress tool in ArcToolbox
and drag the tool within the Python window
d. Notice that the Python dialog has been updated with the new function
14
ArcGIS Enterprise Administration - Part 2
e. Now open the database connection you would like to compress. Make sure the
connection has rights to perform a compress. Drag and drop the connection into the
Python dialog
f. Hit the Enter button on the keyboard as this will execute the command. On the right,
the dialog will show the start time and how long it took to complete the operation.

15
ArcGIS Enterprise Administration - Part 2
2. Using the ArcCatalog Tool
a. Right Click on a database connection in the ArcCatalog TOC
b. Choose Administration/Compress Database
Note: Compress process will only compress data that is in read-only mode. If a feature class is
being edited, the compress process will bypass the feature class table and only compress non-
edited data. If you are having problems with compression, please reconcile, post all versions.
Afterwards, delete the versions and make sure all state locks are terminated as well as all users
are disconnected. After all users are disconnected, perform the compression routine. This is
better known as “Zero State Compression”. Afterwards, recreate your versions and you’ll have
clean delta tables. Recommend Zero State Compression at least once a year.

16
ArcGIS Enterprise Administration - Part 2
Spatial and Attribute Indexes
Spatial indexes are managed for you in a sql table. You can delete and recreate the spatial index from
the feature class properties. Spatial indexes allow your spatial data to be queried faster within a grid
concept. Each grid has a size based on the density of your spatial data. In the past, this was a
calculation that needed to be performed by the GIS DBA or GIS Analyst but is now automated for you.
Kudos ESRI!
Spatial Indexes
1. If you are recalculating your feature extent and feel that you want to recreate your spatial
index, right click on a feature class and choose properties.
2. When the feature class properties dialog appears, go to the indexes tab.
3. Click Delete and Create under Spatial Index at the bottom of the dialog. Click Apply.
4. This process will recreate the feature class spatial index table for the feature class.

17
ArcGIS Enterprise Administration - Part 2
Attribute Indexes
Attribute indexes are used to speed the performance of data queries used on a consistent basis. As an
example, we will manually setup an attribute index for Lucity GIS data. Both the common ID and the
Lucity AutoID will speed up your query performance capability for each feature class that is linked to
Lucity when assigning an attribute index. Lucity now has a tool to add Attribute Indexes for Lucity
linked feature classes in the Geodatabase Configuration Tool. This will be featured in the ACT Class
“Geodatabase Configuration Tool Overview”
1. In the same dialog as the previous exercise (Feature Class Properties), please go to the indexes
tab.
2. Click on the Add button next to Attribute Indexes.
3. Create LucityIDX for the Name and add the NTG_ID which is linked to the Lucity AutoID.

18
ArcGIS Enterprise Administration - Part 2
4. Click ok and Apply.
5. Complete the same operation again by adding LucityCMN index and associate it with the field
NTG_NUMBER which is linked to the Lucity AltID.
6. Click Ok and Apply.

19
ArcGIS Enterprise Administration - Part 2
Tune SQL Server space for Geodatabases
In terms of SQL Server space for Geodatabases, the functionality of the Geodatabase is key to how
much space you will need. Recommend splitting up the vector and the raster data into two separate
Geodatabases. Raster should be in its own database. This will allow for easy to manage backups and
system configuration. If you don’t want Raster data in a Geodatabase, I would suggest using the
mosaic tool in ArcGIS which requires an image extension for ArcGIS for Server when publishing.
1. When loading Raster data calculate the decompressed size of the image and set this as the file
size for the initial load. The logfile can be somewhat small as ESRI has changed the transaction
of the loads from one long transaction to iterative raster load transactions. A good rule of
thumb, create logfiles for Raster 1/3 of the size of the Raster database. For the data file size,
find out the decompression size of the complete mosaic raster data or single image size as a
collection. You can choose to use the new mosaic option for raster as this will create a virtual
mosaic dataset like the terrain datasets but that’s totally up to you as the administrator.

20
ArcGIS Enterprise Administration - Part 2
2. For log files, don’t let the log files use unlimited file growth as a looped transaction could bring
your server down.
3. Do the same for the data filegroup.
4. Most Raster datasets are 30 GB to 70 GB once loaded in the Enterprise Geodatabase. You may
want to compensate for the increase. It’s faster to pre-allocate space for Raster before you
load. Don’t allow Raster databases to get too large. As a recommendation, you could split up
Raster databases into separate databases maxing out each one into 300GB databases.
5. After loading, analyze through ArcCatalog and assign permissions. Make sure to backup,
truncate and shrink the log files before making it available to the public.
6. If large loads for vector data or a Geodatabase that is used as an editing Geodatabase, perform
similar operations.
7. Set your growth to a manageable amount within your data storage. For Vector, you can use
percentage. For Raster, you will be adding large amounts of data in one transaction. You
should consider size growth rather than percentage.

21
ArcGIS Enterprise Administration - Part 2
If you want to create backups using the SQL Server maintenance wizard, this is an easy step by step
process. However, in our example below, we will be creating backups from SQL Backup Master.
This an optional program to use for backing up SQL Express as well as SQL Server Standard and
Enterprise. Note: when you want 99% assurance of your enterprise geodatabase backups, simply
backup to a known location both offsite and onsite as a file geodatabase.
Enterprise Geodatabase Backups

22
ArcGIS Enterprise Administration - Part 2
Security Scan Report
Since 10.4, Esri has added a security scan python script that will print out possible security issues with
your ArcGIS for Server configuration. Below, we will show you how to setup the python script to run on
ArcGIS for Server and execute. List of severity is listed on Esri’s Security best practices page.
1. Add python within the environment variables for Windows. Add at the end of the path
;C:\python27\ArcGISx6410.5
2. Copy python script from the ArcGIS for Server path to a known path (C:\Program
Files\ArcGIS\Server\tools\admin.serverScan.py). In this example, I’ll run the python script from
the root of C:\
3. Execute serverScan.py in command line. I highly recommend to ‘run as administrator’.

23
ArcGIS Enterprise Administration - Part 2
4. Click on the html server scan report to view in any browser.

24
ArcGIS Enterprise Administration - Part 2
Backups
If you want to create backups using the SQL Server maintenance wizard, this is an easy step by step
process. However, in our example below, we will be creating backups from SQL Backup Master.
This an optional program to use for backing up SQL Express as well as SQL Server Standard and
Enterprise. Note: when you want 99% assurance of your enterprise geodatabase backups, simply
backup to a known location both offsite and onsite as a file geodatabase.
Enterprise Geodatabase Backups

25
ArcGIS Enterprise Administration - Part 2
Full Backup: This will backup the entire database.
Intermediate Backups: Captures changes to the database since the last full backup
(also known as differential backups.
Truncate Logs: Truncates logs to free up space
Shrink: Shrinks log files.
Analyze and Index: Analyze/update statistics, and updates indexes
We will be calculating an index of 90% capacity for fillfactor (which gives 10% growth
for data indexes). Also, we will retain the backups for 13 days and starting over on
the 14
th
day.
Full Backup: Everday at night
Differential or Intermediate backup: Running every 12 hours
Backup Logs: Run every 4 hours.
Shrink Logs: Run after full backup
Analyze, update statistics and indexes: Run after full backup.
Create backup copy
Test Recovery randomly (maybe every quarter)
For Raster or Large Static Databases (20GB or more), consider separate plan for backup
and recovery. Still backup transaction logs and shrink transaction logs on a periodic
basis.
1. A free or paid tool to use is http://www.sqlbackupmaster.com/. SQL Server Maintenance
Backup Job.

26
ArcGIS Enterprise Administration - Part 2
Create new database backup
Connect to SQL Server instance, backup databases and add destinations for backup

27
ArcGIS Enterprise Administration - Part 2
If using Windows Auth, you’ll be prompted for running the backup as windows auth.

28
ArcGIS Enterprise Administration - Part 2
Click on the schedule hyperlink. You may want to start this overnight when there is
little chance people are on Lucity/GIS or other sql databases within the sql server
instance.

29
ArcGIS Enterprise Administration - Part 2
Click on e-mail notifications hyperlink

30
ArcGIS Enterprise Administration - Part 2
Save and you can see your Backup plan listed. You can create multiple plans for
different SQL Server instances as well. As you can see, recovery is simple and time
stamped for each different type of backup within the plan.

31
ArcGIS Enterprise Administration - Part 2
Add a destination, there are several choices. Pick one.
Add in your credentials and recycle period.

32
ArcGIS Enterprise Administration - Part 2
Click on backup job settings and change temporary backup folder. Recommend
somewhere local on the server if you can. This will backup and compress the files
before it’s copied to the final destination

33
ArcGIS Enterprise Administration - Part 2
Go to SQL Scripts tab and you can add your maintenance scripts. For this example, the
maintenance script will only run after the full backup is complete and bypasses script on
differential and transaction log backups. The script will update statistics, rebuild indexes, and
shrink the transaction logs. In our setup in this example, this script only fires off every 24 hours at
night.
34
ArcGIS Enterprise Administration - Part 2
Example Script for After Full Backup
--Rebuild Index and Update Statistics
--Rebuild Indexes
Use Master
go
DECLARE @cmd VARCHAR(8000);
SET @cmd = 'exec sp_MSforeachtable @command1=''print ''''?'''''', @command2=''set QUOTED_IDENTIFIER ON;ALTER INDEX ALL ON ? REBUILD WITH
(FILLFACTOR=90,ONLINE=OFF)'''
EXEC sp_msforeachdb @command1 =@cmd
go
DECLARE @cmd VARCHAR(8000);
SET @cmd = 'EXEC sp_updatestats'
EXEC sp_msforeachdb @command1 =@cmd
go
--Shrink Logfiles for non-system databases
USE MASTER
declare
@isql varchar(2000),
@dbname varchar(64),
@logfile varchar(128)
declare c1 cursor for
SELECT d.name, mf.name as logfile--, physical_name AS current_file_location, size
FROM sys.master_files mf
inner join sys.databases d
on mf.database_id = d.database_id
where d.name not in ('master','model','msdb','tempdb')
and mf.type_desc = 'LOG'
open c1
fetch next from c1 into @dbname, @logfile
While @@fetch_status <> -1
begin
select @isql='USE ' + @dbname + ' checkpoint'
print @isql
exec(@isql)
select @isql='USE ' + @dbname + ' DBCC SHRINKFILE (N''' + @logfile + ''', 100)'
print @isql
exec(@isql)
fetch next from c1 into @dbname, @logfile
end
close c1
deallocate c1
go

35
ArcGIS Enterprise Administration - Part 2
Backup ArcGIS for Server Site
Provided with ArcGIS for Server, you can now backup your site. This backup only accounts for the site
configuration not the data. If you have caches, handle the backup of the caches using another copy or
backup utility.
1. On your ArcGIS for Server, go to C:\Program Files\ArcGIS\Server\tools\admin and copy the two
python script utilities.
2. Create a new folder in a known location that is easy to get to in command line. As an example,
I created an agsutil folder under the root of c:\.
3. Paste them in the new location.
4. Go to the command prompt as an administrator, run the backup.py script. Make sure you are
connecting to python’s home directory or set python.exe as a path. Below is an example after
setting python.exe path in environment variables.
a. Python.exe c:\agsutil\backup.py –u <ags admin> -p <password> -s http://<localhost or
servername:6080> -f c:\backup\ags
b. After running, below is an example of the output.

36
ArcGIS Enterprise Administration - Part 2
Restore ArcGIS for Server Site
Provided with ArcGIS for Server, you can restore a backup of your site.
5. Go to command prompt and restore your site using the backup and restore.py script. Below is
an example.
a. Python.exe c:\agsutil\restore.py –u <username> -p <password> -s <localhost or
servername>:6080 –f c:\backup\ags\Aug-29-2014_09-58-13.agssite –r c:\backup\ags
b. This procedure will take some time and your site will be down until complete.
6. It is important that you reregister your web adaptor to ArcGIS for Server after the restore is
complete.
Automate Replica Synchronization using Python
1. Go to ArcCatalog and open model builder. This is the Garfield way of creating python scripts
for the non-savvy coder.
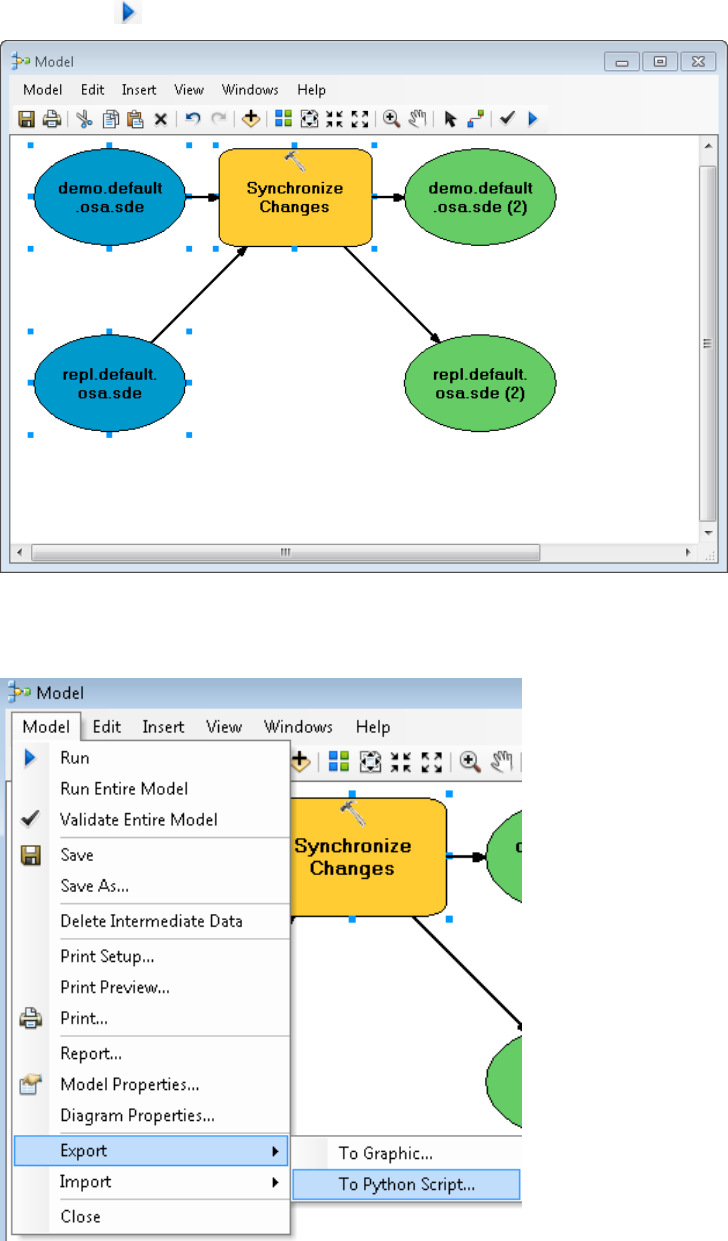
2. In Model Builder, open arctoolbox if not already open and go to Distributed
Geodatabases/Synchronize Changes

37
ArcGIS Enterprise Administration - Part 2
3. Drag and drop the tool into Model Builder.
4. Once tool is in Model Builder, double click on Synchronize Changes box to open the dialog.
5. Fill in the information appropriately. For reference, please visit the Replica section.
38
ArcGIS Enterprise Administration - Part 2
6. Click ok. Notice colors change in the dialog. Run the model to test by clicking on the run
button.
7. After successfully testing the model, go to the model menu and click on export/To Python
Script.
39
ArcGIS Enterprise Administration - Part 2
8. Save in location that has Python and ArcCatalog installed. For example, auto_synch.py under
the root of c:\.
9. Edit the Python script so that it references arcinfo rather than arceditor. This can produce
errors in your script. Also, add the RED content below to enable logging when running this
script.
# Set the necessary product code
import arcinfo
# Import arcpy module
import arcpy
# Record Logs
arcpy.SetLogHistory(True)
# Local variables:
demo_default_osa_sde = "Database Connections\\demo.default.osa.sde"
repl_default_osa_sde = "Database Connections\\repl.default.osa.sde"
# Process: Synchronize Changes
arcpy.SynchronizeChanges_management(demo_default_osa_sde, "DBO.Lucity_Demo",
repl_default_osa_sde, "FROM_GEODATABASE1_TO_2", "IN_FAVOR_OF_GDB1", "BY_OBJECT",
"DO_NOT_RECONCILE")

40
ArcGIS Enterprise Administration - Part 2
10. Go to Windows Task Scheduler and create a basic task.
11. Click next and schedule the synchronization of the replica to whenever you want the
synchronization to take place. Usually each day or once a week will fit most organizations. In
this example, we are going to setup a weekly schedule. Click next.

41
ArcGIS Enterprise Administration - Part 2
12. In the timeliness of this schedule, I want this to fire off before the backups have occurred so
that my databases stay in tune. In my backup routines, I may have a performance maintenance
script that analyzes, updates statistics and indexes as well as backups the transaction logs and
shrinks the database. Therefore, in this example we’ll set the synchronization to occur after I
leave for the day on Friday. Click next.
13. Choose ‘start a program’ and click next.

42
ArcGIS Enterprise Administration - Part 2
14. In Windows Vista and above, we need to add the python program as the script so that it knows
what executable to use. In ‘Add arguments (optional):’, you need to add the location of your
saved python script. Also, in ‘Start in (optional), you need to add the location folder of the
python executable. Once complete, click next.
15. Click the ‘Open the Properties dialog for this task when I click Finish’ checkbox to verify
administrative user to run this task and its credentials. Click Finish.

43
ArcGIS Enterprise Administration - Part 2
16. Check the ‘Run whether user is logged on or not’ radio button and check the checkbox next to
‘Run with highest privileges’.
17. Test the task by right clicking on the new task and select run.
18. Check the ArcToolBox results history location by going to the following location.
C:\Users\<username>\AppData\Roaming\ESRI\Desktop10.5\ArcToolbox\History

44
ArcGIS Enterprise Administration - Part 2
Options
Versioning
Is an alternative state of the database where you can make edits and changes that will not affect the
base tables. When complete and edits are ready, the parent table will be reconciled and posted with
the child version. Within the Geodatabase, there are two tables that store changes to the base data.
These are called delta tables which are known as Add and Delete tables.
What are A and D tables?
A tables are add tables. Anytime you add a record or change a record, the changes are added
to the A table.
D tables are delete tables. Anytime you delete a record, the delete rows are added to the D
table.
A and D tables are numbered based on the registration_id in the SDE_Table_Registry table.
Example of finding an Add Table.
If you have made an edit to a feature class, you need to get the registration_id for that feature class
and go to the appropriate A table. This is stored in the sde_table_registry in SQL Server. For child
versions, they are subsequent IDs such as default version would be the actual registration_id (A144) and
the child version would be (A145). Same applies to the D tables.
When Does Versioning Make Sense?
The option to moving edits to base tables is a scary thing for GIS people. Why?
You can edit simple data only—points, lines, polygons, annotation, and relationships.
You cannot edit a feature class in a topology, geometric network, or terrain.
You cannot archive changes for the dataset.
You cannot replicate the dataset.
When you edit the DEFAULT version or post a version to the DEFAULT, you do not have
the ability to resolve conflicts, so it is possible to overwrite another user's edits.

45
ArcGIS Enterprise Administration - Part 2
How to Create a Version
1. Right click on a Database Connection link in ArcCatalog TOC or right click in the white space in
the contents tab in ArcCatalog
2. Click on Administration/Administrator Geodatabase.
3. Right click on the Default version and select new version

46
ArcGIS Enterprise Administration - Part 2
4. Create a Name for the new version and select public. Click Ok.
5. What’s the difference between Access types
Private: Created user eyes only; no one has access unless owner of the version
Public: Everyone can see the version and create versions from. If you have edit
privileges, you can edit the version.
Protected: Everyone can see the version but cannot edit the version unless owner.
Everyone can create versions from.
6. This is now the child of Default and is listed in the Geodatabase Administration dialog.

47
ArcGIS Enterprise Administration - Part 2
Replica
A replica is a copy of a database using GUID attributes that synchronize from the parent to the child
databases or vice versa. There are several ways to create a replica but we will be creating the most
likely replica used which is a one-way replica. One-way replicas are easy to setup and are handy for
the administrators to offload view only users off the production database while performing
synchronizations from time to time. Keeping the database in synch when production changes have
been approved is a nice way to distribute your data to users while retaining data integrity, security and
flexibility.
1. Prepare your data for a replica. Go to your database and right click on Feature Datasets, and
go to manage/add global ids. Global Ids are necessary for the Geodatabase to keep track of
changes in each database that is a part of a replica.
Note: Data must be registered as versioned
2. Do this for stand-alone Feature Classes as well.
3. To create a replica, go to ArcToolbox/Data Management Tools/Distributed Geodatabase and
expand.

48
ArcGIS Enterprise Administration - Part 2
4. Click on Create Replica
5. Browse or drag and drop data you want to replicate from into the Create Replica dialog
window. Change the Replica Type to one-way replica. Add the replicated database connection
to replicate the data to. Give the Replica a name.
6. The advanced settings allow you to change the behavior of your replica. Usually, you would
except the defaults and click ok.
7. Once replica is in place, you can assign privileges.

49
ArcGIS Enterprise Administration - Part 2
Apply Schema Changes to Replica
To update the schema in a replica, there are three tools that you can use to update the schema.
However, there are certain instances where you will need to unregister the replica, delete the replica
feature class/tables/datasets and recreate the replica for the changes to push down from the parent to
the child. Below is a matrix from Esri’s ArcGIS Resources page for schema changes. It describes what
is supported with the update process and what is not supported.
Steps to complete
Compare Schema in Parent
Import Schema into Child
1. Open ArcCatalog.
2. Right Click on the Replica database and choose distributed geodatabase/compare replica
schema

50
ArcGIS Enterprise Administration - Part 2
3. Browse to the parent geodatabase
4. Choose Replica Name if you have multiple replicas
5. Choose a location to save the replica schema changes xml file
6. After complete, right click on the Replica database and choose distributed geodatabase/import
replica schema

51
ArcGIS Enterprise Administration - Part 2

52
ArcGIS Enterprise Administration - Part 2
7. Locate the schema change xml file generated and add to the import schema changes wizard
8. Review the information and click next
9. In the next screen, you should see the changes to the schema to apply. In this scenario, we
deleted a field called ‘test; short int’.
10. Click Finish and Synchronize Changes.
