
Configuration Note
AudioCodes Professional Services – Interoperability Lab
Microsoft
®
Skype for Business Server 2015
and ITSP SIP Trunk
using AudioCodes Mediant™ E-SBC
Version 7.2

Configuration Note Contents
Version 7.2 3 AudioCodes Mediant E-SBC
Table of Contents
1 Introduction ......................................................................................................... 7
1.1 Intended Audience ................................................................................................. 7
1.2 About AudioCodes E-SBC Product Series .............................................................. 7
2 Component Information ...................................................................................... 9
2.1 AudioCodes E-SBC Version ................................................................................... 9
2.2 Microsoft Skype for Business Server 2015 Version ................................................ 9
2.3 Deploying the SBC ............................................................................................... 10
2.3.1 Example Environment ..............................................................................................10
2.3.2 Environment Setup ..................................................................................................11
3 Configuring Skype for Business Server 2015 ................................................. 13
3.1 Configuring the E-SBC as an IP / PSTN Gateway ................................................ 13
3.2 Configuring the "Route" on Skype for Business Server 2015 ................................ 21
4 Configuring AudioCodes E-SBC ...................................................................... 31
4.1 Step 1: IP Network Interfaces Configuration ......................................................... 32
4.1.1 Step 1a: Configure VLANs.......................................................................................33
4.1.2 Step 1b: Configure IP Network Interfaces for LAN and WAN .................................33
4.2 Step 2: Enable the SBC Application ..................................................................... 36
4.3 Step 3: Configure Media Realms .......................................................................... 37
4.4 Step 4: Configure SIP Signaling Interfaces ........................................................... 40
4.5 Step 5: Configure Proxy Sets ............................................................................... 42
4.6 Step 6: Configure Coders ..................................................................................... 45
4.7 Step 7: Configure IP Profiles ................................................................................ 48
4.8 Step 8: Configure IP Groups ................................................................................. 52
4.9 Step 9: SIP TLS Connection Configuration ........................................................... 54
4.9.1 Step 9a: Configure the NTP Server Address...........................................................54
4.9.2 Step 9b: Configure the TLS version ........................................................................55
4.9.3 Step 9c: Configure a Certificate ...............................................................................56
4.10 Step 10: Configure SRTP ..................................................................................... 62
4.11 Step 11: Configure Maximum IP Media Channels ................................................ 63
4.12 Step 12: Configure IP-to-IP Call Routing Rules .................................................... 64
4.13 Step 13: Configure IP-to-IP Manipulation Rules .................................................... 69
4.14 Step 14: Configure Message Manipulation Rules ................................................. 71
4.15 Step 15: Configure Registration Accounts ............................................................ 73
4.16 Step 16: Miscellaneous Configuration................................................................... 74
4.16.1 Step 16a: Configure Call Forking Mode ..................................................................74
4.16.2 Step 16b: Configure SBC Alternative Routing Reasons .........................................75
4.17 Step 17: Reset the E-SBC .................................................................................... 76
A Configuring SBC to Send 414 Request - URI Too Long ................................. 77
B Configuring SBC to Send 503 Instead 500 Toward Skype for Business ...... 83

AudioCodes Mediant E-SBC 4 Document #: LTRT-54030
Microsoft Skype for Business & ITSP SIP Trunk
This page is intentionally left blank.

Configuration Note Notices
Version 7.2 5 AudioCodes Mediant E-SBC
Notice
This document describes how to connect the Microsoft Skype for Business Server 2015 and
ITSP SIP Trunk using AudioCodes Mediant E-SBC product series.
Information contained in this document is believed to be accurate and reliable at the time of
printing. However, due to ongoing product improvements and revisions, AudioCodes cannot
guarantee accuracy of printed material after the Date Published, nor can it accept
responsibility for errors or omissions. Updates to this document and other documents as well
as software files can be viewed by registered customers at
http://www.audiocodes.com/downloads.
© Copyright 2016 AudioCodes Ltd. All rights reserved.
This document is subject to change without notice.
Date Published: August-28-2016
Trademarks
AudioCodes, AC, HD VoIP, HD VoIP Sounds Better, IPmedia, Mediant, MediaPack, What’s
Inside Matters, OSN, SmartTAP, VMAS, VoIPerfect, VoIPerfectHD, Your Gateway To
VoIP, 3GX, VocaNOM and CloudBond 365 are trademarks or registered trademarks of
AudioCodes Limited All other products or trademarks are property of their respective
owners. Product specifications are subject to change without notice.
WEEE EU Directive
Pursuant to the WEEE EU Directive, electronic and electrical waste must not be disposed
of with unsorted waste. Please contact your local recycling authority for disposal of this
product.
Customer Support
Customer technical support and services are provided by AudioCodes or by an authorized
AudioCodes Service Partner. For more information on how to buy technical support for
AudioCodes products and for contact information, please visit our Web site at
www.audiocodes.com/support
.

AudioCodes Mediant E-SBC 6 Document #: LTRT-54030
Microsoft Skype for Business & ITSP SIP Trunk
Document Revision Record
LTRT Description
54030 Initial document release for Version 7.2.
Documentation Feedback
AudioCodes continually strives to produce high quality documentation. If you have any
comments (suggestions or errors) regarding this document, please fill out the
Documentation Feedback form on our Web site at http://www.audiocodes.com/downloads
.

Configuration Note 1. Introduction
Version 7.2 7 AudioCodes Mediant E-SBC
1 Introduction
This Configuration Note describes how to set up AudioCodes Enterprise Session Border
Controller (hereafter, referred to as E-SBC) for interworking between ITSP's SIP Trunk and
Microsoft's Skype for Business Server 2015 environment.
You can also use AudioCodes' SBC Wizard tool to automatically configure the E-SBC
based on this interoperability setup. However, it is recommended to read through this
document in order to better understand the various configuration options. For more
information on AudioCodes' SBC Wizard including download option, visit AudioCodes Web
site at http://www.audiocodes.com/sbc-wizard
(login required).
1.1 Intended Audience
The document is intended for engineers, or AudioCodes and ITSP Partners who are
responsible for installing and configuring ITSP's SIP Trunk and Microsoft's Skype for
Business Server 2015 for enabling VoIP calls using AudioCodes E-SBC.
1.2 About AudioCodes E-SBC Product Series
AudioCodes' family of E-SBC devices enables reliable connectivity and security between
the Enterprise's and the service provider's VoIP networks.
The E-SBC provides perimeter defense as a way of protecting Enterprises from malicious
VoIP attacks; mediation for allowing the connection of any PBX and/or IP-PBX to any
service provider; and Service Assurance for service quality and manageability.
Designed as a cost-effective appliance, the E-SBC is based on field-proven VoIP and
network services with a native host processor, allowing the creation of purpose-built
multiservice appliances, providing smooth connectivity to cloud services, with integrated
quality of service, SLA monitoring, security and manageability. The native implementation
of SBC provides a host of additional capabilities that are not possible with standalone SBC
appliances such as VoIP mediation, PSTN access survivability, and third-party value-
added services applications. This enables Enterprises to utilize the advantages of
converged networks and eliminate the need for standalone appliances.
AudioCodes E-SBC is available as an integrated solution running on top of its field-proven
Mediant Media Gateway and Multi-Service Business Router platforms, or as a
software-only solution for deployment with third-party hardware.

AudioCodes Mediant E-SBC 8 Document #: LTRT-54030
Microsoft Skype for Business & ITSP SIP Trunk
This page is intentionally left blank.

Configuration Note 2. Component Information
Version 7.2 9 AudioCodes Mediant E-SBC
2 Component Information
2.1 AudioCodes E-SBC Version
Table 2-1: AudioCodes E-SBC Version
SBC Vendor
AudioCodes
Models
Mediant 500 E-SBC
Mediant 500L Gateway & E-SBC
Mediant 800B Gateway & E-SBC
Mediant 1000B Gateway & E-SBC
Mediant 2600 E-SBC
Mediant 4000 SBC
Mediant 4000B SBC
Mediant 9000 SBC
Mediant Software SBC (SE and VE)
Software Version
SIP_7.20A.000.058 or later
Protocol
SIP/UDP (to the ITSP SIP Trunk)
SIP/TCP or TLS (to the S4B Front End Server)
Additional Notes
None
2.2 Microsoft Skype for Business Server 2015 Version
Table 2-2: Microsoft Skype for Business Server 2015 Version
Vendor
Microsoft
Model
Skype for Business
Software Version
Release 2015 6.0.9319.0
Protocol
SIP
Additional Notes
None

AudioCodes Mediant E-SBC 10 Document #: LTRT-54030
Microsoft Skype for Business & ITSP SIP Trunk
2.3 Deploying the SBC
2.3.1 Example Environment
The example scenario below is referred to throughout this document in order to show how
to deploy the SBC.
In the example environment:
Enterprise deployed with Microsoft Skype for Business Server 2015 in its private
network for enhanced communication within the Enterprise.
Enterprise wishes to offer its employees enterprise-voice capabilities and to connect
the Enterprise to the PSTN network using ITSP's SIP Trunking service.
AudioCodes E-SBC is implemented to interconnect between the Enterprise LAN and
the SIP Trunk.
• Session: Real-time voice session using the IP-based Session Initiation Protocol
(SIP).
• Border: IP-to-IP network border between Skype for Business Server 2015
network in the Enterprise LAN and ITSP's SIP Trunk located in the public
network.
The figure below illustrates this interoperability test topology:
Figure 2-1: Example Environment Topology between E-SBC and Microsoft Skype for Business
with ITSP SIP Trunk

Configuration Note 2. Component Information
Version 7.2 11 AudioCodes Mediant E-SBC
2.3.2 Environment Setup
The interoperability test topology includes the following environment setup:
Table 2-3: Environment Setup
Area Setup
Network
Microsoft Skype for Business Server 2015 environment is
located on the Enterprise's LAN
ITSP SIP Trunk is located on the WAN
Signaling
Transcoding
Microsoft Skype for Business Server 2015 operates with SIP-
over-TLS transport type
ITSP SIP Trunk operates with SIP-over-UDP transport type
Codecs
Transcoding
Microsoft Skype for Business Server 2015 supports G.711A-law
and G.711U-law coders
ITSP SIP Trunk supports G.711A-law, G.711U-law, and G.729
coder
Media Transcoding
Microsoft Skype for Business Server 2015 operates with SRTP
media type
ITSP SIP Trunk operates with RTP media type

AudioCodes Mediant E-SBC 12 Document #: LTRT-54030
Microsoft Skype for Business & ITSP SIP Trunk
This page is intentionally left blank.

Configuration Note 3. Configuring Skype for Business Server 2015
Version 7.2 13 AudioCodes Mediant E-SBC
3 Configuring Skype for Business Server
2015
This chapter describes how to configure Microsoft Skype for Business Server 2015 to
operate with AudioCodes E-SBC.
Note: Dial plans, voice policies, and PSTN usages are also necessary for Enterprise
voice deployment; however, they are beyond the scope of this document.
3.1 Configuring the E-SBC as an IP / PSTN Gateway
The procedure below describes how to configure the E-SBC as an IP / PSTN Gateway.
To configure E-SBC as IP/PSTN Gateway and associate it with Mediation Server:
1. On the server where the Topology Builder is installed, start the Skype for Business
Server 2015 Topology Builder (Windows Start menu > search for Skype for
Business Server Topology Builder), as shown below:
Figure 3-1: Starting the Skype for Business Server Topology Builder

AudioCodes Mediant E-SBC 14 Document #: LTRT-54030
Microsoft Skype for Business & ITSP SIP Trunk
The following is displayed:
Figure 3-2: Topology Builder Dialog Box
2. Select the Download Topology from existing deployment option, and then click
OK; you are prompted to save the downloaded Topology:
Figure 3-3: Save Topology Dialog Box
3. Enter a name for the Topology file, and then click Save. This step enables you to roll
back from any changes you make during the installation.

Configuration Note 3. Configuring Skype for Business Server 2015
Version 7.2 15 AudioCodes Mediant E-SBC
The Topology Builder screen with the downloaded Topology is displayed:
Figure 3-4: Downloaded Topology
4. Under the Shared Components node, right-click the PSTN gateways node, and then
from the shortcut menu, choose New IP/PSTN Gateway, as shown below:
Figure 3-5: Choosing New IP/PSTN Gateway

AudioCodes Mediant E-SBC 16 Document #: LTRT-54030
Microsoft Skype for Business & ITSP SIP Trunk
The following is displayed:
Figure 3-6: Define the PSTN Gateway FQDN
5. Enter the Fully Qualified Domain Name (FQDN) of the E-SBC (e.g.,
ITSP.S4B.interop). This FQDN should be equivalent to the configured Subject Name
(CN) in the TLS Certificate Context (see Section 4.9.3 on page 56).
6. Click Next; the following is displayed:
Figure 3-7: Define the IP Address
7. Define the listening mode (IPv4 or IPv6) of the IP address of your new PSTN gateway,
and then click Next.
8. Define a root trunk for the PSTN gateway. A trunk is a logical connection between the
Mediation Server and a gateway uniquely identified by the following combination:
Mediation Server FQDN, Mediation Server listening port (TLS or TCP), gateway IP

Configuration Note 3. Configuring Skype for Business Server 2015
Version 7.2 17 AudioCodes Mediant E-SBC
and FQDN, and gateway listening port.
Notes:
• When defining a PSTN gateway in Topology Builder, you must define a root
trunk to successfully add the PSTN gateway to your topology.
• The root trunk cannot be removed until the associated PSTN gateway is
removed.
Figure 3-8: Define the Root Trunk
a. In the 'Listening Port for IP/PSTN Gateway' field, enter the listening port that the
E-SBC will use for SIP messages from the Mediation Server that will be
associated with the root trunk of the PSTN gateway (e.g., 5067). This parameter
is later configured in the SIP Interface table (see Section 4.3 on page 37).
b. In the 'SIP Transport Protocol' field, select the transport type (e.g., TLS) that the
trunk uses. This parameter is later configured in the SIP Interface table (see
Section 4.3 on page 37).
c. In the 'Associated Mediation Server' field, select the Mediation Server pool to
associate with the root trunk of this PSTN gateway.
d. In the 'Associated Mediation Server Port' field, enter the listening port that the
Mediation Server will use for SIP messages from the SBC (e.g., 5067).
e. Click Finish.

AudioCodes Mediant E-SBC 18 Document #: LTRT-54030
Microsoft Skype for Business & ITSP SIP Trunk
The E-SBC is added as a PSTN gateway, and a trunk is created as shown below:
Figure 3-9: E-SBC added as IP/PSTN Gateway and Trunk Created
9. Publish the Topology: In the main tree, select the root node Skype for Business
Server, and then from the Action menu, choose Publish Topology, as shown below:
Figure 3-10: Choosing Publish Topology

Configuration Note 3. Configuring Skype for Business Server 2015
Version 7.2 19 AudioCodes Mediant E-SBC
The following is displayed:
Figure 3-11: Publish the Topology
10. Click Next; the Topology Builder starts to publish your topology, as shown below:
Figure 3-12: Publishing in Progress

AudioCodes Mediant E-SBC 20 Document #: LTRT-54030
Microsoft Skype for Business & ITSP SIP Trunk
11. Wait until the publishing topology process completes successfully, as shown below:
Figure 3-13: Publishing Wizard Complete
12. Click Finish.

Configuration Note 3. Configuring Skype for Business Server 2015
Version 7.2 21 AudioCodes Mediant E-SBC
3.2 Configuring the "Route" on Skype for Business
Server 2015
The procedure below describes how to configure a "Route" on the Skype for Business
Server 2015 and to associate it with the E-SBC PSTN gateway.
To configure the "route" on Skype for Business Server 2015:
1. Start the Microsoft Skype for Business Server 2015 Control Panel (Start > search for
Microsoft Skype for Business Server Control Panel), as shown below:
Figure 3-14: Opening the Skype for Business Server Control Panel

AudioCodes Mediant E-SBC 22 Document #: LTRT-54030
Microsoft Skype for Business & ITSP SIP Trunk
2. You are prompted to enter your login credentials:
Figure 3-15: Skype for Business Server Credentials
3. Enter your domain username and password, and then click OK; the Microsoft Skype
for Business Server 2015 Control Panel is displayed:
Figure 3-16: Microsoft Skype for Business Server 2015 Control Panel

Configuration Note 3. Configuring Skype for Business Server 2015
Version 7.2 23 AudioCodes Mediant E-SBC
4. In the left navigation pane, select Voice Routing.
Figure 3-17: Voice Routing Page
5. In the Voice Routing page, select the Route tab.
Figure 3-18: Route Tab

AudioCodes Mediant E-SBC 24 Document #: LTRT-54030
Microsoft Skype for Business & ITSP SIP Trunk
6. Click New; the New Voice Route page appears:
Figure 3-19: Adding New Voice Route
7. In the 'Name' field, enter a name for this route (e.g., ITSP).
8. In the 'Starting digits for numbers that you want to allow' field, enter the starting digits
you want this route to handle (e.g., * to match all numbers), and then click Add.
9. Associate the route with the E-SBC Trunk that you created:
a. Under the 'Associated Trunks' group, click Add; a list of all the deployed
gateways is displayed:
Figure 3-20: List of Deployed Trunks

Configuration Note 3. Configuring Skype for Business Server 2015
Version 7.2 25 AudioCodes Mediant E-SBC
b. Select the E-SBC Trunk you created, and then click OK; the trunk is added to the
'Associated Trunks' group list:
Figure 3-21: Selected E-SBC Trunk
10. Associate a PSTN Usage to this route:
‒ Under the 'Associated PSTN Usages' group, click Select and then add the
associated PSTN Usage.
Figure 3-22: Associating PSTN Usage to Route

AudioCodes Mediant E-SBC 26 Document #: LTRT-54030
Microsoft Skype for Business & ITSP SIP Trunk
11. Click OK (located on the top of the New Voice Route page); the New Voice Route
(Uncommitted) is displayed:
Figure 3-23: Confirmation of New Voice Route
12. From the Commit drop-down list, choose Commit all, as shown below:
Figure 3-24: Committing Voice Routes

Configuration Note 3. Configuring Skype for Business Server 2015
Version 7.2 27 AudioCodes Mediant E-SBC
The Uncommitted Voice Configuration Settings page appears:
Figure 3-25: Uncommitted Voice Configuration Settings
13. Click Commit; a message is displayed confirming a successful voice routing
configuration, as shown below:
Figure 3-26: Confirmation of Successful Voice Routing Configuration

AudioCodes Mediant E-SBC 28 Document #: LTRT-54030
Microsoft Skype for Business & ITSP SIP Trunk
14. Click Close; the new committed Route is displayed in the Voice Routing page, as
shown below:
Figure 3-27: Voice Routing Screen Displaying Committed Routes
15. For ITSPs that implement a call identifier, continue with the following steps:
Note: The SIP History-Info header provides a method to verify the identity (ID) of the call
forwarder (i.e., the Skype for Business user number). This ID is required by ITSP SIP
Trunk in the P-Asserted-Identity header. The device adds this ID to the P-Asserted-
Identity header in the sent INVITE message using the IP Profile (see Section 4.6 on
page 45).
a. In the Voice Routing page, select the Trunk Configuration tab. Note that you
can add and modify trunk configuration by site or by pool.
Figure 3-28: Voice Routing Screen – Trunk Configuration Tab
b. Click Edit; the Edit Trunk Configuration page appears:

Configuration Note 3. Configuring Skype for Business Server 2015
Version 7.2 29 AudioCodes Mediant E-SBC
c. Select the Enable media bypass option.
d. Select one of the following options from the 'Encryption Support Level’ dropdown:
♦ Required - SRTP encryption will be used to help protect traffic between the
Mediation Server and the gateway or private branch exchange (PBX).
♦ Optional - SRTP encryption will be used if the service provider or equipment
manufacturer supports it.
♦ Not Supported - SRTP encryption is not supported by the service provider
or equipment manufacturer and will therefore not be used.
The option selected depends on customer configuration / requirements:
♦ If you set ‘Encryption Support Level’ to Optional, make sure the encryption
is enabled in PowerShell (https://support.microsoft.com/en-us/kb/2761579
):
Get-CsMediaConfiguration |Set-CsMediaConfiguration -
EncryptionLevel SupportEncryption
Identity : Global
EnableQoS : False
EncryptionLevel : SupportEncryption
EnableSiren : False
MaxVideoRateAllowed : VGA600K
e. Select the Enable forward call history check box, and then click OK.
f. Repeat Steps 11 through 13 to commit your settings.
16. Use the following command on the Skype for Business Server Management Shell
after reconfiguration to verify correct values:
♦ Get-CsTrunkConfiguration
Identity :
Service:PstnGateway:ITSP.S4B.interop
OutboundTranslationRulesList :
SipResponseCodeTranslationRulesList : {}

AudioCodes Mediant E-SBC 30 Document #: LTRT-54030
Microsoft Skype for Business & ITSP SIP Trunk
OutboundCallingNumberTranslationRulesList : {}
PstnUsages : {}
Description :
ConcentratedTopology : True
EnableBypass : True
EnableMobileTrunkSupport : False
EnableReferSupport : True
EnableSessionTimer : True
EnableSignalBoost : False
MaxEarlyDialogs : 20
RemovePlusFromUri : False
RTCPActiveCalls : True
RTCPCallsOnHold : True
SRTPMode : Required
EnablePIDFLOSupport : False
EnableRTPLatching : False
EnableOnlineVoice : False
ForwardCallHistory : True
Enable3pccRefer : False
ForwardPAI : False
EnableFastFailoverTimer : True
EnableLocationRestriction : False
NetworkSiteID :

Configuration Note 4. Configuring AudioCodes E-SBC
Version 7.2 31 AudioCodes Mediant E-SBC
4 Configuring AudioCodes E-SBC
This chapter provides step-by-step procedures on how to configure AudioCodes E-SBC for
interworking between Microsoft Skype for Business Server 2015 and the ITSP SIP Trunk.
These configuration procedures are based on the interoperability test topology described in
Section 2.3 and includes the following main areas:
E-SBC WAN interface - ITSP SIP Trunking environment
E-SBC LAN interface - Skype for Business Server 2015 environment
This configuration is done using the E-SBC's embedded Web server (hereafter, referred to
as Web interface).
Notes:
• For implementing Microsoft Skype for Business and ITSP SIP Trunk based on the
configuration described in this section, AudioCodes E-SBC must be installed with a
License Key that includes the following software features:
√ Microsoft
√ SBC
√ Security
√ DSP
√ RTP
√ SIP
For more information about the License Key, contact your AudioCodes sales
representative.
• The scope of this interoperability test and document does not cover all security
aspects for connecting the SIP Trunk to the Microsoft Skype for Business
environment. Comprehensive security measures should be implemented per your
organization's security policies. For security recommendations on AudioCodes’
products, refer to the Recommended Security Guidelines document.

AudioCodes Mediant E-SBC 32 Document #: LTRT-54030
Microsoft Skype for Business & ITSP SIP Trunk
4.1 Step 1: IP Network Interfaces Configuration
This step describes how to configure the E-SBC's IP network interfaces. There are several
ways to deploy the E-SBC; however, scenario exemplified in this document employs the
following deployment method:
E-SBC interfaces with the following IP entities:
• Skype for Business servers, located on the LAN
• ITSP SIP Trunk, located on the WAN
E-SBC connects to the WAN through a DMZ network
Physical connection: The type of physical connection to the LAN depends on the
method used to connect to the Enterprise's network. In this example, E-SBC connects
to the LAN and DMZ using dedicated LAN ports
(i.e., two ports and two network cables are used).
E-SBC also uses two logical network interfaces:
• LAN (VLAN ID 1)
• DMZ (VLAN ID 2)
Figure 4-1: Network Interfaces in Interoperability Test Topology

Configuration Note 4. Configuring AudioCodes E-SBC
Version 7.2 33 AudioCodes Mediant E-SBC
4.1.1 Step 1a: Configure VLANs
This step describes how to define VLANs for each of the following interfaces:
LAN VoIP (assigned the name "LAN_IF")
WAN VoIP (assigned the name "WAN_IF")
To configure the VLANs:
1. Open the Ethernet Device table (Setup menu > IP Network tab > Core Entities folder
> Ethernet Devices).
2. There will be one existing row for VLAN ID 1 and underlying interface GROUP_1.
3. Add another VLAN ID 2 for the WAN side as follows:
Parameter Value
Index
1
VLAN ID
2
Underlying Interface
GROUP_2 (Ethernet port group)
Name
vlan 2
Tagging
Untagged
Figure 4-2: Configured VLAN IDs in Ethernet Device
4.1.2 Step 1b: Configure IP Network Interfaces for LAN and WAN
This step describes how to configure the IP network interfaces for each of the following
interfaces:
LAN VoIP (assigned the name "LAN_IF")
WAN VoIP (assigned the name "WAN_IF")
To configure the IP network interfaces:
1. Open the IP Interfaces table (Setup menu > IP Network tab > Core Entities folder >
IP Interfaces).
2. Modify the existing LAN network interface:
a. Select the 'Index' radio button of the OAMP + Media + Control table row, and
then click Edit.
b. Configure the interface as follows:

AudioCodes Mediant E-SBC 34 Document #: LTRT-54030
Microsoft Skype for Business & ITSP SIP Trunk
Parameter Example Setting for IPv4 Example Setting for IPv6
Name
LAN_IF (arbitrary descriptive
name)
IPv6_LAN_IF (arbitrary
descriptive name)
Application Type
OAMP + Media + Control Media + Control (The OAMP
application can be configured
only with IPv4.)
Interface Mode See IPv4 in the SBC
documentation.
See IPv6 in the SBC
documentation.
IP Address
10.15.17.77 (LAN IP address
of E-SBC)
2001::77 (only a global
address can be entered)
Prefix Length
16 (subnet mask in bits for
255.255.0.0)
64 (only 64 is supported)
Default Gateway
10.15.0.1 2001::1
Primary DNS
10.15.27.1 2001::10
Secondary DNS
0.0.0.0 2001::10
Ethernet Device
vlan 1 vlan 1
3. Add a network interface for the WAN side:
a. Click New.
b. Configure the interface as follows:
Parameter Example Setting for IPv4 Example Setting for IPv6
Name
WAN_IF (arbitrary descriptive
name)
IPv6_WAN_IF (arbitrary
descriptive name)
Application Type
Media + Control Media + Control
Interface Mode See IPv4 in the SBC
documentation.
See IPv6 in the SBC
documentation.
IP Address
195.189.192.157 (DMZ IP
address of E-SBC)
2002::157
Prefix Length
25 (subnet mask in bits for
255.255.255.128)
64
Default Gateway
195.189.192.129 (router's IP
address)
2002::129
Primary DNS
80.179.52.100 2001:4860:4860::8888
Secondary DNS
80.179.55.100 2001:4860:4860::8844
Ethernet Device
vlan 2 vlan 2
4. Click Apply.

Configuration Note 4. Configuring AudioCodes E-SBC
Version 7.2 35 AudioCodes Mediant E-SBC
The configured IP network interfaces are shown below:
Figure 4-3: Configured Network Interfaces in IP Interfaces Table

AudioCodes Mediant E-SBC 36 Document #: LTRT-54030
Microsoft Skype for Business & ITSP SIP Trunk
4.2 Step 2: Enable the SBC Application
This step describes how to enable the SBC application.
To enable the SBC application:
1. Open the Applications Enabling page (Setup menu > Signaling & Media tab > Core
Entities folder > Applications Enabling).
Figure 4-4: Enabling SBC Application
2. From the 'SBC Application' drop-down list, select Enable.
3. Click Apply.
4. Reset the E-SBC with a burn to flash for this setting to take effect (see Section 4.17 on
page 76).

Configuration Note 4. Configuring AudioCodes E-SBC
Version 7.2 37 AudioCodes Mediant E-SBC
4.3 Step 3: Configure Media Realms
This step describes how to configure Media Realms. The simplest configuration is to create
two Media Realms - one for internal (LAN) traffic and one for external (WAN) traffic.
To configure Media Realms:
1. Open the Media Realms table (Setup menu > Signaling & Media tab > Core Entities
folder > Media Realms).
2. Add a Media Realm for the LAN interface. You can use the default Media Realm
(Index 0), however modify it as shown below:
Parameter Value
Index
0
Name
MRLan (descriptive name)
IPv4 Interface Name
LAN_IF
IPv6 Interface Name
IPv6_LAN_IF (Only applicable if using IPv6)
Port Range Start
6000 (represents lowest UDP port number used for
media on LAN)
Number of Media Session Legs
100 (media sessions assigned with port range)
Figure 4-5: Configuring Media Realm for LAN

AudioCodes Mediant E-SBC 38 Document #: LTRT-54030
Microsoft Skype for Business & ITSP SIP Trunk
3. Configure a Media Realm for WAN traffic:
Parameter Value
Index
1
Name
MRWan (arbitrary name)
Topology Location
Up
IPv4 Interface Name
WAN_IF
IPv6 Interface Name
IPv6_WAN_IF (Only applicable if using IPv6)
Port Range Start
7000 (represents lowest UDP port number used
for media on WAN)
Number of Media Session Legs
100 (media sessions assigned with port range)
Figure 4-6: Configuring Media Realm for WAN

Configuration Note 4. Configuring AudioCodes E-SBC
Version 7.2 39 AudioCodes Mediant E-SBC
The configured Media Realms are shown in the figure below:
Figure 4-7: Configured Media Realms in Media Realm Table

AudioCodes Mediant E-SBC 40 Document #: LTRT-54030
Microsoft Skype for Business & ITSP SIP Trunk
4.4 Step 4: Configure SIP Signaling Interfaces
This step describes how to configure SIP Interfaces. In the example scenario, an internal
and external SIP Interface must be configured for the E-SBC.
To configure SIP Interfaces:
1. Open the SIP Interfaces table (Setup menu > Signaling & Media tab > Core Entities
folder > SIP Interfaces).
2. Add a SIP Interface for the LAN interface. You can use the default SIP Interface
(Index 0), but modify it as shown below:
Parameter Value
Index
0
Name
S4B (see note at the end of this section)
Network Interface
LAN_IF
Application Type
SBC
UDP and TCP
0
TLS Port
5067 (see note below)
Media Realm
MRLan
Note: The TLS port parameter must be identically configured in the Skype for Business
Topology Builder (see Section 3.1 on page 13).
3. Configure a SIP Interface for the WAN:
Parameter Value
Index
1
Name
ITSP
Network Interface
WAN_IF
Application Type
SBC
UDP Port
5060
TCP and TLS
0
Media Realm
MRWan

Configuration Note 4. Configuring AudioCodes E-SBC
Version 7.2 41 AudioCodes Mediant E-SBC
The configured SIP Interfaces are shown in the figure below:
Figure 4-8: Configured SIP Interfaces in SIP Interface Table
Note: Current software releases uses the string names of the configuration entities
(e.g., SIP Interface, Proxy Sets, and IP Groups). Therefore, it is recommended to
configure each configuration entity with meaningful names for easy identification.

AudioCodes Mediant E-SBC 42 Document #: LTRT-54030
Microsoft Skype for Business & ITSP SIP Trunk
4.5 Step 5: Configure Proxy Sets
This step describes how to configure Proxy Sets. The Proxy Set defines the destination
address (IP address or FQDN) of the IP entity server. Proxy Sets can also be used to
configure load balancing between multiple servers.
In the example scenario, two Proxy Sets need to be configured for the following IP entities:
Microsoft Skype for Business Server 2015
ITSP SIP Trunk
The Proxy Sets will be later applied to the VoIP network by assigning them to IP Groups.
To configure Proxy Sets:
1. Open the Proxy Sets table (Setup menu > Signaling & Media tab > Core Entities
folder >Proxy Sets).
2. Add a Proxy Set for the Skype for Business Server 2015 as shown below:
Parameter Value
Index
1
Name
S4B
SBC IPv4 SIP Interface
S4B
Proxy Keep-Alive
Using Options
Redundancy Mode
Homing
Load Balancing Method
Round Robin
Proxy Hot Swap
Enable
Figure 4-9: Configuring Proxy Set for Microsoft Skype for Business Server 2015

Configuration Note 4. Configuring AudioCodes E-SBC
Version 7.2 43 AudioCodes Mediant E-SBC
a. Select the index row of the Proxy Set that you added, and then click the Proxy
Address link located below the table; the Proxy Address table opens.
b. Click New; the following dialog box appears:
Figure 4-10: Configuring Proxy Address for Microsoft Skype for Business Server 2015
c. Configure the address of the Proxy Set according to the parameters described in
the table below.
Parameter Value
Index
0
Proxy Address
FE.S4B.interop:5067
(Skype for Business Server 2015 IP
address / FQDN and destination port)
Transport Type
TLS
d. Click Apply.
3. Configure a Proxy Set for the ITSP SIP Trunk:
Parameter Value
Index
2
Name
ITSP
SBC IPv4 SIP Interface
ITSP
Proxy Keep-Alive
Using Options
Keep-Alive Failure responses
503 (If this is received in response to a keep-alive
message using SIP OPTIONS, the SBC considers the
proxy as down and tries the next proxy.)
Proxy Hot Swap
Enable

AudioCodes Mediant E-SBC 44 Document #: LTRT-54030
Microsoft Skype for Business & ITSP SIP Trunk
Figure 4-11: Configuring Proxy Set for ITSP SIP Trunk
a. Select the index row of the Proxy Set that you added, and then click the Proxy
Address link located below the table; the Proxy Address table opens.
b. Click New; the following dialog box appears:
Figure 4-12: Configuring Proxy Address for ITSP SIP Trunk
c. Configure the address of the Proxy Set according to the parameters described in
the table below.
Parameter Value
Index
0
Proxy Address
ITSP.com:5060 ( IP address / FQDN and
destination port)
Transport Type
UDP
d. Click Apply.

Configuration Note 4. Configuring AudioCodes E-SBC
Version 7.2 45 AudioCodes Mediant E-SBC
4.6 Step 6: Configure Coders
This step describes how to configure coders (termed Coder Group). As Skype for Business
Server 2015 supports the G.711 coder while the network connection to ITSP SIP Trunk
may restrict operation with a lower bandwidth coder such as G.729, you need to add a
Coder Group with the G.729 coder for the ITSP SIP Trunk.
Note that the Coder Group ID for this entity will be assign to its corresponding IP Profile in
the next step.
To configure coders:
1. Open the Coder Groups table (Setup menu > Signaling & Media tab > Coders &
Profiles folder > Coder Groups).
2. Configure a Coder Group for Skype for Business Server 2015:
Parameter Value
Coder Group ID
1
Coder Name
G.711 U-law
G.711 A-law
Silence Suppression
Enable (for both coders)
Figure 4-13: Configuring Coder Group for Skype for Business Server 2015
3. Configure a Coder Group for ITSP SIP Trunk:
Parameter Value
Coder Group ID
2
Coder Name
G.729
Figure 4-14: Configuring Coder Group for ITSP SIP Trunk

AudioCodes Mediant E-SBC 46 Document #: LTRT-54030
Microsoft Skype for Business & ITSP SIP Trunk
The procedure below describes how to configure an Allowed Coders Group to ensure that
voice sent to the ITSP SIP Trunk uses the G.729 coder whenever possible. Note that this
Allowed Coders Group ID will be assign to the IP Profile belonging to the ITSP SIP Trunk
Profile in the next step.
To set a preferred coder for the ITSP SIP Trunk:
1. Open the Allowed Audio Coders Groups table (Setup menu > Signaling & Media tab
> Coders & Profiles folder > Allowed Audio Coders Groups).
2. Click New and configure a name for the Allowed Video Coders Group for ITSP SIP
Trunk.
Figure 4-15: Configuring Allowed Coders Group for ITSP SIP Trunk
3. Click Apply.
4. Select the new row that you configured, and then click the Allowed Video Coders link
located below the table; the Allowed Video Coders table opens.
5. Click New and configure an Allowed Coders as follows:
Parameter Value
Index
0
Coder
G.729
Figure 4-16: Configuring Allowed Coders for ITSP SIP Trunk

Configuration Note 4. Configuring AudioCodes E-SBC
Version 7.2 47 AudioCodes Mediant E-SBC
6. Open the Media Settings page (Setup menu > Signaling & Media tab > Media folder
> Media Settings).
Figure 4-17: SBC Preferences Mode
7. From the 'Preferences Mode' drop-down list, select Include Extensions.
8. Click Apply.

AudioCodes Mediant E-SBC 48 Document #: LTRT-54030
Microsoft Skype for Business & ITSP SIP Trunk
4.7 Step 7: Configure IP Profiles
This step describes how to configure IP Profiles. The IP Profile defines a set of call
capabilities relating to signaling (e.g., SIP message terminations such as REFER) and
media (e.g., coder and transcoding method).
In the example scenario, IP Profiles need to be configured for the following IP entities:
Microsoft Skype for Business Server 2015 - to operate in secure mode using SRTP
and TLS
ITSP SIP trunk - to operate in non-secure mode using RTP and UDP
To configure IP Profile for the Skype for Business Server 2015:
1. Open the IP Profiles table (Setup menu > Signaling & Media tab > Coders &
Profiles folder > IP Profiles).
2. Click New, and then configure the parameters as follows:
Parameter Value
General
Index
1
Name
S4B
Media Security
SBC Media Security Mode
SRTP
Symmetric MKI
Enable
MKI Size
1
Enforce MKI Size
Enforce
Reset SRTP State Upon Re-key
Enable
Generate SRTP Keys Mode:
Always
SBC Early Media
Remote Early Media RTP Detection
Mode
By Media (required, as Skype for Business
Server 2015 does not send RTP immediately
to remote side when it sends a SIP 18x
response)
SBC Media
Extension Coders Group
AudioCodersGroups_1
SBC Signaling
Remote Update Support
Supported Only After Connect
Remote re-INVITE Support
Supported Only With SDP
Remote Delayed Offer Support
Not Supported
SBC Forward and Transfer
Remote REFER Mode
Handle Locally (required, as Skype for
Business Server 2015 does not support
receipt
of SIP REFER)
Remote 3xx Mode
Handle Locally (required, as Skype for
Business Server 2015 does not support receipt
of SIP 3xx responses)

Configuration Note 4. Configuring AudioCodes E-SBC
Version 7.2 49 AudioCodes Mediant E-SBC
Media
Media IP Version Preference
Only IPv4 or Only IPv6
Figure 4-18: Configuring IP Profile for Skype for Business Server 2015
3. Click Apply.

AudioCodes Mediant E-SBC 50 Document #: LTRT-54030
Microsoft Skype for Business & ITSP SIP Trunk
To configure an IP Profile for the ITSP SIP Trunk:
1. Click New, and then configure the parameters as follows:
Parameter Value
General
Index
2
Name
ITSP
Media Security
SBC Media Security Mode
RTP
SBC Early Media
Remote Can Play Ringback
No (required, as Skype for Business Server
2015 does not provide a ringback tone for
incoming calls)
SBC Media
Extension Coders Group
AudioCodersGroups_2
Allowed Audio Coders
ITSP Allowed Coders
Allowed Coders Mode
Preference
(lists Allowed Coders first and then
original coders in received SDP offer)
SBC Signaling
P-Asserted-Identity Header Mode
Add (required for anonymous calls)
SBC Forward and Transfer
Remote REFER Mode
Handle Locally (required, as Skype for
Business Server 2015 does not support receipt
of SIP REFER)
Media
Media IP Version Preference
Only IPv4 or Only IPv6
Note: The SIP Trunk's IP Profile depends on the SIP Trunk behavior. Refer to the
explanations of the IP Profile parameters in the SBC User's Manual in order to
configure the profile according to SIP Trunk behavior.

Configuration Note 4. Configuring AudioCodes E-SBC
Version 7.2 51 AudioCodes Mediant E-SBC
Figure 4-19: Configuring IP Profile for ITSP SIP Trunk
2. Click Apply.

AudioCodes Mediant E-SBC 52 Document #: LTRT-54030
Microsoft Skype for Business & ITSP SIP Trunk
4.8 Step 8: Configure IP Groups
This step describes how to configure IP Groups. The IP Group represents an IP entity on
the network with which the E-SBC communicates. This can be a server (e.g., IP PBX or
ITSP) or it can be a group of users (e.g., LAN IP phones). For servers, the IP Group is
typically used to define the server's IP address by associating it with a Proxy Set. Once IP
Groups are configured, they are used to configure IP-to-IP routing rules for denoting source
and destination of the call.
In the example scenario, IP Groups must be configured for the following IP entities:
Skype for Business Server 2015 (Mediation Server) located on LAN
ITSP SIP Trunk located on WAN
To configure IP Groups:
1. Open the IP Groups table (Setup menu > Signaling & Media tab > Core Entities
folder > IP Groups).
2. Add an IP Group for the Skype for Business Server 2015:
Parameter Value
Index
1
Name
S4B
Type
Server
Proxy Set
S4B
IP Profile
S4B
Media Realm
MRLan
SIP Group Name (according to ITSP requirement)
3. Configure an IP Group for the ITSP SIP Trunk:
Parameter Value
Index
2
Name
ITSP
Topology Location
Up
Type
Server
Proxy Set
ITSP
IP Profile
ITSP
Media Realm
MRWan
SIP Group Name (according to ITSP requirement)

Configuration Note 4. Configuring AudioCodes E-SBC
Version 7.2 53 AudioCodes Mediant E-SBC
The configured IP Groups are shown in the figure below:
Figure 4-20: Configured IP Groups in IP Group Table

AudioCodes Mediant E-SBC 54 Document #: LTRT-54030
Microsoft Skype for Business & ITSP SIP Trunk
4.9 Step 9: SIP TLS Connection Configuration
This section describes how to configure the E-SBC for using a TLS connection with the
Skype for Business Server 2015 Mediation Server. This is essential for a secure SIP TLS
connection.
4.9.1 Step 9a: Configure the NTP Server Address
This step describes how to configure the NTP server's IP address. It is recommended to
implement an NTP server (Microsoft NTP server or a third-party server) to ensure that the
E-SBC receives the accurate and current date and time. This is necessary for validating
certificates of remote parties.
To configure the NTP server address:
1. Open the Time & Date page (Setup menu > Administration tab > Time & Date).
2. In the 'Primary NTP Server Address' field, enter the IP address of the NTP server
(e.g., 10.15.27.1).
Figure 4-21: Configuring NTP Server Address
3. Click Apply.

Configuration Note 4. Configuring AudioCodes E-SBC
Version 7.2 55 AudioCodes Mediant E-SBC
4.9.2 Step 9b: Configure the TLS version
This step describes how to configure the E-SBC to use TLS only. AudioCodes
recommends implementing only TLS to avoid flaws in SSL.
To configure the TLS version:
1. Open the TLS Contexts table (Setup menu > IP Network tab > Security folder > TLS
Contexts).
2. In the TLS Contexts table, select the required TLS Context index row (usually default
index 0 will be used), and then click ‘Edit’.
3. From the 'TLS Version' drop-down list, select ‘TLSv1.0 TLSv1.1 and TLSv1.2’
Figure 4-22: Configuring TLS version
4. Click Apply.

AudioCodes Mediant E-SBC 56 Document #: LTRT-54030
Microsoft Skype for Business & ITSP SIP Trunk
4.9.3 Step 9c: Configure a Certificate
This step describes how to exchange a certificate with Microsoft Certificate Authority (CA).
The certificate is used by the E-SBC to authenticate the connection with Skype for
Business Server 2015.
The procedure involves the following main steps:
a. Generating a Certificate Signing Request (CSR).
b. Requesting Device Certificate from CA.
c. Obtaining Trusted Root Certificate from CA.
d. Deploying Device and Trusted Root Certificates on E-SBC.
Note: The Subject Name (CN) field parameter should be identically configured in the
DNS Active Directory and Topology Builder (see Section 3.1 on page 13).
To configure a certificate:
1. Open the TLS Contexts page (Setup menu > IP Network tab > Security folder > TLS
Contexts).
2. In the TLS Contexts page, select the required TLS Context index row, and then click
the Change Certificate link located below the table; the Context Certificates page
appears.
3. Under the Certificate Signing Request group, do the following:
a. In the 'Subject Name [CN]' field, enter the E-SBC FQDN name
(e.g., ITSP.S4B.interop).
b. Fill in the rest of the request fields according to your security provider's
instructions.
c. Click the Create CSR button; a textual certificate signing request is displayed in
the area below the button:

Configuration Note 4. Configuring AudioCodes E-SBC
Version 7.2 57 AudioCodes Mediant E-SBC
Figure 4-23: Certificate Signing Request – Creating CSR
4. Copy the CSR from the line "----BEGIN CERTIFICATE" to "END CERTIFICATE
REQUEST----" to a text file (such as Notepad), and then save it to a folder on your
computer with the file name, certreq.txt.
5. Open a Web browser and navigate to the Microsoft Certificates Services Web site at
http://<certificate server>/CertSrv.
Figure 4-24: Microsoft Certificate Services Web Page
6. Click Request a certificate.

AudioCodes Mediant E-SBC 58 Document #: LTRT-54030
Microsoft Skype for Business & ITSP SIP Trunk
Figure 4-25: Request a Certificate Page
7. Click advanced certificate request, and then click Next.
Figure 4-26: Advanced Certificate Request Page
8. Click Submit a certificate request ..., and then click Next.
Configuration Note 4. Configuring AudioCodes E-SBC
Version 7.2 59 AudioCodes Mediant E-SBC
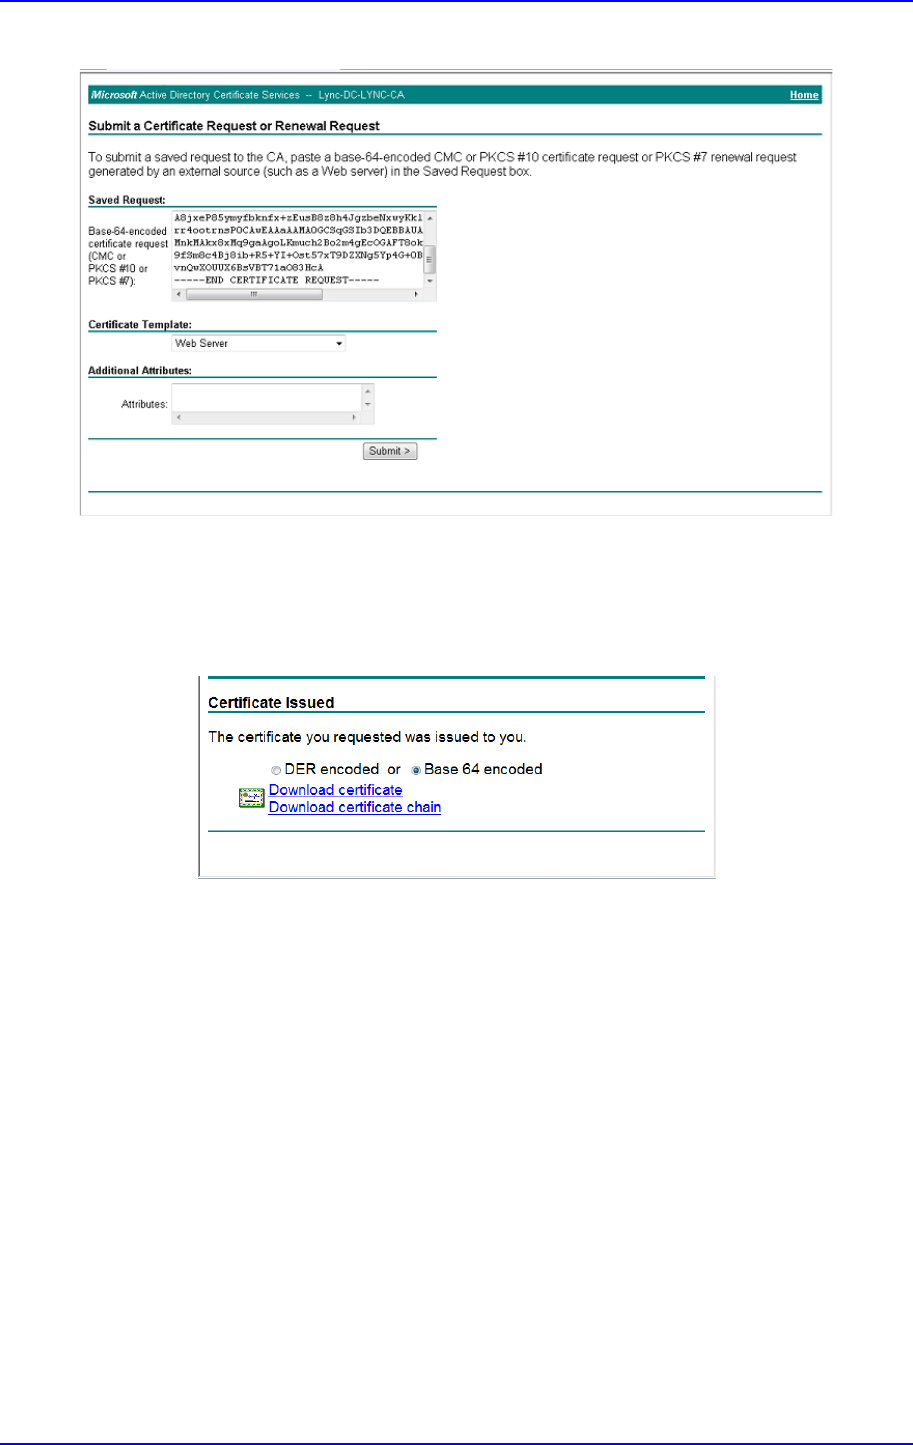
Figure 4-27: Submit a Certificate Request or Renewal Request Page
9. Open the certreq.txt file that you created and saved in Step 4, and then copy its
contents to the 'Saved Request' field.
10. From the 'Certificate Template' drop-down list, select Web Server.
11. Click Submit.
Figure 4-28: Certificate Issued Page
12. Select the Base 64 encoded option for encoding, and then click Download
certificate.
13. Save the file as gateway.cer to a folder on your computer.
14. Click the Home button or navigate to the certificate server at http://<Certificate
Server>/CertSrv.
15. Click Download a CA certificate, certificate chain, or CRL.

AudioCodes Mediant E-SBC 60 Document #: LTRT-54030
Microsoft Skype for Business & ITSP SIP Trunk
Figure 4-29: Download a CA Certificate, Certificate Chain, or CRL Page
16. Under the 'Encoding method' group, select the Base 64 option for encoding.
17. Click Download CA certificate.
18. Save the file as certroot.cer to a folder on your computer.
19. In the E-SBC's Web interface, return to the TLS Contexts page and do the following:
a. In the TLS Contexts page, select the required TLS Context index row, and then
click the Change Certificate link located below the table; the Context Certificates
page appears.
b. Scroll down to the Upload certificates files from your computer group, click
the Browse button corresponding to the 'Send Device Certificate...' field,
navigate to the gateway.cer certificate file that you saved on your computer in
Step 13, and then click Send File to upload the certificate to the E-SBC.
Figure 4-30: Upload Device Certificate Files from your Computer Group

Configuration Note 4. Configuring AudioCodes E-SBC
Version 7.2 61 AudioCodes Mediant E-SBC
20. In the E-SBC's Web interface, return to the TLS Contexts page.
a. In the TLS Contexts page, select the required TLS Context index row, and then
click the Trusted Root Certificates link, located at the bottom of the TLS
Contexts page; the Trusted Certificates page appears.
b. Click the Import button, and then select the certificate file to load.
Figure 4-31: Importing Root Certificate into Trusted Certificates Store
21. Click OK; the certificate is loaded to the device and listed in the Trusted Certificates
store.
22. Reset the E-SBC with a burn to flash for your settings to take effect (see Section 4.17
on page 76).

AudioCodes Mediant E-SBC 62 Document #: LTRT-54030
Microsoft Skype for Business & ITSP SIP Trunk
4.10 Step 10: Configure SRTP
This step describes how to configure media security. If you configure the Microsoft
Mediation Server to use SRTP, you need to configure the E-SBC to operate in the same
manner. Note that SRTP was enabled for Skype for Business Server 2015 when you
configured an IP Profile for Skype for Business Server 2015 (see Section 4.6 on page 45).
To configure media security:
1. Open the Media Security page (Setup menu > Signaling & Media tab > Media
folder > Media Security).
Figure 4-32: Configuring SRTP
2. From the 'Media Security' drop-down list, select Enable to enable SRTP.
3. Click Apply.
4. Reset the E-SBC with a burn to flash for your settings to take effect (see Section 4.17
on page 76).
Note: If you are implementing SRTP, make sure that you also configure the Lync
server for SRTP 'Encryption Support Level'). For more information, see here.

Configuration Note 4. Configuring AudioCodes E-SBC
Version 7.2 63 AudioCodes Mediant E-SBC
4.11 Step 11: Configure Maximum IP Media Channels
This step describes how to configure the maximum number of required IP media channels.
The number of media channels represents the number of DSP channels that the E-SBC
allocates to call sessions.
Note: This step is required only if transcoding is required.
To configure the maximum number of IP media channels:
1. Open the Media Settings page (Setup menu > Signaling & Media tab > Media folder
> Media Settings).
Figure 4-33: Configuring Number of Media Channels
2. In the 'Number of Media Channels' field, enter the number of media channels
according to your environments transcoding calls (e.g., 100).
3. Click Apply.
4. Reset the E-SBC with a burn to flash for your settings to take effect (see Section 4.17
on page 76).

AudioCodes Mediant E-SBC 64 Document #: LTRT-54030
Microsoft Skype for Business & ITSP SIP Trunk
4.12 Step 12: Configure IP-to-IP Call Routing Rules
This step describes how to configure IP-to-IP call routing rules. These rules define the
routes for forwarding SIP messages (e.g., INVITE) received from one IP entity to another.
The E-SBC selects the rule whose configured input characteristics (e.g., IP Group) match
those of the incoming SIP message. If the input characteristics do not match the first rule in
the table, they are compared to the second rule, and so on, until a matching rule is located.
If no rule is matched, the message is rejected. The routing rules use the configured IP
Groups (as configured in Section 4.8 on page 52,) to denote the source and destination of
the call.
In the example scenario, the following IP-to-IP routing rules need to be configured to route
calls between Skype for Business Server 2015 (LAN) and ITSP SIP Trunk (DMZ):
Terminate SIP OPTIONS messages on the E-SBC that are received from the both
LAN and DMZ
Calls from Skype for Business Server 2015 to ITSP SIP Trunk
Calls from ITSP SIP Trunk to Skype for Business Server 2015
To configure IP-to-IP routing rules:
1. Open the IP-to-IP Routing table (Setup menu > Signaling & Media tab > SBC folder
> Routing > IP-to-IP Routing).
2. Configure a rule to terminate SIP OPTIONS messages received from the both LAN
and DMZ:
a. Click New, and then configure the parameters as follows:
Parameter Value
Index
0
Name
Terminate OPTIONS (arbitrary
descriptive name)
Source IP Group
Any
Request Type
OPTIONS
Destination Type
Dest Address
Destination Address
internal

Configuration Note 4. Configuring AudioCodes E-SBC
Version 7.2 65 AudioCodes Mediant E-SBC
Figure 4-34: Configuring IP-to-IP Routing Rule for Terminating SIP OPTIONS
b. Click Apply.
3. Configure a rule to route calls from Skype for Business Server 2015 to ITSP SIP
Trunk:
a. Click New, and then configure the parameters as follows:
Parameter Value
Index
1
Name
S4B to ITSP (arbitrary descriptive name)
Source IP Group
S4B
Destination Type
IP Group
Destination IP Group
ITSP
Destination SIP Interface
ITSP

AudioCodes Mediant E-SBC 66 Document #: LTRT-54030
Microsoft Skype for Business & ITSP SIP Trunk
Figure 4-35: Configuring IP-to-IP Routing Rule for S4B to ITSP
b. Click Apply.

Configuration Note 4. Configuring AudioCodes E-SBC
Version 7.2 67 AudioCodes Mediant E-SBC
4. Configure rule to route calls from ITSP SIP Trunk to Skype for Business Server 2015:
a. Click New, and then configure the parameters as follows:
Parameter Value
Index
2
Name
ITSP to S4B (arbitrary descriptive name)
Source IP Group
ITSP
Destination Type
IP Group
Destination IP Group
S4B
Destination SIP Interface
S4B
Figure 4-36: Configuring IP-to-IP Routing Rule for ITSP to S4B
b. Click Apply.

AudioCodes Mediant E-SBC 68 Document #: LTRT-54030
Microsoft Skype for Business & ITSP SIP Trunk
The configured routing rules are shown in the figure below:
Figure 4-37: Configured IP-to-IP Routing Rules in IP-to-IP Routing Table
Note: The routing configuration may change according to your specific deployment
topology.

Configuration Note 4. Configuring AudioCodes E-SBC
Version 7.2 69 AudioCodes Mediant E-SBC
4.13 Step 13: Configure IP-to-IP Manipulation Rules
This step describes how to configure IP-to-IP manipulation rules. These rules manipulate
the SIP Request-URI user part (source or destination number). The manipulation rules use
the configured IP Groups (as configured in Section 4.8 on page 52) to denote the source
and destination of the call.
Note: Adapt the manipulation table according to your environment dial plan.
For this example scenario, a manipulation is configured to add the "+" (plus sign) to the
destination number for calls from the ITSP SIP Trunk IP Group to the Skype for Business
Server 2015 IP Group for any destination username prefix.
To configure a number manipulation rule:
1. Open the Outbound Manipulations table (Setup menu > Signaling & Media tab >
SBC folder > Manipulation > Outbound Manipulations).
2. Click New, and then configure the parameters as follows:
Parameter Value
Index
0
Name
Add + toward S4B
Source IP Group
SP
Destination IP Group
S4B
Destination Username Prefix
* (asterisk sign)
Manipulated Item
Destination URI
Prefix to Add
+ (plus sign)

AudioCodes Mediant E-SBC 70 Document #: LTRT-54030
Microsoft Skype for Business & ITSP SIP Trunk
Figure 4-38: Configuring IP-to-IP Outbound Manipulation Rule
3. Click Apply.
The figure below shows an example of configured IP-to-IP outbound manipulation rules for
calls between Skype for Business Server 2015 IP Group and ITSP SIP Trunk IP Group:
Figure 4-39: Example of Configured IP-to-IP Outbound Manipulation Rules
Rule Index Description
1
Calls from ITSP IP Group to S4B IP Group with any destination number (*), add "+" to the
prefix of the destination number.
2
Calls from S4B IP Group to ITSP IP Group with the prefix destination number "+", remove
"+" from this prefix.
3
Calls from S4B IP Group to ITSP IP Group with source number prefix "+", remove the "+"
from this prefix.

Configuration Note 4. Configuring AudioCodes E-SBC
Version 7.2 71 AudioCodes Mediant E-SBC
4.14 Step 14: Configure Message Manipulation Rules
This step describes how to configure SIP message manipulation rules. SIP message
manipulation rules can include insertion, removal, and/or modification of SIP headers.
Manipulation rules are grouped into Manipulation Sets, enabling you to apply multiple rules
to the same SIP message (IP entity).
Once you have configured the SIP message manipulation rules, you need to assign them
to the relevant IP Group (in the IP Group table) and determine whether they must be
applied to inbound or outbound messages.
See an example below of a message manipulation rule configuration; use the SBC User's
Manual for detailed instructions on how to configure message manipulation rules according
to your requirements.
In the example scenario, the configured manipulation rule replaces the user part of the SIP
From Header with the value from the SIP History-Info Header.
To configure SIP message manipulation rule:
1. Open the Message Manipulations page (Setup menu > Signaling & Media tab >
Message Manipulation folder > Message Manipulations).
2. Configure a new manipulation rule (Manipulation Set 4) for ITSP SIP Trunk. This rule
applies to messages sent to the ITSP SIP Trunk IP Group in a call forward scenario.
Parameter Value
Index
0
Name
Call Forward
Manipulation Set ID
4
Condition
header.history-info.0 regex (<sip:)(.*)(@)(.*)
Action Subject
header.from.url.user
Action Type
Modify
Action Value
$2

AudioCodes Mediant E-SBC 72 Document #: LTRT-54030
Microsoft Skype for Business & ITSP SIP Trunk
Figure 4-40: Configuring SIP Message Manipulation Rule 0 (for ITSP SIP Trunk)
3. Assign Manipulation Set ID 4 to the ITSP SIP trunk IP Group:
a. Open the IP Groups table (Setup menu > Signaling & Media tab > Core
Entities folder > IP Groups).
b. Select the row of the ITSP SIP trunk IP Group, and then click Edit.
c. Set the 'Outbound Message Manipulation Set' field to 4.
Figure 4-41: Assigning Manipulation Set 4 to the ITSP SIP Trunk IP Group
d. Click Apply.

Configuration Note 4. Configuring AudioCodes E-SBC
Version 7.2 73 AudioCodes Mediant E-SBC
4.15 Step 15: Configure Registration Accounts
This step describes how to configure SIP registration accounts. This is required so that the
E-SBC can register with the ITSP SIP Trunk on behalf of Skype for Business Server 2015.
The ITSP SIP Trunk requires registration and authentication to provide service.
In the interoperability test topology, the Served IP Group is Skype for Business Server
2015 IP Group and the Serving IP Group is ITSP SIP Trunk IP Group.
To configure a registration account:
1. Open the Accounts table (Setup menu > Signaling & Media tab > SIP Definitions
folder > Accounts).
2. Click New.
3. Configure the account according to the provided information from , for example:
Parameter Value
Served IP Group
S4B
Application Type
SBC
Serving IP Group
ITSP
Host Name As provided by the SIP Trunk provider
Register
Regular
Contact User
1234567890 (trunk main line)
User Name As provided by the SIP Trunk provider
Password As provided by the SIP Trunk provider
Figure 4-42: Configuring a SIP Registration Account
4. Click Apply.

AudioCodes Mediant E-SBC 74 Document #: LTRT-54030
Microsoft Skype for Business & ITSP SIP Trunk
4.16 Step 16: Miscellaneous Configuration
This section describes miscellaneous E-SBC configuration.
4.16.1 Step 16a: Configure Call Forking Mode
This step describes how to configure the E-SBC's handling of SIP 18x responses received
for call forking of INVITE messages. In the example scenario, if a SIP 18x response with
SDP is received, the E-SBC opens a voice stream according to the received SDP. The E-
SBC re-opens the stream according to subsequently received 18x responses with SDP or
plays a ringback tone if a 180 response without SDP is received. It is mandatory to set this
field for the Skype for Business Server 2015 environment.
To configure call forking:
1. Open the SBC General Settings page (Setup menu > Signaling & Media tab > SBC
folder > SBC General Settings).
2. From the 'SBC Forking Handling Mode' drop-down list, select Sequential.
Figure 4-43: Configuring Forking Mode
3. Click Apply.

Configuration Note 4. Configuring AudioCodes E-SBC
Version 7.2 75 AudioCodes Mediant E-SBC
4.16.2 Step 16b: Configure SBC Alternative Routing Reasons
This step describes how to configure the E-SBC's handling of SIP 503 responses received
for outgoing SIP dialog-initiating methods, e.g., INVITE, OPTIONS, and SUBSCRIBE
messages. In this case E-SBC attempts to locate an alternative route for the call.
To configure SIP reason codes for alternative IP routing:
1. Open the Alternative Routing Reasons table (Setup menu > Signaling & Media tab >
SBC folder > Routing > Alternative Reasons).
2. Click New.
3. From the 'Release Cause' drop-down list, select 503 Service Unavailable.
Figure 4-44: SBC Alternative Routing Reasons Table
4. Click Apply.

AudioCodes Mediant E-SBC 76 Document #: LTRT-54030
Microsoft Skype for Business & ITSP SIP Trunk
4.17 Step 17: Reset the E-SBC
After you have completed the configuration of the E-SBC described in this chapter, save
("burn") the configuration to the E-SBC's flash memory with a reset for the settings to take
effect.
To reset the device through Web interface:
1. Open the Maintenance Actions page (Setup menu > Administration tab >
Maintenance folder > Maintenance Actions).
Figure 4-45: Resetting the E-SBC
2. Ensure that the ' Save To Flash' field is set to Yes (default).
3. Click the Reset button; a confirmation message box appears, requesting you to
confirm.
4. Click OK to confirm device reset.

Configuration Note A. Configuring SBC to Send 414 Request - URI Too Long
Version 7.2 77 AudioCodes Mediant E-SBC
A Configuring SBC to Send 414
Request - URI Too Long
The procedure below describes how to configure the SBC to send a 414 Request-URI Too
Long response, when it encounters a Request URI it cannot handle due to excessive
length.
When the SBC receives an INVITE with a long Request URI (a condition rule), it routes it to
an unknown destination IP address (i.e., 1.1.1.1). It sets a variable for this call to 1. After a
timeout, the SBC generates an internal 408 Request Timeout response. Using message
manipulation, the SBC converts this response to a 414 Request-URI Too Long response
(only if the variable value is 1).
To configure a condition for this route:
1. Open the Message Manipulations page (Setup menu > Signaling & Media tab >
Message Manipulation folder > Message Conditions).
2. Click the New tab and configure the parameters as follows:
Parameter Example Setting
Index
0
Name
R-URI Too Long
Condition
header.request-uri.url.host.name len>'100' (You can
choose the length of the Request-URI to process)
Figure A-1: Configuring a Condition for the Route
3. Click Apply.

AudioCodes Mediant E-SBC 78 Document #: LTRT-54030
Microsoft Skype for Business & ITSP SIP Trunk
To configure IP-to-IP routing route:
1. Open the IP-to-IP Routing table (Setup menu > Signaling & Media tab > SBC folder
> Routing > IP-to-IP Routing).
2. Add a rule to route long-URI calls to unknown IP address:
a. Click Insert (This rule should be the first rule in the table).
b. Configure the parameters like this:
Parameter Example Setting
Index
0 (This rule should be the first rule in the table)
Message Condition
R-URI Too Long (The condition configured above)
Destination Type
Dest Address
Destination Address
1.1.1.1 (fake IP address)
Figure A-2: IP-to-IP Routing Rule for Long-URI Calls
c. Click Apply.

Configuration Note A. Configuring SBC to Send 414 Request - URI Too Long
Version 7.2 79 AudioCodes Mediant E-SBC
To configure a message manipulation rule:
1. Open the Message Manipulations page (Setup menu > Signaling & Media tab >
Message Manipulation folder > Message Manipulations).
2. Configure a new manipulation rule (Manipulation Set 1) to set a variable to 1 in the
case of a long-URI call:
a. Click New.
b. Configure the parameters as follows:
Parameter Example Setting
Index
0
Name
Long URI
Manipulation Set ID
1
Message Type
invite.request
Condition
header.request-uri.url.host.name len>'100'
Action Subject
var.call.src.0
Action Type
Modify
Action Value
1
Figure A-3: Manipulation Rule to Set a Variable to '1' in Case of Long-URI Call
c. Click Apply.

AudioCodes Mediant E-SBC 80 Document #: LTRT-54030
Microsoft Skype for Business & ITSP SIP Trunk
3. Configure a new manipulation rule (Manipulation Set 2) to convert ‘408’ response to
‘414’:
a. Click New.
b. Configure the parameters as follows:
Parameter Example Setting
Index
1
Name
Long URI
Manipulation Set ID
2
Message Type
invite.response.408
Condition
var.call.src.0 == '1'
Action Subject
header.request-uri.methodtype
Action Type
Modify
Action Value
'414'
Figure A-4: Manipulation Rule to Convert ‘408’ to ‘414’
c. Click Apply.

Configuration Note A. Configuring SBC to Send 414 Request - URI Too Long
Version 7.2 81 AudioCodes Mediant E-SBC
4. Assign Manipulation Set IDs 1 and 2 to the Skype for Business 2015 IP Group:
a. Open the IP Groups table (Setup menu > Signaling & Media tab > Core
Entities folder > IP Groups).
b. Select the row of the Skype for Business 2015 IP Group, and then click Edit.
c. Set the 'Inbound Message Manipulation Set' field to 1.
d. Set the 'Outbound Message Manipulation Set' field to 2.
Figure A-5: Assigning Manipulation Set to the Skype for Business 2015 IP Group
e. Click Apply.

AudioCodes Mediant E-SBC 82 Document #: LTRT-54030
Microsoft Skype for Business & ITSP SIP Trunk
This page is intentionally left blank.

Configuration Note B. Configuring SBC to Send 503 Instead 500 Toward Skype for Business
Version 7.2 83 AudioCodes Mediant E-SBC
B Configuring SBC to Send 503 Instead 500
Toward Skype for Business
The procedure below describes how to configure the SBC to send a 503 Service
Unavailable instead of 500 Server Internal Error response toward Skype for Business,
when the routed IP Group is down or no route is available.
When the SBC receives an INVITE from Skype for Business and determines that no route
is available (IP Group is down), the usual behavior is to send 500 Server Internal Error
response to the Skype for Business. However, if there is alternative trunk configured in the
Skype for Business, it will re-route only by receiving 503 Service Unavailable response. In
order to overcome this problem two message manipulation rules are inserted.
To configure SIP message manipulation rule:
1. Open the Message Manipulations page (Setup menu > Signaling & Media tab >
Message Manipulation folder > Message Manipulations).
2. Configure a new manipulation rule (Manipulation Set 2). This rule applies to reply
messages sent to the Skype for Business IP Group in cases where the destination
route is not reachable.
Parameter Value
Index
0
Name
Change 500 to 503
Manipulation Set ID
2
Message Type
invite.response.500
Condition
header.request-uri.methodtype=='500'
Action Subject
header.request-uri.methodtype
Action Type
Modify
Action Value
‘503’
Figure B-1: Configuring SIP Message Manipulation Rule

AudioCodes Mediant E-SBC 84 Document #: LTRT-54030
Microsoft Skype for Business & ITSP SIP Trunk
3. Configure another manipulation rule (Manipulation Set 2). This rule applies to reply
messages sent to the Skype for Business IP Group in cases where the destination
route is not reachable.
Parameter Value
Index
1
Name
Change 500 to 503 Reason
Manipulation Set ID
2
Row Role
Use Previous Condition
Action Subject
header.reason
Action Type
Modify
Action Value
'SIP ;cause=503 ;text=”SIP Trunk Is Down”’
Figure B-2: Configuring SIP Message Manipulation Rule

Configuration Note B. Configuring SBC to Send 503 Instead 500 Toward Skype for Business
Version 7.2 85 AudioCodes Mediant E-SBC
This page is intentionally left blank.

International Headquarters
AudioCodes Inc.
1 Hayarden Street, 27 World’s Fair Drive,
Airport City Somerset, NJ 08873
Lod 7019900, Israel Tel: +1-732-469-0880
Tel: +972-3-976-4000 Fax: +1-732-469-2298
Fax: +972-3-976-4040
Contact us: www.audiocodes.com/info
Website: www.audiocodes.com
Document #: LTRT-54030
