

User Guide 2
Table of Contents
1 User guide overview 7
1.1 Navigation 7
1.1.1 Logging in 7
1.1.2 Tab navigation 7
1.1.3 All tabs menu 10
1.1.4 Tab strip 11
1.1.5 User options 13
1.1.6 Resetting your password 18
1.1.7 Favorites 19
1.1.8 Quick nav 21
1.2 Logging into RelativityOne 22
1.2.1 Logging in to RelativityOne with a password 22
1.2.2 Password 23
1.2.3 Two-factor authentication 23
1.2.4 OpenID Connect 25
1.2.5 SAML 2.0 26
1.2.6 Creating or resetting a password 26
1.3 SSO Troubleshooting console 27
1.3.1 Considerations 27
1.3.2 Viewing the SSO Troubleshooting console 27
2 Markups 29
2.1 Highlights 29
2.1.1 Creating highlights 29
2.2 Redactions 29
2.2.1 Creating basic redactions 29
2.2.2 Creating inverse redactions 30
2.2.3 Creating full-page redactions 31
2.2.4 Creating mass redactions 31
2.3 Editing markups 32
2.4 Deleting markups 33

User Guide 3
2.4.1 Working with overlapping markups 33
2.4.2 Working with markups outside of page boundaries 34
2.4.3 Editing redaction text with a markup set 35
2.4.4 Editing redaction text 36
2.4.5 Editing font size in text box redactions 36
2.5 Mass deleting markups 36
2.6 Controlling markup visibility 37
2.7 Viewing markup history 37
2.8 Using the Markup Navigation pane 37
3 Persistent highlight sets 39
3.1 Getting started with persistent highlight sets 39
3.1.1 Showing and hiding persistent highlight sets in the Viewer 40
3.1.2 Navigating highlighted terms in the Viewer 43
3.1.3 Persistent highlight set behavior across Viewers 44
3.1.4 Persistent highlight behavior 45
3.2 Creating persistent highlight sets 46
3.2.1 Fields 47
3.3 Entering highlight terms 48
3.3.1 Color-coding persistent highlights 48
3.3.2 Guidelines for adding terms or phrases 50
3.4 Using the highlight fields source 50
3.4.1 Best practices 53
3.5 Importing search terms for persistent highlighting 54
3.5.1 Relativity component setup 54
3.5.2 Importing terms 55
3.6 Creating efficient searches for persistent highlighting 57
3.6.1 Using terms search 57
3.6.2 Using highlight fields 58
4 Search terms reports 61
4.1 Guidelines for using search terms reports 61
4.2 Creating a search terms report 62
4.2.1 Fields 62

User Guide 4
4.2.2 Adding terms and highlight colors 66
4.2.3 Editing terms and highlight colors 66
4.2.4 Deleting terms 67
4.2.5 Copying a search terms report 67
4.3 Running a search terms report 67
4.3.1 Search terms reports status 69
4.3.2 Managing errors 69
4.4 Accessing tagged documents using the Field Tree browser 71
4.5 Using tagged search terms in a saved search 72
4.6 Permissions 74
5 Searching overview 76
5.1 Filters 76
5.2 Keyword searches 76
5.3 Saved searches 76
5.4 dtSearches 76
5.5 Analytics 76
5.6 Regular expressions 77
5.7 Additional features 77
5.8 Search conditions 77
5.8.1 Setting up search conditions 78
5.8.2 Canceling queries 79
5.8.3 Frequently asked searching questions 80
6 Tabs 82
6.1 Creating and editing tabs 82
6.2 Fields 82
6.2.1 Tab Information 83
6.2.2 Tab Location 84
6.3 Nesting children tabs 85
7 Viewer 86
7.1 Native Viewer 87
7.1.1 Navigating the Native Viewer 89
7.1.2 Copying text in the Viewer 95

User Guide 5
7.1.3 Streaming audio and video files 95
7.1.4 Document Intelligence 98
7.2 Image Viewer 101
7.2.1 Navigating the Image Viewer 101
7.2.2 Saving an image as a PDF 106
7.3 Extracted Text Viewer 106
7.4 Productions Viewer 111
7.4.1 Navigating the Productions Viewer 111
7.4.2 Imaging on the fly 114
7.5 PDF Viewer 115
7.6 Document actions menu 119
7.7 Viewer settings menu 122
7.8 Pop Out Viewer 123
7.8.1 Standalone Viewer 125
7.8.2 Document preview panel 126
7.9 Related items card 127
7.10 Document and Production History card 129
7.11 Documents card 130
7.11.1 Email thread visualization tool 131
7.12 .eml and .msg header dates and times in the Viewer 131
7.13 Thumbnail Viewer 132
7.14 Document compare 132
7.15 Viewer-supported file types 134
7.15.1 Text only designation 135
7.15.2 File IDonly designation 135
7.15.3 Supported File ID-only file types 135
7.15.4 Supported Text-only file types 136
7.15.5 Supported File types 137
7.15.6 Viewer audio and video-supported file types 149
7.15.7 Troubleshooting errors 150
7.15.8 Supported audio file types 150
7.15.9 Supported video file types 151

User Guide 6
8 Workspaces 154
8.1 Viewing workspace details 155
8.2 Migrating and retrieving workspaces to and from cold storage 155
8.2.1 Migrate workspaces to cold storage 155
8.2.2 Retrieve workspaces from Cold Storage 157
8.3 Workspace admin group 159
8.4 Document and item list navigation 159
8.4.1 Browsers panel 159
8.4.2 View bar 163
8.4.3 Document Preview panel 164
8.4.4 Item list 166

User Guide 7
1 User guide overview
When working with Relativity as a reviewer, it's important to familiarize yourself with the software's many
features.
This guide outlines Relativity’s capabilities and walks you through how you can best use Relativity for
document review, from logging in to creating a word index inside a workspace.
1.1 Navigation
Relativity is an application with many screens and functions. This section describes the Review Interface
you use to review documents and some of the standard procedures you'll need to perform as you use the
product.
1.1.1 Logging in
Relativity offers several ways to log in and it's possible to have two or more methods available to you. Your
system admin will provide you with all the information you need to log on. Contact your system admin if you
have additional questions.
For procedures to log in, see Logging in to Relativity.
1.1.2 Tab navigation
When you log in to Relativity, you see tabs displayed in the sidebar on the left side of the page. You may
also be able to access tabs using the tab strip, which runs horizontally across the top of the page. The
sidebar and tab strip display the currently available tabs whether you are on the instance or workspace-
level. The active tab in the sidebar is indicated by the tab icon displaying in orange and in the tab strip, the
active tab is indicated by an orange line displaying under the name.
The tabs are arranged based on the order value for each tab.
You can navigate tabs using the following features.
1.1.2.1 Sidebar
The sidebar allows you to place tabs that you commonly use on the left-side of Relativity so that you can
access them at your convenience.

User Guide 8
Tabs are ordered from top to bottom of the sidebar based on the value entered in Order. The lowest order
value displays at the top and the highest value displays at the bottom.
The total number of tabs that display in the sidebar is determined by the resolution of your browser. Tabs
that have been assigned to the sidebar and do not fit, are available by hovering your cursor over the More
icon. If a tab has one or more child tabs, you can view and select those tabs by hovering over the parent
tab's row in the fly-out menu.
User Guide 9
The More icon will display with an orange bar on the right side More to indicate that the active tab is located
in the More menu.
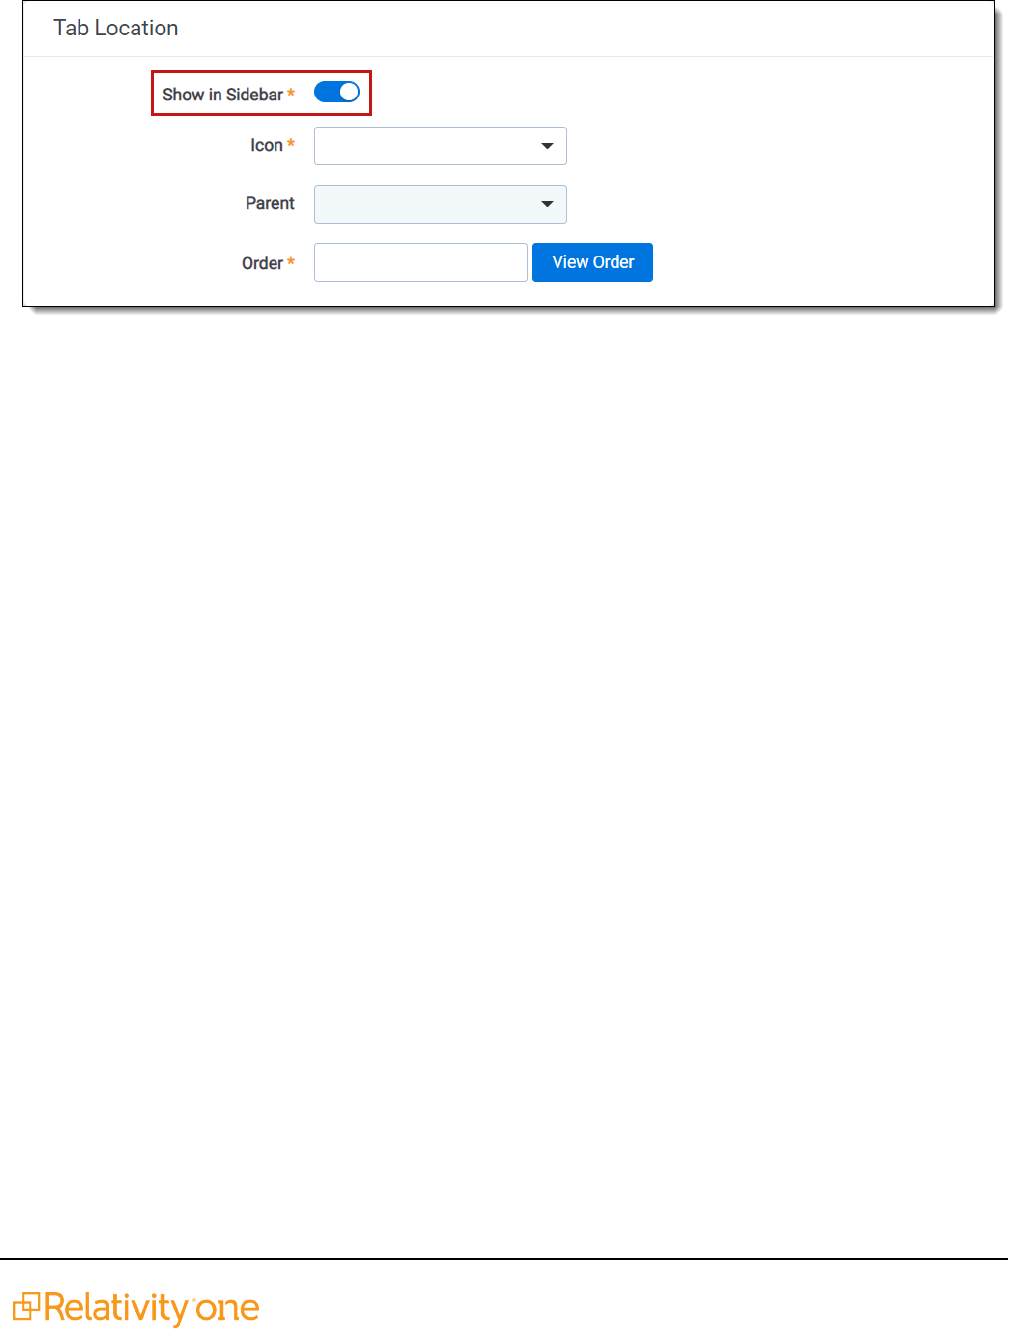
To add a new or pre-existing tab to the sidebar, toggle the Show in Sidebar on and click Save.
Tabs can display in the sidebar with their name and icon. Alternatively, to reduce the width of the sidebar
and increase the number of icons that can display, you can click the collapse arrow icon to only display the
icon for each tab.

User Guide 10
1.1.3 All tabs menu
Click the icon at the bottom of the sidebar to display the All tabs menu. Every child tab that a user can
view, as determined by their permissions, will display in the menu in alphabetic order. This menu does not
display parent tabs.

User Guide 11
1.1.4 Tab strip
If you select a tab that either has child tabs or is a child tab to a parent tab, the tab strip will display
horizontally across the top of Relativity. If a tab in the tab strip has one or more children tabs, hover your
cursor over it to view and select the desired tab. Depending on the size of your browser, there may be more
tabs than can display in the tab strip. You can hover your cursor over More in the tab strip to view additional
tabs in a fly-out menu.

User Guide 12
1.1.4.1 Parent and child tab display
Parent tabs can be displayed in the sidebar or the tab strip. Tabs that have child tabs in the tab strip will
display with an arrow on the right side.
To view the child tabs of a parent tab in the sidebar or tab strip, hover your cursor over the parent tab and
the child tabs will display in a fly-out menu.

User Guide 13
When you select a child tab from the sidebar or the tab strip, you are taken to that page. For example,
Production Sets. In addition to an orange bar displaying underneath the parent tab in the sidebar, the child
tab and the path to reach the active tab is highlighted in blue to help you track your location in the sidebar or
the tab strip.
Instead of clicking the drop-down arrow, you can also click the parent tab itself. Clicking the parent tab takes
you to the default child tab, which is identified by the order setting for each child tab.
1.1.5 User options
When you first log in to Relativity, you see the default Home tab. Relativity displays the Workspaces tab as
your default Home tab when you navigate to Home. You can change the default Home tab to be any tab you
want.
You can click your avatar in the upper-right corner to see the user drop-down menu. The avatar contains the
initials of your first and last name
1.1.5.1 Changing the default Home tab
Relativity displays the Workspaces tab as your default Home tab when you navigate to Home. You can
change the default Home tab to be any tab that is available for default and that is not a specific tab within a
workspace.
Perform the following steps to change the default Home tab:

User Guide 14
1. Navigate to the Tabs tab.
2. Click on the tab you want to set as the default Home tab.
3.
Click the in the row of the tab you wish to edit.
4. Toggle the Set as Default Tab field on.
5. Click Save.
Note: If a user is not a member of a group with permission to view the tab set as the default Home tab,
Relativity redirects to the lowest ordered tab the user's permissions allow.
1.1.5.2 My settings
Clicking My Settings from within the user drop-down menu opens a settings mode pop-up, which displays
your user information. Click Edit to change your settings.
n
First name—your first name.
n
Last name—your last name.
Note: Your first and last name appear as your username throughout Relativity.
n
Email address—your email address and login.
n
Skip Default Preference—when reviewing documents, skip prevents a reviewer seeing documents
that are already coded, depending on the selected view. Choose one of the following options:
o
Normal—this setting disables the skip feature.
o
Skip—this setting turns on the skip feature.
n
Default Filter Visibility—determines whether or not the filters for columns in views display by
default.
o
Hidden—hides filters by default.
o
Visible—displays filters by default.
n
Item list page length—a numeric field indicating the default list length for all lists in Relativity. It can
be set from 1-200.

User Guide 15
n
Default Selected File Type—the default viewer mode used when first loading the Viewer. Viewer,
Native, Image, Long Text, or Production. If the mode selected is not available, the Viewer will instead
use the first available option. See Viewer on page86 for details.
n
Default Saved SearchOwner—determines whether saved searches are public or private by
default. If set to Public, the search is public and all users with rights to it can see it. If set to Logged in
User, the search is private and only the logged in user is able to see it.
Note: Depending on your permissions, you may not have rights to edit the Default Saved
SearchOwner field.
n
Native Viewer Cache Ahead—if checked, this field pre-loads the next native document in your
review queue when the active document is loaded.
n
User-Group Email Notifications—user's preference for email notifications when adding or deleting
Users or Groups.
o
All Emails—receive all email notifications.
o
No Emails—receive no email notifications.
o
Only Failed Operations—receive email notifications on failed operations only.
Note: Depending on your permissions, you may not have rights to edit the User-Group Email
Notifications field.
After changing your settings as needed, click Save.
1.1.5.3 Dashboards
When you've created a page configuration you'd like to preserve, you can create a customized dashboard.
You can save multiple dashboards to quickly change the page configuration. The item list and any widgets
on the dashboard will update automatically in response to filtering or searching. Dashboards only report on
data within the workspace you are in.
Note: For a list of dashboards that provide an effective starting point for administrators to help review
teams visualize their data set, see Common commonly-used dashboards in the Admin Guide.

User Guide 16
The page initially appears with the folder browser on the top left, the search panel on the bottom left and the
item list to the right. Within this new framework, you have multiple options for customizing your display.
You can resize, move, or collapse any panel on the page, including any widgets you create.
n
To resize any panel, hover over the line separating the item list from the panel until you see the
mouse pointer change to horizontal arrows, then click and drag.
n
To move, hover over the top of the panel until you see the icon. Then, click and drag the panel to
the new location.
n
To collapse the search panel or browser pane, click the icon. Once collapsed, click the icon to
restore the browser pane or the icon to restore the search panel.
Additionally, you can drag and drop panels to rearrange on the page. Click any panel and drag it to a new
location. The other panels will automatically move to accommodate the panel you're dropping.
Dashboards and widgets can be copied over to newly created workspaces if they are part of a template.
Dashboards only report on data within the workspace you are in if data is loaded in the workspace.
Note: You must have the correct workspace permissions to add, edit, or save a dashboard and to save
pivot widgets to your dashboard.
You can also export individual Pivot widgets to Excel or to PNGformat from each widget's context menu.
See Exporting a Pivot widget in the Admin Guide for more information.

User Guide 17
Note: To enable the Add Widgets button and Pivot functionality for an Relativity Dynamic Object (RDO),
you must select Enabled for the Pivot property in the Object Type Information section for the object.
Creating a dashboard
To create a dashboard:
1. Click the Dashboards drop-down menu in the top right corner of the screen.
Note: You can only access the drop-down if Pivot is Enabled for the given object type.
2. Click New Dashboard to save the current page configuration as a new dashboard.
3. Enter a name and an order number for the dashboard.
Note: The dashboard with the lowest order number will appear by default when you log in to Relativity.
Adding widgets to a dashboard
You can add the following widgets to customize your dashboard:
n
Pivot charts and tables—you can use Pivot to summarize data in tables or charts to visually ana-
lyze trends in your data.
n
Cluster visualizations—on the Documents tab, you can use Relativity Cluster Visualization to
render your cluster data as an interactive visual map by adding a Cluster Visualization widget. This
offers you a quick overview of your document cluster sets and quickly drill into each cluster set to view
sub-clusters and conceptually-related clusters of documents. Please note that there may be only one
cluster visualization widget per dashboard.
n
Communication Analysis—after running the name normalization operation within structured ana-
lytics, you can use this widget to visualize communication frequencies, patterns, and networks
between the entities linked to the documents in the view.
Note: When you reach the maximum number of widgets allowed on a dashboard, the Add Widget button
will be grayed out and a tooltip displays when you hover over it that lets you know the reason you cannot
add any additional widgets to your dashboard. This is controlled by the MaxNumberDashboardWidgets
instance setting.
Saving changes to a dashboard
You can also make changes on the fly and save a dashboard with the changes. If a dashboard has not been
saved, an orange notification displays in the Dashboard drop-down menu until it is saved.
1. Click the Dashboards drop-down menu in the top right corner of the screen to display the list of dash-
boards available on the current tab.
2. Click Save to save the changes to the existing dashboard. Click Save As to save the page con-
figuration as a new dashboard, and then enter a Name and Order number.

User Guide 18
Note: If a dashboard is part of a locked application, the option to save the dashboard is unavailable.
Deleting a dashboard
To delete a dashboard from the current tab you are in, click the icon to the right of the dashboard you want
to delete in the Dashboards drop-down menu.
Click Delete in the Delete Dashboard Confirmation pop-up window to delete the dashboard.
Note: If a dashboard is part of a locked application, the option to delete the dashboard is unavailable.
Renaming a dashboard
To rename a dashboard:
1.
Click on the icon next to the name of the dashboard in the Dashboard drop-down menu.
2. Enter a Name and an Order number for the dashboard.The order number controls the order in which
the dashboard displays in the list.
3. Click Save to save your changes.
Note: If a dashboard is part of a locked application, the option to edit the dashboard is unavailable.
1.1.5.4 Using the search panel
While working in the Document list in the new UI framework, you can use the search panel to filter your data.
1.1.6 Resetting your password
There are two ways you can reset your password if your system admin has given you the appropriate
permissions. You can use the Reset Password option inside Relativity or the Forgot your password? link
on the Relativity login screen.
Note: If your password has expired, the Reset Password dialog appears automatically when you log in to
Relativity. Your system admin determines when your password expires and the number of previous
passwords that you cannot reuse.
1.1.6.1 Resetting your password inside Relativity
If you're already logged in to Relativity, you can reset your password by clicking Reset Password in the
Home drop-down menu. This directs you to a Reset Password pop-up dialog.
Enter your old password, then enter and retype your new password. Click Save.

User Guide 19
You can use your new password next time you log in to Relativity.
1.1.6.2 Resetting your password outside Relativity
If you cannot log in to Relativity because you've forgotten your password, perform the following steps to
reset your password.
1. Click Forgot your password? on the login screen.
2. Enter your email address in the pop-up dialog.
Relativity sends an email to the address you provide. You should receive this message within a few
minutes. If you do not receive an email, check your spam or junk mail folder.
3. Click the link in the email to reset your password. This link will be active for 15 minutes and expires
after that time. If the link has expired, or if you click the link more than once, you'll have to generate a
new password reset request.
4. The link directs you to a page where you can create a new password.
5. Enter a new password and retype it, then click Submit. After your password successfully resets,
you'll get a message prompting you to log in with your new password. An email will be sent to the
address you entered, notifying you that your password reset was successful.
1.1.7 Favorites
The Favorites menu contains all your bookmarks (Favorites) and the last 10 pages in your browsing history
(Recents). The Favorites menu can be accessed by clicking the icon in the upper-right part of the
page.

User Guide 20
Use Favorites to quickly navigate the Relativity application. If you visit a particular page on a regular basis,
minimize the number of clicks it takes to get there by adding the page as a favorite.
To mark a page as a favorite, click the star to the right of the breadcrumbs at the top of the page. The star
turns yellow and Relativity adds the page to the Favorites section. Relativity doesn't limit the number of
pages you can mark as a favorite.
Relativity records pages in the Recents section on each page load. That means that pop-up windows aren't
recorded as Recents.

User Guide 21
Note: If you're a system admin, you can turn off this feature by editing the RecentHistoryEnabled and
FavoritesEnabled instance setting values. You can also change the number of Recents the Favorites
menu displays by editing the RecentHistoryNumberOfItemsDisplays instance setting value.
1.1.8 Quick nav
Quick nav can be used to quickly search for and navigate to any workspace or tab in Relativity. To access
quick nav, click the Quick nav search box in the upper right corner of Relativity, or use the keyboard shortcut
Ctrl+/.
Note: Verify that the quick nav Ctrl+/ keyboard shortcut works on custom pages. Contact Customer
Support with any problems.
Open quick nav, and type the name of any tab or workspace.
Any tab or workspace that contains the character string within the name appears in the list of results.
Results appear after you type more than one character, and they refine with each character you type. The
results link you directly to the tab or workspace in Relativity.
Note: In Relativity terms, the search works the same as a leading and trailing wildcard search.
You can click on any result or use the up and down arrow keys to move through the results. Press Enter to
navigate to the selected item.
Your search remains until the page is refreshed or you navigate to a new tab. The Esc key also clears your
search from quick nav. If no text is entered in the quick nav search field, the Esc key closes quick nav. You
can also click anywhere outside the quick nav window to close it.
Quick nav displays three types of results in the following order:

User Guide 22
n
Workspace tabs—lists all workspace tabs that fit the search criteria and are available with your per-
mission settings.
Note: This item only appears when you are in a workspace.
n
Admin Tabs—lists all admin tabs that fit the search criteria and are available with your permission
settings.
n
Workspaces—lists all workspaces that fit the search criteria and are available with your permission
settings. Click the workspace to go to the default tab for that workspace.
Quick nav results only reflect items available with your permission settings.
Using quick nav
Imagine you're a system admin in a workspace within Relativity, and a user emails you with a
password reset request. You press Ctrl+/ and type the letters “use”. The results filter to only
contain Admin and Workspace tab names with the letters u-s-e.
The results display a Users tab in the Admin tabs section. You click the Users tab and find the
user who needs a password reset in the list. Once their password is reset, you use quick nav to
get back to the workspace you were previously working in.
The following list highlights more features of quick nav functionality.
n
Type the word "home" in quick nav to navigate to your default Home tab.
n
Quick nav is enabled or disabled with the QuickNavEnabled instance setting.
n
Quick nav is available to look up workspaces and admin tabs from Home for groups assigned the Use
Quick Nav admin permission, and it is available to look up tabs in a workspace for groups assigned
the Use Quick Nav workspace permission.
n
The maximum number of returned quick nav search results is limited to any number between 2-50,
but the default is 20.
n
The maximum number of searchable characters is 50.
1.2 Logging into RelativityOne
RelativityOne offers several ways to log in and it is possible to have two or more methods available to you.
As a RelativityOne user, your RelativityOne admin provides you with all the information you need to log in.
Note: For help with single sign-on errors, please see the SSO Troubleshooting console on page27.
1.2.1 Logging in to RelativityOne with a password
1. Enter your Username.
2. Click Continue.
3. Enter your password.
4. Click Login.

User Guide 23
Note: The Forgot your password?link only displays if the admin enables Allow Password Recovery via
Email setting, for more information see the Authentication Guide.
1.2.2 Password
This method uses only a username and a password. Your RelativityOne admin provides you with the
following:
n
Login email address.
n
Password request email.
Prior to logging in, if you have not already, create your password. See Creating or resetting a password on
page26.
To log in:
1. Navigate to the RelativityOne site.
2. Log in with your password. See Logging in to RelativityOne with a password on the previous page
1.2.3 Two-factor authentication
The two-factor authentication method requires a passcode in addition to the username and password. The
system emails you the passcode during login and is different each time. Your RelativityOne admin provides
you with the following:
n
Login email address.
n
Password request email.
Prior to logging in, if you have not already, create your password. See Creating or resetting a password on
page26.
Prior to logging in, if you have not already, download the required two-factor authentication app. When using
the authenticator app for the first time, Relativity will need to connect your profile to the app.
To connect your authentication app,
1. Enter your username.
2. Enter your password.

User Guide 24
3. On the Two-Step Verification Required step, click Continue.
4. Open your authenticator app on your device.
5. In your app, tap the button to add a new account.
6. Hold phone up and scan the QR code provided by Relativity.
If you are unable to scan the QRcode, click the Can't scan QRcode?link below the QRcode. Once
clicked, a code will appear. Enter the code into your authenticator app on your phone. Once entered
into the authenticator app, you can continue to the next step.
7. Click Next.
8. Re-enter your email and password.
9. Enter the authentication code in the app.
10. Click Next.
11. Click Done.

User Guide 25
To log in with an authenticator app method:
1. Navigate to the RelativityOne site.
2. Log in with your password.
3. Follow the instructions on the app or enter the authentication code from the authentication app.
4. Click Next.
To log in with the Relativity email method:
1. Navigate to the RelativityOne site.
2. Log in with your password. An Authenticate Login dialog appears. The system immediately emails
you a passcode, and the passcode will be different each time.
3. Enter that value in Passcode.
4. Click Login.
1.2.4 OpenID Connect
This method requires you to have an OpenIDConnect account. Your RelativityOne provides you with the
following:
n
OpenIDConnect account username from the identify provider's side.
n
Relativity OpenIDConnect button name on the login page.
To log in:
1. Navigate to the RelativityOne site.
2. Click the Relativity OpenIDConnect button name.
3. Enter your username.
4. Click Logon.
5. Authenticate with your OpenIDprovider.

User Guide 26
1.2.5 SAML 2.0
This method requires you to have an account with SAML 2.0 authentication provider set up by your
RelativityOne admin. Your admin provides you with a Relativity account with a SAML2.0 login method.
To log in:
1. Log into the SAML 2.0 provider system.
2. Navigate to the RelativityRelativityOne instance using a shortcut in the SAML 2.0 provider interface
or a bookmark in your browser. You are automatically logged in.
1.2.6 Creating or resetting a password
Use this procedure if you are logging in to RelativityOne for the first time or if you are resetting your
password. Your system admin must send you a password reset email. If you forget your password, you can
click the Forgot your password link on the logon screen if it is available, or contact your RelativityOne
admin. In either case, the system sends you a new password email.
Note: If you are a system admin, the Password Reset Email will not be sent to you. For more information,
see the Authentication Guide.
1. Within the password request email, click Reset Password or enter the full URL into your browser.
2. Enter a password following the restrictions listed on the screen. You must remember this password to
log in. The link within the email is valid for 15 minutes, and you can only use the most recent email.
Although, once the password is set, you do not have to log in immediately.
Note: The following non-alpha-numeric characters are not allowed: \, ", <, >, £in passwords.

User Guide 27
3. Click Submit.
4. Click Return to RelativityOne.
1.3 SSO Troubleshooting console
The SSO Troubleshooting console eliminates the need for third-party tools when gathering essential
information for troubleshooting error messages. It offers administrators actionable error messages to help
them address configuration issues.
1.3.1 Considerations
n
This console should not be utilized for auditing purposes.
n
You must have the Edit permission on the Authentication Provider object to view the console.>
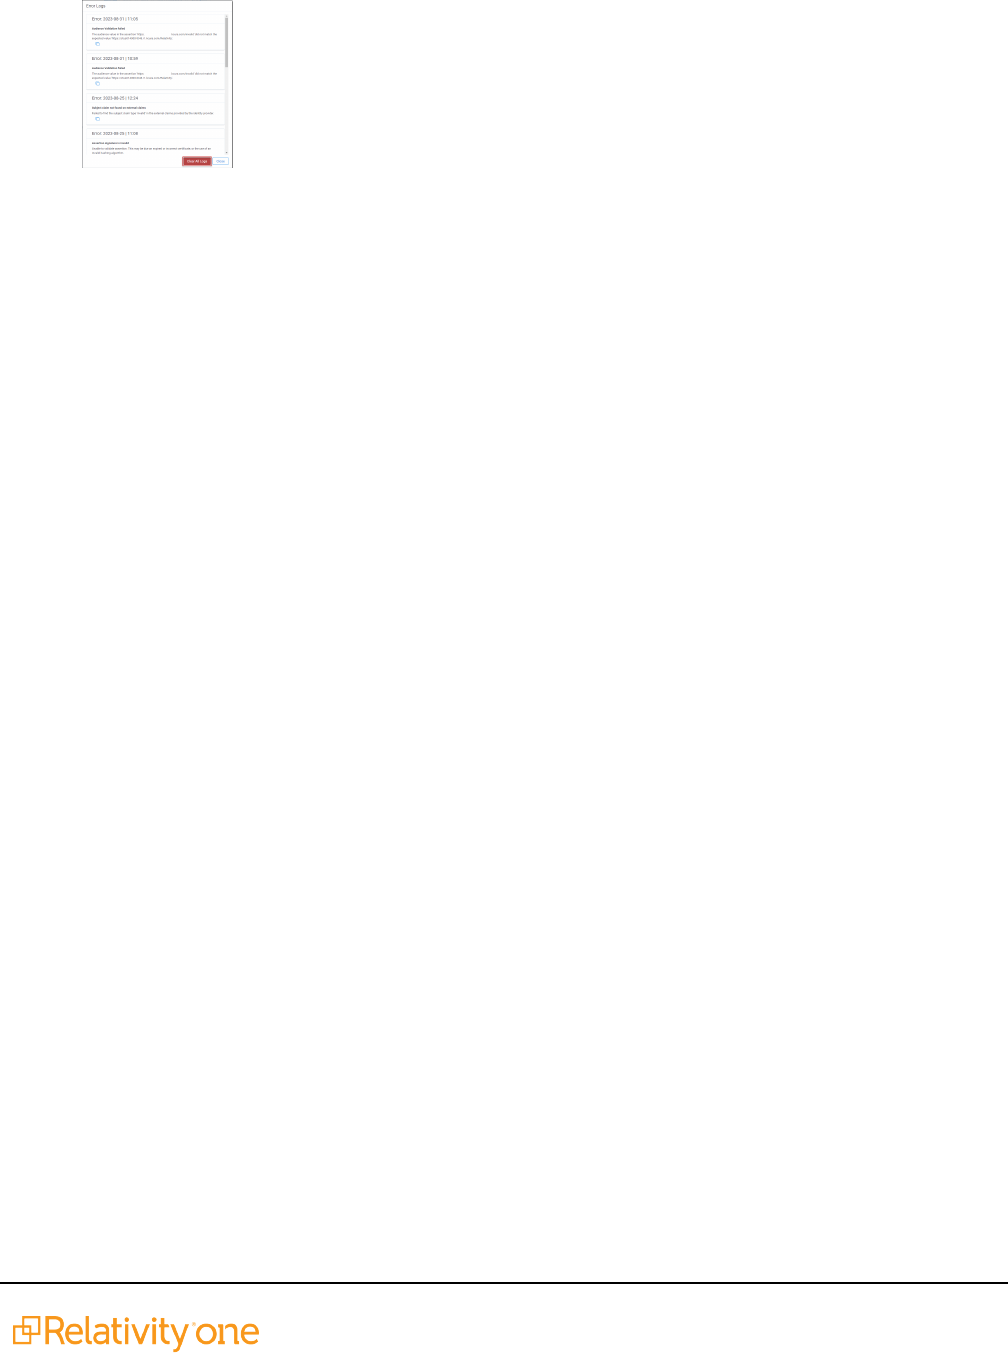
n
The error log will only show the 10 most recent error messages.
1.3.2 Viewing the SSO Troubleshooting console
To view and manage the errors in the console:
1. Navigate and select your authentication provider
2.
Click on the Errors Log button.
User Guide 28
3. Review the errors and make the necessary updates to resolve the issue.
4. Once the errors have been resolved, clear the error log.
See this related pages:

User Guide 29
2 Markups
Markups in Relativity refer to highlights and redactions. You can add markups to documents that contain an
image using the Image Viewer. When you open a document in the Native Viewer that has not been imaged,
select Image on the Fly from the Document actions menu to image the document which can then be
opened in the Image Viewer.
Note: If two people edit a markup at the same time, an error occurs.
2.1 Highlights
When you create a highlight, a colored box appears in the area you select, just like using a highlighter.
2.1.1 Creating highlights
To create a highlight:
1.
Click .
Blue is the default color. Click the drop-down menu to select a different color.
2. Draw the highlight across the sections of text you want to highlight.
When you create a highlight, it appears in the Markup Navigation Pane. See Using the Markup Navigation
pane on page37.
2.2 Redactions
A redaction hides text on a page. In Relativity, you can create several different types of redactions:
n
Creating basic redactions below
n
Creating inverse redactions on the next page
n
Creating full-page redactions on page31
n
Creating mass redactions on page31
When you create a redaction, it appears in the Markup Navigation Pane. See Using the Markup Navigation
pane on page37.
2.2.1 Creating basic redactions
To apply a basic redaction to a document:
1.
Click .
The black redaction tool is the default. Click the drop-down menu to select a different tool. You can
select from the following:
n
Black Redaction—creates a solid black box, like using a black marker. While you draw the
box, a gray translucent fill appears.

User Guide 30
n
Cross Redaction—creates a white redaction box black border and a black X from corner to
corner.
n
Text Redaction—creates a white redaction box with black text. The text will fill the box by
default. To change the font size, keep the redaction box selected and click , and
then select a new font size from the drop-down menu. You can right-click a text box redaction
to apply different text. See Editing redaction text on page36. The system admin determines
which text options are available.
n
White Redaction—creates a solid white box with a gray border. The gray border does not
print or produce.
2. Draw the redaction boxes across the sections of the page you want to redact. You can draw in any dir-
ection.
2.2.2 Creating inverse redactions
An inverse redaction creates a black redaction across the full page except on the locations where you draw
boxes. To create an inverse redaction, perform the following steps:
1.
Click the Redaction Mode icon and select Inverse Redact from the drop-down menu.
2. Draw the inverse redaction boxes across the sections of the page you do not want to redact.
A blue cast indicates where you will add the black redaction, and the white box indicates the area that
is not redacted. You can move or re-size the white box using the controls. You can also highlight text
that is not redacted.

User Guide 31
2.2.3 Creating full-page redactions
A full-page redaction creates a redaction across the entire page. To apply a full-page redaction, click the
Redaction Mode icon and select Full-Page Redact from the drop-down menu. The black full page
redaction tool is the default. Click the Redaction Type drop-down menu to select a different tool. You can
select from the following:
n
Black Redaction—creates a solid black box, like using a black marker.
n
Cross Redaction—creates a white redaction box with a black border and a black X from corner to
corner.
n
Text Redaction—creates a white redaction box with black text. You can right-click a text box
redaction to apply different text. See Editing redaction text on page36. The system admin determines
which text options are available.
n
White Redaction—creates a solid white box with a gray border. The gray border will not be printed or
produced.
You can also create a keyboard shortcut to apply a full-page redaction. See Creating keyboard shortcuts in
the Admin guide.
After you apply a full-page redaction, you can resize it to make it smaller than the full page and then work
with it like a normal redaction. Additionally, you can create new redactions on top of a full-page redaction if
desired.
2.2.4 Creating mass redactions
You can use the mass redact option to apply full-page redactions of any type to a set of pages in your
document. To apply mass redactions:
1.
Click the Redaction Mode icon and select Mass Redact from the drop-down menu.
The Mass Redact Options pop-up appears.

User Guide 32
2. Select the type of redaction to apply. You can select from the following:
n
Black—creates a solid black box, like using a black marker.
n
Cross—creates a white redaction box with a black border and a black X from corner to corner.
n
Text—creates a white redaction box with black text. In the Text Options section, you can select
the font size and text to apply to the redactions. To apply custom text, select <Enter
CustomText> from the Text drop-down menu, then enter the text in the Text field.
n
White—creates a solid white box with a gray border. The gray border will not print or produce.
3. Specify a range of images to apply the redaction to. Select Pages and enter a set of pages or select
All pages in document to apply the full-page redactions to the entire document.
4. Click OK. The redactions apply to the set of pages you specify.
2.3 Editing markups
To re-size a single markup,
1.
Click inside the markup shape.
Blue dot controls appear on the corners and edges of the markup.
2.
Select any control and drag to re-size the markup.
3.
Optionally, you can also re-size markups using the arrow keys.
n
To re-size a markup in a larger increment, press Shift + the arrow key on your keyboard that
points in the direction you would like to expand the markup.
n
To re-size a markup in a smaller increment, press Ctrl + Shift + the arrow key on your
keyboard that points in the direction you would like to expand the markup.
You can move markups individually or as a set. To select multiple markups on a page,

User Guide 33
click the selector tool and drag across the markups. Alternatively, press Shift or Ctrl and click to select
individual markups, or click Ctrl +A to select all markups on an image. Controls appear on the corners and
edges of all selected markups.
To move, click and drag the selected markups to a new location. You can also move selected markups
using the arrow keys. To move a markup in a larger increment, press the arrow key on your keyboard that
points in the direction you would like to move the markup. To move a markup in a smaller increment, press
Ctrl + the arrow key on your keyboard that points in the direction you would like to move the markup.
2.4 Deleting markups
You can delete markups individually or as a set. To delete a single markup, right-click a markup and click
Delete. You can also press the Delete key with a markup selected and click Yes on the Confirm Delete pop-
up. For Mac users, press Fn + Delete.
To delete multiple markups:
1.
You can use any of the following methods to select markups for deletion:
n
Left-click and drag the selection box over the markups you wish to delete.
n
Hold down on Ctrl on your keyboard, and left-click on each markup you wish to delete.
n
Right-click on a markup after selecting any other markups you would like to delete.
2.
Select Delete from the right-click menu.
The Delete Markups modal displays.
3.
Verify that you wish to delete the number of markups displayed in the modal and click the Delete X
Markups button.
The selected markups are deleted.
Note: If you have a full-page redaction applied to an image, then you apply an additional full-page
redaction, the most recently applied full-page redaction appears on top. If you then delete the second
redaction, the first full-page redaction persists.
2.4.1 Working with overlapping markups
If you have multiple markups on a page that overlap each other, when you hover over the markups,
translucent controls appear. Click the markup you want to work with, and the controls become active to
indicate which markup is active. In the following example, the black box redaction is active.

User Guide 34
2.4.2 Working with markups outside of page boundaries
If you have markups that exist outside the boundaries of an image, such as those created by custom
applications, they will render in their currently saved coordinates in the Viewer. Interacting with the markup
by attempting to move or select it will move the markup within the page boundaries. This change is saved
and audited in the workspace.

User Guide 35
2.4.3 Editing redaction text with a markup set
When you create a text redaction, it will display the most recent word or phrase you entered while editing a
redaction. If you have never edited or created a text redaction before, it will display Redacted instead.
To perform this task you need the permissions for the markup sets object as well as the individual markup
set you wish to use.
To edit the text in a text box redaction using the default text for a markup set:
1. Choose the desired markup set from the drop-down list in the bottom-left corner of the Viewer.
2. Right-click the redaction and select the default redaction text from the markup set.
The new text appears in the redaction.

User Guide 36
2.4.4 Editing redaction text
To edit the text in a text box redaction, perform the following steps:
1. Right-click the redaction and select Edit.
The Edit RedactionText pop-up opens.
2. Enter the new redaction text in the field and click Edit Redaction.
The new text appears in the redaction. Any new redactions you create will display the same text until
you edit a redaction or use the default Redacted option.
2.4.5 Editing font size in text box redactions
The font size for text box redactions defaults to fill the entire text box. To edit the font size, perform the
following steps:
1. Select the text box redactions.
You can press Ctrl or Shift and click to select multiple text box redactions.
2. Click the Font Size drop-down menu and select a font size.
The font size applies to the text in all selected text box redactions.
When you create a new text box redaction, the last selected font size automatically applies to the text.
2.5 Mass deleting markups
You can mass delete markups from a single page, from a range of pages, or from your entire document at
once using the delete redactions and highlights option. To mass delete markups:
1.
Click .
The Mass Delete Markup pop-up appears.

User Guide 37
2. Select the markup types you want to delete. You can select Non full-page redactions, Full-page
redactions, Highlights, or any combination of these.
3. Select the range of pages from which to delete the selected markups. You can select Current page,
Pages, enter a set of pages, or All pages in document.
4. Click Delete Markups. The selected markup types are deleted from the range of pages you selected.
2.6 Controlling markup visibility
You can toggle redaction visibility between visible, transparent, and invisible. Use the Change Markup
Visibility button to change the setting.
n
Click once to set the markups to transparent.
n
Click a second time to set the markups to invisible. The redactions are not deleted, just temporarily
hidden.
n
Click a third time to return the markups to full visibility.
2.7 Viewing markup history
To view the history of any highlight or redaction, right-click it and select Show Markup History. The Markup
Information pop-up appears with information identifying each action, the user who performed the action, and
the date and time at which the user performed the action .
2.8 Using the Markup Navigation pane
In the viewer, you can locate markups in a document using the Markup Navigation pane. To open this pane,
click

User Guide 38
in the lower left corner of the viewer. The Markup Navigation pane displays a list of all redactions and
highlights that reviewers created in the document, as well as references to their page numbers and parent
markup sets.
You can click anywhere on the markup row to jump to the page where the markup occurs. In addition,
Relativity updates the active markup set to the one associated with your row selection in the Markup
Navigation pane.

User Guide 39
3 Persistent highlight sets
With persistent highlight sets you can configure and apply term highlighting to assist with document review
in the Viewer. In the Persistent Highlight Sets pane of the Viewer, you can see all sets saved in a workspace
and apply or hide term highlights in the document you are reviewing.
If a document you are reviewing contains any of the terms specified in a set, the list of terms and the number
of times they appear in the document appear under the set. If a document contains no terms from the set,
you can not expand or collapse the set in the tree. If the document contains some terms in the set, only the
terms that exist in the document appear below the set name.
System admins can control which highlight sets different users see when working within a document. See
Workspace security in the Admin guide.
Persistent highlight sets are independent of markup sets. See Markup sets in the Admin guide.
3.1 Getting started with persistent highlight sets
You create persistent highlight sets in the Persistent Highlight Sets tab of a workspace. Each set includes
a list of terms populated manually or from a source field in the set configuration. After you create a persistent
highlight set, the set and its terms are available in the Persistent Highlight Sets pane of the Viewer.

User Guide 40
The following persistent highlight set includes several terms with highlight color-coding. See Color-coding
persistent highlights on page48 for more information.
This set is available when a user opens the viewer and any edits made to this set are reflected immediately.
3.1.1 Showing and hiding persistent highlight sets in the Viewer
To view the list of available persistent highlights sets and related terms in the Persistent Highlight Sets
pane, click the Show/Hide Persistent Highlight Sets pane icon in the left drawer.
Click the next to a persistent highlight set to expand it and show the list of terms from that set found in the
document. By default, all persistent highlight sets are enabled in the Viewer, and terms found in a document
are selected in the Persistent Highlight Sets pane and highlighted in the document. Click a persistent
highlight set's name or the icon to hide all term highlights from the set in the Viewer. When a persistent
highlight set's icon is and the terms appear partially transparent in the Persistent Highlight Sets pane,
the term highlights for the set are hidden in the Viewer.

User Guide 41
Clear a term's check box to hide its highlights in the Viewer. Select its check box to apply highlighting for the
term in the Viewer again.
If any of the set’s terms are not present in the current document open in the Viewer, they do not display in
the Persistent Highlight Sets pane. For example, if you created a set named Investments that contains five
highlight terms, and only three of the terms show in the pane for a particular document, the other two terms
are not present in the document.
You can navigate through the hits for a persistent highlight set or for a term while viewing a document in the
Viewer. Click on either the persistent highlight set or the desired term in the Persistent Highlight Sets pane
and the Go to Next/Previous Highlights icons display in the row.
You can use the Next/Previous icons to cycle through the hits for either the persistent highlight set or the
highlighted term. Regardless of where you are in a document, when you click the Next icon for the first
time, you will be taken to the first highlight in the document for that persistent highlight set or term. Even if
you have moved past it while browsing the document.
Clicking the Next/Previous icons also emphasizes the actively navigated highlight with an orange glow to
help you track which one is active.

User Guide 42
When you select a persistent highlight term in the Persistent Highlight Sets pane, in addition to highlighting
all instances of that term in the body of an email, the Viewer also highlights instances of the term in the email
header.
The number of terms and hits is listed to the left of the persistent highlight set's name. It is possible to have
many highlight sets enabled but no highlights appear in a document.
Selections made in the Persistent Highlight Sets pane persist throughout a user's session in Relativity. This
includes any of the following changes related to the Persistent Highlight Sets pane in the Viewer:
n
Showing or hiding the Persistent Highlight Sets pane.
n
Enabling or disabling a persistent highlight set.

User Guide 43
n
Expanding or collapsing the term list for a persistent highlight set.
n
Checking or clearing terms check boxes in a persistent highlight set.
3.1.2 Navigating highlighted terms in the Viewer
To navigate between terms highlighted on a document in the Viewer, use the Go to Previous Highlight
and Go to Next Highlight icons on the Viewer toolbar.
The Go to Previous Highlight and Go to Next Highlight icons only navigate between terms enabled in
the Persistent Highlight Sets pane.
When navigating through a document's highlighted terms, the following notification displays in the bottom-
left to inform you that you have reached the beginning or end of the document and there are no more
highlights.
3.1.2.1 Actively navigated and inactive highlights
To support advanced highlights within persistent highlight sets, two types colors can be available in the
Viewer - actively navigated and inactive highlights. The colors are the same, but have a different level of
opacity. Active highlights are the highlights that the Viewer is focused on. Active highlights are at full opacity
and inactive highlights are at a lower opacity level. See Color-coding persistent highlights for more
information.
Note: Beginning in Relativity 11.3.1, the auto-contrast feature has been added to color-coding persistent
highlights. This feature automatically determines the text color based off the background color you select
to ensure readability no matter which colors are selected. For example, if the background color is closer to
black, the text will automatically be white or if the background color is closer to white, the text will
automatically be black.
Note: The opacity level of the highlights for proximity searching and inactive terms can be adjusted by
editing the value of the ViewerHighlightStyleDefault instance setting.

User Guide 44
Color name Highlight Color Number
[Default] 0
Black 1
Dark red 2
Dark green 3
Dark yellow 4
Dark blue 5
Dark magenta 6
Dark cyan 7
Light gray 8
Gray 9
Red 10
Green 11
Yellow 12
Blue 13
Magenta 14
Cyan 15
White 16
Light green 17
Light blue 18
Light yellow 19
Light purple 20
Light red 21
Light orange 22
Purple 23
Orange 24
Dark purple 25
Dark orange 26
3.1.3 Persistent highlight set behavior across Viewers
Note the following regarding persistent highlight set behavior as the reviewer moves from document to
document, changes Viewers, and uses pane toggles:

User Guide 45
n
Any changes made to a persistent highlight set tree in the panel when the Viewer is undocked, such
as terms selected or unselected, will display when the Viewer is docked again.
n
A synced standalone Viewer will not display changes made to a persistent highlight set, such as
terms selected or unselected, in the pane of the main Viewer. However, Persistent Highlight Sets
pane settings remain the same in the standalone Viewer as the reviewer goes from doc to doc within
the standalone Viewer.
n
The Persistent Highlight Sets pane maintains its current state when you swap Viewer panes.
n
The Persistent Highlight Sets pane in the Extracted Text Viewer and Native Viewer are independent
of each other. A change made to the pane in the Extracted Text Viewer is not automatically reflected
when the reviewer switches to the Native Viewer and back.
n
Advanced persistent highlighting, available when using a search term report as a highlight field
source, is only available in the Native and Extracted Text Viewer. See Using the highlight fields
source on page50.
See the Viewer documentation in the Admin Guide.
3.1.4 Persistent highlight behavior
When using a search term report that includes search syntax as a highlights source field, the highlight
behavior is more inclusive than using persistent highlight terms. See Using the highlight fields source on
page50.
The different levels of opacity occur on a key term and interval term level. The key terms in the search are
high opacity level highlights. The other interval terms picked up with search syntax are highlighted at a lower
opacity level. For example, if you use the search "account w/5 cap" the words "account" and "cap" are
highlighted with the full opacity highlight. The words between "account"and "cap" will have the lower opacity
level highlight.


User Guide 47
1. Navigate to the Persistent Highlight Sets tab.
2. Click New Persistent Highlight Set.
3. Complete all required fields in the Persistent Highlight Set Information section. See Fields below for
details.
4. Click Save.
Note: Verify that reviewers are not actively reviewing documents when creating persistent highlight sets.
Creating persistent highlight sets while reviewers are actively reviewing documents can cause errors.
3.2.1 Fields
Persistent highlight sets include the following fields.
n
Name- the descriptive name under which you want this set to appear in the Viewer and item list.
n
Order -the order in which you want this set to appear.
n
Source - determines the area the set draws from when designating characters to be highlighted and
displayed in the Viewer. There are two options:
o
Highlight Fields - designates fields as the source of highlighting. Highlight Fields is capable of
using dtSearch functionality. Selecting this radio button means you must select a Highlight
Field in order to save this set.
o
Terms- designates terms as the source of highlighting. Selecting this radio button means you
must enter terms into the Terms field below to save this set.
n
Highlight Fields- choose the field referencing the list of terms to be highlighted. Click the Select but-
ton to bring up the system view called Field Picker on Persistent Highlight Sets, which displays the
Name and Object Type for applicable multiple object fields. It also includes those created by search
terms reports. To select the desired Highlight Field, check the field’s box, click Add, and click Set. The
field displays on the layout. See Using the highlight fields source on page50.

User Guide 48
Note: If your search terms report is run against a dtSearch index with a customized alphabet file,
the hits on the STR may not match the highlights rendered in the Viewer. Depending on how the
alphabet file has been customized, you may see fewer highlight hits rendered in the Review Inter-
face.
n
Terms - enter terms you wish to highlight and select the color code to distinguish them in the Viewer.
See Entering highlight terms below.
3.3 Entering highlight terms
If you choose Terms as the source of your highlighting, you have to enter the terms in the Terms field text
box to save the new highlight set. You also have the option of applying color-coding to these terms in the
Viewer.
3.3.1 Color-coding persistent highlights
When you enter a term in the Highlight Terms box, you can also specify the color for both the text and the
background. Use the following format to color-code your persistently highlighted text:
[background color];[text color];[term to be highlighted]
For example, enter “3;16;Relativity” to highlight Relativity with dark green background and white text.
Note: Beginning in Relativity 11.3.1, the auto-contrast feature has been added to color-coding persistent
highlights. This feature automatically determines the text color based off the background color you select
to ensure readability no matter which colors are selected. For example, if the background color is closer to
black, the text will automatically be white or if the background color is closer to white, the text will
automatically be black.
Highlights are rendered at full opacity (using the original highlight color) when they are active. When they
are not active, they will be rendered in a lighter shade of the original highlight color.

User Guide 49
Note: The opacity level of the highlights can be adjusted by editing the value of the
ViewerHighlightStyleDefault instance setting.
The following table includes available color codes.
Color name Highlight Color Number
[Default] 0
Black 1
Dark red 2
Dark green 3
Dark yellow 4
Dark blue 5
Dark magenta 6
Dark cyan 7
Light gray 8
Gray 9
Red 10
Green 11
Yellow 12
Blue 13
Magenta 14
Cyan 15
White 16
Light green 17
Light blue 18
Light yellow 19
Light purple 20
Light red 21
Light orange 22
Purple 23
Orange 24
Dark purple 25
Dark orange 26
If you enter terms with no color-coding, the background defaults to magenta and black text.

User Guide 50
Note: Default has different implications for text and background. The default background color is white
and the default text color is black.
3.3.2 Guidelines for adding terms or phrases
Use the following guidelines when adding terms or phrases into the Terms text box:
n
Enter a term that you want highlighted and press Enter. You can enter multiple terms but each one
must be on a separate line.
n
Enter terms for persistent highlighting exactly as they appear in the document. Don't use quotation
marks and connectors.
Note: Quotation marks are not compatible with persistent highlighting with terms as a source,
which automatically searches for an exact phrase. Quotation marks are compatible when using
highlight fields as a source however. Using highlight fields as a source can result in slower
document loading speeds.
n
Keep lists simple. Do not use punctuation, special characters, or operators. Do not use dtSearch syn-
tax when entering a list of terms as the source for the set. You may use dtSearch index terms in a
search terms report, then use Fields as the Persistent Highlight Source instead to support highlights
for dtSearch syntax.
o
ANDor ORoperators are not used in keyword searching. If used, Relativity looks for the exact
phrase including AND or OR. For example, you entered these search terms: Apple AND
Banana. Relativity highlights the entire phrase apple and banana in the document. Separate
occurrences of apple, and occurrences of banana, are not highlighted.
o
Persistent highlight set terms do support wildcards. You can view highlighted terms that con-
tain an * (asterisk) character, including a wildcard in the middle of a term. For example:
l
term* matches and highlights any word that starts with term with zero or more following
characters.
l
*term matches and highlights any word that ends with term with zero or more preceding
characters.
l
*term* matches and highlights any word that has term in it with zero or more preceding
or following characters.
n
Do not enter duplicate terms.
n
Identify and remove terms with large hit counts.
n
List variations of a term first and enter the root term last.
n
If the list of terms is large (>100 terms), use Highlight Fields with a Search Terms Report. For more
information, see Search terms reports on page61.
3.4 Using the highlight fields source
Using the Highlight Fields source in a persistent highlight set you can choose a field referencing a list of
terms to highlight.
User Guide 51
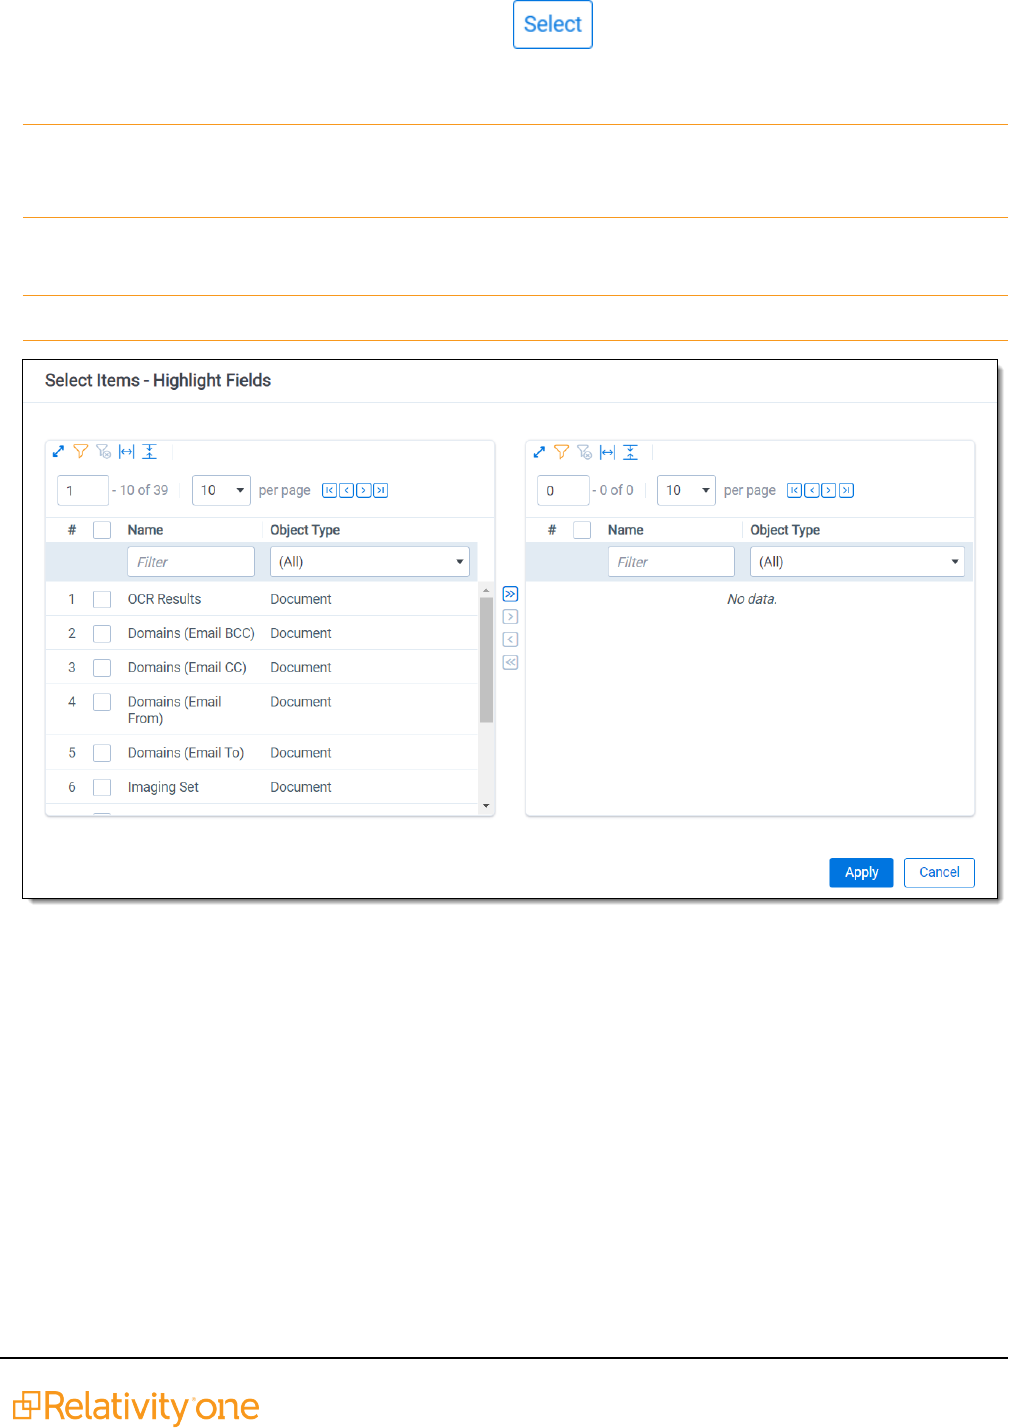
Select the Highlight Fields option, and then click the button to open the Select items - Highlight
Fields modal. This system view displays the Name and Object Type for applicable multiple object fields,
including those created by Search Terms Reports.
Note: Persistent highlights generated by a search terms report don't automatically update after you load
new data into a workspace. To incorporate the text from new documents, perform either a full or
incremental build on the dtSearch Index, then a full or incremental build on the search terms report.
To select a Highlight Field, check the field’s box, click right arrow to move it the right section. Once all of the
desired fields have been selected, click Apply. The field appears on the layout.
Note: We recommend selecting a search terms report or the Domains field as your highlight fields source.
When using a Search Terms Report as the highlight fields source, the number of terms that Relativity
searches for will vary among different records. Relativity only looks for the terms listed in the Search Terms
Report for that document.

User Guide 52
Relativity exhibits similar behavior when using an email Domains field as the highlight fields source.
Relativity only looks for the email domains listed in the field for that document.

User Guide 53
3.4.1 Best practices
Consider the following guidelines when creating or adding terms using Search Terms Reports as the
highlight fields source:
n
Enter terms exactly as they appear in the document.
n
You can use operators such as ANDand OR. For example, if you enter these search terms: Apple
AND Banana, Relativity would highlight the two terms “apple" and "banana” in the document. See
Search terms reports on page61 for more information.
n
Wildcards are useful in some cases. For example, the search term appl* highlights apple, application,
applies, and so on. An excessive use of wildcards affects performance. Leading wildcards such as *it-
ting, are not recommended. Using asterisks in the middle of a term don't count as wildcards.
n
dtSearch operators can be used to highlight searches when used for a Persistent Highlight Sets in the
Native Viewer. You must use a Highlight Fields source (such as a Search Terms Report results field)
to use dtSearch syntax. Relativity dtSearch operators are not supported in the Extracted Text Viewer.
The highlights for these searches use the active and inactive highlighting functionality. Actively nav-
igated highlights are the highlights that the Viewer is focused on and display with full opacity. Inactive
highlights display at a lower opacity level.
Note: The increase of dtSearch operators does decrease performance.

User Guide 54
o
Persistent highlight does understand proximity searching. If you enter the phrase Relativity w/5
software as a search term, the search term report uses a dtSearch to find and tag all doc-
uments that meet the criteria. When viewed in the Viewer, the persistent highlighting functions
as a dtSearch.
o
Persistent highlights does understand the stemming character (~). If you enter the term apply~
as a search term, the search term report finds and tags all documents with the word apply, or
any document that stems from apply; including applied, applies, application, and so on. When
looking at the document in the Viewer, the persistent highlight functions as a dtSearch. See
Search terms reports on page61 for information on supported syntax.
o
Any operator in quotes will be treated as literal by the Viewer search. For example, stemming
“~” and wildcard “*” operators. However, dtSearch will treat stemming and wild card operators
in quotes not as literal, but as the operator itself. For example, "run~” in the Viewer will find the
exact phrase “run~” and "run~” in dtSearch will return hits for run, runner, running, etc.
3.5 Importing search terms for persistent highlighting
To import search terms to use as a source for persistent highlighting perform the following procedures.
3.5.1 Relativity component setup
Before importing search terms, use the following steps to create a Relativity Dynamic Object to handle the
data.
1. Navigate to the Object Type tab in your workspace.
2. Click New Object Type.
a. Provide a name for the new object in the required Name property.
b. Keep all remaining properties at their default values.
c. Click Save.
3. Navigate to the Fields tab.
4. Click New Field to create the field that to hold the persistent highlight color information. This field also
connects your Dynamic Object to the Document object.
5. In the New Field form, specify the following properties:
a. Object Type- <Dynamic Object created in step 2>
b. Name- Highlight Colors
c. Field Type- Fixed-Length Text
d. Length- 10
e. Keep all remaining properties at their default values.
f. Click Save and New.
6. Create a new field to link your Dynamic Object and the Document object. Specify the following prop-
erties:

User Guide 55
a. Object Type- Document
b. Name- <User preference>
c. Field Type- Multiple Object
d. Associative Object Type- <Dynamic Object created in step 2>
e. Keep all remaining properties at their default values.
f. Click Save.
7. Navigate to the Persistent Highlight Sets tab in your workspace.
8. Click New Persistent Highlight Set.
9. Create a new set with the following properties:
a. Name- <User preference>
b. Order- <User preference>; this controls the position of this set in the Persistent Highlight Tree
in the Viewer.
c. Source- Highlight Fields
d. Highlight Fields- <The name of the field created in step 6b.>
e. Click Save.
3.5.2 Importing terms
To import a CSV or other Relativity-supported load file containing terms, use the following procedure.
1. Open the Relativity Desktop Client.
2. Select the workspace you are importing into.
3. Select the Dynamic Object you created above from the object drop-down menu.
4. Select Tools from the top menu.
5. Select Import | <Dynamic Object> load file.
6. Select your terms load file and corresponding delimiters.
7. Map the field in your load file that contains the terms to the Name field in Relativity.
Here you can also import Relativity Highlight Color. You must have this information in the load file
contained in a field in the following format: highlight color; text color (for example, 15;9). If you do not
have this information in the load file, you can manually enter it for terms in Relativity. Because the
latter can be time consuming, we recommend having this information in the load file if possible.
Color name Highlight Color Number
[Default] 0
Black 1
Dark red 2
Dark green 3

User Guide 56
Color name Highlight Color Number
Dark yellow 4
Dark blue 5
Dark magenta 6
Dark cyan 7
Light gray 8
Gray 9
Red 10
Green 11
Yellow 12
Blue 13
Magenta 14
Cyan 15
White 16
Light green 17
Light blue 18
Light yellow 19
Light purple 20
Light red 21
Light orange 22
Purple 23
Orange 24
Dark purple 25
Dark orange 26
8. Click Import to import the terms.
9. Navigate to the object tab you created in step two of the Relativity component setup section.
10. Click on a term.
11. Select the layout you want to use from the drop-down menu.
12. Click the pencil icon to edit the layout.
13. Click Add Object list.
14. Use the drop-down menu to select the field you created in 6b of the Relativity component setup sec-
tion.
15. Set the View field to your preferred document view.

User Guide 57
16. Set the Link View field to your preferred document view.
17. Click Save.
18. Click Link.
19. Select all documents.
20. Click Add.
21. Click Set.
22. Repeat steps 10 through 22 on each term.
23. Verify that the terms are highlight through the following:
a. Open a document in the workspace.
b. Open the Persistent Highlight Tree in the Viewer.
c. Note the presence of the newly created Persistent Highlight Set and verify that terms are high-
light in the appropriate colors.
3.6 Creating efficient searches for persistent highlighting
Creating efficient searches improves the performance of persistent highlighting, whether you're working
with a Terms Search or Highlight Fields. Use the following guidelines to create efficient searches.
3.6.1 Using terms search
Avoid the following when writing searches for persistent highlighting:

User Guide 58
n
Do not use "AND" or "OR" connectors. Persistent highlighting looks for the exact phrase, trade and
complete, instead of the word, trade, and the word, complete.
n
Proximity, fuzziness, and stemming logic cannot be used in a Terms Search. Consider using High-
light Fields to access these search features as described below. The system ignores the dtSearch
syntax. Terms receive no highlight if you use these advanced searching features. The search terms
report Count column still lists the number of matching terms. For example:
o
The search term, oil w/10 water, searches for the exact phrase oil w/10 water.
o
If you enter the term apply~ as a search term, persistent highlighting technology looks for the
term apply followed by any special character.
n
Avoid using terms with a large number of hits per document. Persistent highlighting highlights each
hit. For example, it takes longer to load a Word document containing 1,000 instances of a single term.
n
Avoid using terms that only occur once in a document. Use search terms reports for those terms
instead.
n
Avoid long lists of numbers, such as Bates numbers or account numbers.
n
Do not use duplicate terms.
Use the following techniques to optimize your searches:
n
Use the dtSearch Dictionary to identify variations of a term instead of using wildcards.
o
Identify which terms should be in the highlight set and which terms are not necessary.
o
You may want to avoid highlighting terms with high word counts.
Note: To highlight terms using objects, create a fixed-length text field for your object called Highlight
Colors. You can enter color-coding in this field using the format: [highlight color];[text color].
3.6.2 Using highlight fields
Consider the following guidelines when creating or adding terms using Search Terms Reports as the
highlight fields source:

User Guide 59
n
Enter terms exactly as they appear in the document.
n
You can use operators such as ANDand OR. For example, if you enter these search terms: Apple
AND Banana, Relativity would highlight the two terms “apple" and "banana” in the document. See
Search terms reports on page61 for more information.
n
Wildcards are useful in some cases. For example, the search term appl* highlights apple, application,
applies, and so on. An excessive use of wildcards affects performance. Leading wildcards such as *it-
ting, are not recommended. Using asterisks in the middle of a term don't count as wildcards.
n
dtSearch operators can be used to highlight searches when used for a Persistent Highlight Sets in the
Native Viewer. You must use a Highlight Fields source (such as a Search Terms Report results field)
to use dtSearch syntax. Relativity dtSearch operators are not supported in the Extracted Text Viewer.
The highlights for these searches use the active and inactive highlighting functionality. Actively nav-
igated highlights are the highlights that the Viewer is focused on and display with full opacity. Inactive
highlights display at a lower opacity level.
Note: The increase of dtSearch operators does decrease performance.
o
Proximity searching logic can be used with Highlight Fields. If you enter the phrase "Relativity
w/5 software" as a search term, the search term report uses a dtSearch to find and tag all doc-
uments that meet the criteria. When viewed in the Viewer, the persistent highlighting functions
as a dtSearch. See Search terms reports on page61 for information.
n
Stemming, including the stemming character (~), can also be used with Highlight Fields. If you
enter the term "apply~" as a search term, the search term report finds and tags all documents
with the word apply, or any document that stems from apply; including applied, applies, applic-
ation, and so on. When looking at the document in the Viewer, the persistent highlight functions
as a dtSearch. See Search terms reports on page61 for information.

User Guide 60
n
In Search Terms Reports, you can the Dictionary Search function to identify search terms using stem-
ming or fuzziness. Copy the list of terms returned in this search. Paste them in the Add Terms box on
the Search Terms Report form. Doing this enhances your search term list, while avoiding errors
caused by special characters.
n
Use the dtSearch Dictionary to identify variations of a term instead of using wildcards.
o
Identify which terms should be in the highlight set and which terms are not necessary.
o
You may want to avoid highlighting terms with high word counts.

User Guide 61
4 Search terms reports
Search terms reports provide the ability to identify documents containing specific keywords or terms. You
can enter multiple terms and generate a report listing the number of hits for each term in a document. You
can also select an option to create a multiple object field for the search terms report to use in your persistent
highlight sets. When you select a search terms report for use with a persistent highlight set, the report
determines which terms or phrases to highlight in the documents through the Review Interface.
Using search terms reports
You are a system admin at a law firm and one of your clients, a construction company, is involved
in litigation regarding the use of materials that they were not informed were potentially
environmentally damaging when they purchased them from a major supplier.
There are roughly three million files related to this case, including emails, email attachments,
invoices, and technical manuals related to construction practices and material handling.
Before you begin review, you want a report that tells you how many times the names of toxic
substances appear in the documents. To get this, you create a new search terms report. You give
it a name that is consistent with other objects you've created for this case, "Hazardous Materials
search terms report." For the Index field, you select the dtSearch index you already created for
your reviewers. Since you do not need to actually tag the documents that contain the terms you
want to include, you leave the Tag field unselected. For the Searchable Set field, you select the
set of documents you specified when you created the saved search for the dtSearch index data
source. Finally, in the Add Terms field, you enter the substances you want reported on, which are
the same ones included in your client's lawsuit and the same ones for which you've already
created choices for an issue coding field. These terms are:
n
lead
n
asbestos
n
asphalt
n
radioactive isotopes
You save and run the report. The results tell you how prevalent these terms are in the data set.
You now have a better idea of what lies ahead.
4.1 Guidelines for using search terms reports
Use the following guidelines to ensure that your search terms report properly highlights the required terms:
n
Define a saved search using conditions that return the required group of documents for the Search-
able Set. Persistent highlighting applies only to documents in the searchable set. Relativity also only
counts hits that fall within the searchable set. Related items not included in the searchable set will not
be searched for search terms.
n
Confirm that your dtSearch index includes all documents in the Searchable Set of the search terms
report.

User Guide 62
n
Select the Tag Hits toggle to create a multiple object field for the search terms report. If this field is
not created you cannot select it in the Highlight Fields option when creating a persistent highlights
set. See Persistent highlight sets.
n
When using a search terms report as a highlight source in a persistent highlight set, only the terms in
documents associated with the current reports appear highlighted. If you add new search terms to the
reports, you must run pending terms so that they appear highlighted in documents.
n
The system automatically preserves the precise order in which the terms were entered when gen-
erating a report.
Note: Fuzzy searching is not supported in Search Terms Reports (STR). You must use the Dic-
tionary function to perform fuzzy searching. You would then add the desired terms to the STR. For
information on how to use the Dictionary, see Running a Dictionary search.
4.2 Creating a search terms report
To create a new search terms report, follow these steps:
1. Navigate to the Search Terms Reports tab.
2. Click New Search Terms Report.
3. Complete the fields on the form. See Fields.
4. Click Save.
After saving the search terms report, the Search Terms Report Status section and Search Terms Report
console appear. As the status section indicates, you must add terms to your new report. See Adding terms
and highlight colors.
4.2.1 Fields
Search terms reports contain the following fields:

User Guide 63
n
Name—the search terms reports name. This value cannot exceed 75 characters.
n
Index—the dtSearch index used to create the report.
n
Searchable set—a saved search that includes a set of documents you want to use for your search
terms reports. The Searchable Set Index field displays the index associated with the saved search
you select. The index for the saved search may differ from the search index used to create the search

User Guide 64
terms report.
n
Include relational group—includes the "Documents with Hits + [Group Name]" counts for each term
in the search terms results. This value counts the documents with hits for each term as well as all doc-
uments in the same relational group as the documents with hits. Include relational group only
includes hits of related items in the searchable set. Relativity does not look outside of the searchable
set. Click Select and then choose a relational group to include.
n
Tag Hits—if enabled, saves the results to a multiple object field named after the search terms report
with the prefix STR, STR - Industry terms for example, so that the results can be reviewed later. Tags
each document containing search hits using the STRmultiple object field with the search terms found
in each document.
n
Show in Field Tree—if enabled, automatically adds the terms to the field tree on the Documents
view.
n
Calculate unique hits—if enabled, includes a unique hits value for each term in the search terms
results. Unique hits is the count of documents in the searchable set returned by only that particular
term. If more than one term returns a particular document, that document is not counted as a unique
hit. Unique hits reflect the total number of documents returned by a particular term and only that par-
ticular term.
Note: Unique hits can help you identify terms in your search terms report that may be overly inclus-
ive.
n
Remove Hidden Characters—if enabled, automatically filters out hidden or non-displayable text
control characters when creating or editing terms for the Search Terms Reports.
o
These hidden control characters have been known to cause issues in searching and can be
unknowingly copied from Word or Excel documents.
o
The list of control characters that are filtered are the same as the default ignore section of the
dtSearch alphabet file text.

User Guide 65
n
Email notification recipients—specifies recipients to send an email notification to when your
search terms report finishes running. Enter the email addresses of the recipients. Separate entries
with a semicolon.
n
Notes—enter notes specific to the search terms report.
When viewing a list of search terms for a search terms report, term strings are limited to a set number of
characters by default. Hover over a term to view the term string in its entirety.
4.2.1.1 Creating STRs through workspace templates
Additionally, you can create STRs through workspace templates using the following steps:
1. From your active workspace, ensure that the Search Terms Reports object type setting for Copy
Instances On Workspace Creation is enabled.
2. Create a new workspace using the active workspace as your workspace template.
The search terms reports are copied over to the new workspace.

User Guide 66
4.2.2 Adding terms and highlight colors
To add terms to your search terms report:
Note: You must create a persistent highlight set for highlighted terms to appear in your documents. See
Persistent highlight sets for more information.
1. Click the name of your search terms report.
2. Click Add Terms.
3. Enter your terms in the text box so that each term appears on a separate line.
Alternatively, you can also click the Dictionary link to display the Dictionary Search pop-up. In the
pop-up you can perform searches using fuzziness, proximity, and stemming. Click Copy to List to
add the Dictionary search results to the New Terms text box.
Note: Each line is treated as an individual dtSearch query. For more information about dtSearch,
refer to the Searching Guide .
4. (Optional) Select a background color and text color using the color picker. See the preview text to
verify that the resulting highlighted text is readable. By default, highlighted terms appear as black text
with an orange background.
5. Click Add to add your new terms to the terms list.
Note: A single term has a character limit of 450.
A confirmation message displays with the count of new terms added. Duplicate terms are ignored. After
adding new search terms to an existing report, you must run the terms so that they appear highlighted in
documents. For more information, see Running a search terms report.
4.2.3 Editing terms and highlight colors
To edit a term in your search terms report:
1. Click the name of your search terms report.
2. In the Term column, click on the term you would like to change. The field will become editable.
3. Edit the text, then press Enter.
4. Run Pending Terms in order to update the search terms report. For more information, see Running
a search terms report.
To edit the background and text color of terms:
1. Click the name of your search terms report.
2. Select the checkbox next to the terms you want to change, then click Edit.
3. Choose the new background and text color, then click Save.
Note: Changes to background and text color apply to all terms being edited.

User Guide 67
4.2.4 Deleting terms
To remove terms from the search terms report:
1. Click the name of your search terms report.
2. Select the checkbox next to the terms you want to edit, and then click Edit.
3. Click Delete.
4. Click Delete.
If you remove search terms from the reports, the terms automatically disappear from the search terms report
results. You must run the report again for accurate totals in the status bar and when using View Term
Report.
4.2.5 Copying a search terms report
You can copy an existing search terms report using the mass copy operation.
To copy a search terms report:
1. From the Search Terms Reports tab, click the checkbox next to the search terms report you want to
copy.
2. From the mass operations bar, select Checked. Alternatively, you can select All to copy all search
terms reports.
3. Select Copy in the drop-down menu.
The Copy window displays.
4. Click Ok to copy the items.
4.3 Running a search terms report
You generate a search terms report by using the options available in the search terms report console. The
console appears after you save a search terms report or when you open an existing report from the Search
Terms Reports tab.
The console includes the following options:
n
Run All Terms—generates counts for each term. Use this option when generating the report for the
first time or if you want to regenerate counts for all terms in the report. Run all terms after adding new
documents to the searchable set.
n
Run Pending Terms—updates an existing report. It runs a report on only those terms with a Pending
status.
n
View Results—opens the Search Terms Results (All) page. This page displays the report results, list-
ing the number of document hits for each term. From the Search Terms Results (All) page, click the
To Report button to return to this page.

User Guide 68
n
View Term Report—opens the report in a graphical format. You can print or save the report. To save
the report, click the Export To drop-down menu at the top of the page and select a file type, such as
PDF. The file export begins automatically and saves the file to your local download location.
The Search Terms Reports > Terms table has the following columns:
n
Name—search term included in search terms report.
n
Status—shows the current status of the searched term. Options include Completed, Pending, and
Error.
n
Documents with hits—the number of documents in the searchable set that contain the search term.
Note: Documents with hits is not security-aware or influenced by permissions. This means that it
includes documents the user cannot view in a basic search. For example, a user could perform a
dtSearch that returns a total of five documents, including two inaccessible documents. Even
though the user can only view three documents, the search terms count still includes all five doc-
uments originally tagged with the search term.
n
Documents with hits, including group—counts the documents with hits for each term as well as all
documents in the same relational group as the documents with hits. The count only includes hits of
related items in the searchable set. It will not look outside of the searchable set.
n
Unique hits—counts the number of documents in the searchable set returned by only that particular
term. If more than one term returns a particular document, that document is not counted as a unique
hit. Unique hits reflect the total number of documents returned by a particular term and only that par-
ticular term.
n
Last Run Time—time stamp when the search terms report last ran.
n
Last Updated—time stamp when the search term was last updated.
n
Error messages—displays error messages for report terms, if encountered. See Managing errors
for more details on error handling in search terms reports.
n
Text Color—the font color you set when adding the term.
n
Background Color—the background color you set when adding the term.

User Guide 69
In this page, you can also access a list of any terms that failed during the creation of the search terms report.
To read these error messages, change your view to Search Terms Results (All).
Note: RelativityOne now runs up to 20 search terms reports in parallel, simultaneously, on a single
instance across any number of workspaces. You can, however, queue as many reports as needed and
they will run when others complete.
4.3.1 Search terms reports status
After running a search terms report, the search terms reports status section appears. It lists the search
terms report name and status. The status indicates the current progress of the report. This field contains
either Searching your terms, Completed, or Error.
This section also provides a summary of the search terms report and its results:
n
Number of Terms—total number of terms run in the search terms report.
n
Documents with Hits—the number of documents in the searchable set that contain the search term.
n
Documents with Hits + Relational Groups—counts the documents with hits for each term as well
as all documents in the same relational group as the documents with hits.
n
Documents in Searchable Set—total documents in the designated searchable set.
4.3.2 Managing errors
As the search terms report runs, Relativity checks for errors. If Relativity encounters errors, you will see a
red banner just above the list of terms. You will also see a message in the Error message column for each
term that Relativity could not process. The Status column displays Error.

User Guide 70
The error messages tell you the type of error encountered. For example, you can resolve syntax errors
yourself and then retry them, while support errors require customer support for resolution.
n
Syntax errors—the search index could not search for the term due to an error in the syntax. The mes-
sage tells you what is wrong with the syntax and how to fix it. You can fix these errors yourself by edit-
ing the term and addressing the issue outlined in the error message. For example, the second syntax
error in the image below indicates a missing parenthesis. You can edit the term and add the missing
parenthesis in this case.
After you address syntax errors, you must rerun the report to capture the terms. Click the Run Pend-
ing Terms button in the Run Report console to run the report on the pending terms. When complete,
the page updates with the new term status.

User Guide 71
n
Support errors—are errors that you cannot resolve yourself. Support errors require intervention
from customer support. The error message includes an expandable section with explicit details about
the error, which support can use to help determine and resolve the issue.
4.4 Accessing tagged documents using the Field Tree browser
After you run a search terms report with the Tag option enabled, Relativity creates a folder in the Field Tree
browser with documents grouped by tags found by the search terms report. Each tag includes the count of
documents containing that term. The folder is named after the STR multiple object field created by the
search terms report. For example, if your STR is named Produced Documents, the folder in the Field Tree
browser is named STR - Produced Documents.
Click a search term tag in the Field Tree browser to view documents in your searchable set tagged with the
selected term. You can also email a link to the tagged documents by right-clicking the tag results and
selecting Email Link.

User Guide 72
4.5 Using tagged search terms in a saved search
After you run a search terms report with the Tag option enabled, Relativity creates choices for each of the
terms that you specified. You can then use these choices as criteria in a saved search.
Use this procedure to create a saved search using tagged search terms:
1. Follow the instructions for setting fields in the Information and Search Conditions sections on a saved
search.
2. Click on the Fields tab in the Saved Search pop-up.
3. Select the desired field in the Unselected section and move it to the Selected section using the arrow
icons.
4. Click the Condition button and select an option from the pop-op.

User Guide 73
5. Perform the following tasks on the Select STR dialog:
a. Select your search terms report in the Field box.
b. Select an Operator, such as any of these.
c. Select the STR option from the Condition drop-down menu to select search terms on the
Select Items dialog.
d. Set any other fields as necessary.
6. Click OK.
For example, if you added the tagged search terms called money, crime, and oil, the Conditions sec-
tion would appear as follows:
7. Repeat steps 1-3 for each tagged search terms.
8. Click Apply and Save & Search to run your query.

User Guide 74
4.6 Permissions
You may have an occasion where you want to grant limited permissions to a group of users outside of the
site administrators. For example, you want to limit users from creating new Search Terms Reports to keep
your environment organized. However, at the same time, you want users to view, edit, and add to existing
terms lists.
To add search terms reports permissions to a user group:
1. Create a new user group and add it to your workspace.
Note: If you do not know how to create a new user group, see The Admin Guide. If you need help
adding the group to your workspace, see The Admin Guide.
2. From the Manage Workspace Permissions modal window, click Edit Permissions.
In the image below, the group name is Processing - STR Users.
3. Scroll down to locate the two entries for search terms reports—Search Terms Reports and Search
Terms Result. You want to edit permissions for existing terms, so you will edit the Search Terms Res-
ult object. The Search Terms Reports object grants permissions for reports overall and not the con-
tent within the report. Click one or more icons to enable the permission level. Available levels include
Disable, View, Edit, Delete, Add, or Manage Security.
4. Click Save.
5. Click the Manage Workspace Permissions link.
6. Click the Preview button for your group.
The workspace opens with the group permissions applied. This view is helpful if you want to see how
the workspace looks and functions as a group member. A banner across the top of the page reminds
you of the preview mode.
7. Open a search terms report.
You now see buttons above the search terms list corresponding to the permissions granted. In the
image below, add and edit permissions apply.
8. Check the box next to one or more search terms.
The permission level buttons become active.

User Guide 75
9. Click the appropriate button to edit the search term.
Note: If the only permission level granted is Edit, you will not see any buttons above the list. In this
case, you can click any search term to enable a text box. Complete your edits and click Enter to
save and exit.

User Guide 76
5 Searching overview
Relativity includes flexible search features designed to facilitate the document review process. These
features support a range of searching needs from filtering on fields and simple keyword searches to the
development of complex queries. The following list summarizes the searching features available in
Relativity.
5.1 Filters
You can use filters to limit the documents or items that appear in item lists on Relativity tabs and pop-ups.
When you enable the filters for an item list, you can set criteria on single or multiple fields so that only
matching documents or items appear in the view.
Filters query across the searchable set of documents in the active view to return your results. Relativity
supports multiple filter types so that you can choose the best format for different field types. See the
Searching Guide for more information.
5.2 Keyword searches
You can run keyword searches from the Documents tab and from Dynamic Object tabs. With these
searches, you can leverage the basic functionality for querying the SQL full-text index populated with data
from extracted text fields. The keyword search engine supports the use of Boolean operators and wildcards.
See the Searching Guide for more information.
5.3 Saved searches
Saved searches give you the functionality to define and store queries for repeated use. With flexible
settings, you can create a saved search based on any Relativity search engine, assign security permissions
to it, and define specific columns to display your search results. Saved searches support the development of
complex queries that you build using a form with search condition options. These queries run dynamically to
ensure that updated results appear when you access a saved search. See the Searching Guide for more
information.
5.4 dtSearches
Available on the Documents tab, you can use the advanced searching functionality to run queries with
proximity, stemming, and fuzziness operators, along with basic features such as Boolean operators and
wildcards.
System administrators can create a dtSearch index for a specific subset of documents in a workspace, and
then assign security to it. They must manually update indexes when you modify the document search sets
used to create them. See the Searching Guide for more information.
5.5 Analytics
Supporting conceptual searching, Analytics includes documents in a result set when they contain similar
ideas or conceptual relationships, rather than matching specific search terms or conditions.
You can create searches with Analytics that categorize your documents based on the concepts contained in
a sample document set. Instead of categorizing documents, you can also perform clustering, which uses

User Guide 77
specific algorithms, system-defined rules, to identify conceptually related documents. See the Searching
Guide for more information.
5.6 Regular expressions
Regular Expressions (RegEx) is a form of advanced searching that looks for specific patterns, as opposed
to certain terms and phrases. With RegEx you can use pattern matching to search for particular strings of
characters rather than constructing multiple, literal search queries. You can use RegEx with a dtSearch
index using dtSearch syntax options to construct complex queries. See the Searching Guide for more
information.
5.7 Additional features
Relativity provides additional features that makes searching easy to use from the Documents tab. Use the
search bar to run a keyword search query, or click the drop-down list to select another search index you
created.
With the search condition option, you can build queries using the same condition options available for saved
searches. You can click Save as Search on the Documents tab to create saved searches based on the
criteria defined for keyword searches, dtSearches, Analytics, or the search conditions option. See the
Searching Guide for more information.
You can also use the search bar to view recent searches. Click in the search bar to see up to 10 of the most
recent searches from any index in descending order, with the most recently run search first.
Select any search from the list to run that search. To clear the list, click Clear Recent Searches.
5.8 Search conditions
You can use the search conditions option to build complex queries by selecting fields, operators, and
values. While this feature has the same functionality as the search condition section of the saved search
form, it's conveniently available from the Documents tab and Relativity Dynamic Object tabs. This option
displays up to five rows, with each row representing a separate criterion. Depending on the type of field you
select, different operators appear. You can use this option alone or in conjunction with keyword searches,
dtSearches, Analytics, or Cluster visualization. When you use search options in conjunction with another
search feature, documents must both meet the search criteria and also the conditions specified.

User Guide 78
Note: To use the search conditions option, you must have add or edit permissions for Search and access
to the Saved Searches Browser assigned to you through the Security page. See Workspace security in
the Admin Guide.
5.8.1 Setting up search conditions
5.8.1.1 Setting up search conditions in the Search panel
To set up search conditions in the Search panel follow these steps:
1. Navigate to the Search Builder.
2. Click Add Condition and select the fields to which you want to apply conditions.
A pop-up window opens for each condition field you select.
3. Set the required conditions in the relevant field pop-up window by selecting the desired field or by
choosing a field category and then selecting the desired field.
4. Click Apply.
5. (Optional) Click Add Logic Group to add a logic group. Logic groups are evaluated first, and then
connected to other filter conditions or logic groups using AND / OR operators.
6. (Optional) Drag and drop conditions together to create logic groups.
7. (Optional) Add the ANDor ORoperators to connect the criterion.
8. Click Apply.
If you need to edit the condition, click on the condition card. The pop-up reopens so you can make changes.
5.8.1.2 Setting up search conditions in the Search browser
To set up search conditions in the Search browser, follow these steps:
1. Click the Saved Search icon to navigate to the Search Browser.
2. Click New Search.
3. Click Add Condition and select the fields to which you want to apply conditions.
A pop-up window opens for each condition field you select.
4. Set the required conditions in the relevant field pop-up window.
5. Click Apply.
6. (Optional) Click Add Logic Group to add a logic group and drag and drop your conditions into the
frames. Logic groups are evaluated first and then connected to other filter conditions or logic groups
using AND / OR operators.
7. (Optional) Add the ANDor ORoperators to connect the criterion.
8. Enter all required fields.
9. Click Save or Save As.

User Guide 79
If you need to edit the condition, click on the condition card. The pop-up reopens so you can make changes.
5.8.1.3 Using the multiple object condition builder
You can set conditions for multiple object fields from a single pop-up window. The following example uses
Batch as a multiple object field condition.
To use the multi-object condition builder, follow these steps:
1. Click Add Condition from the Search browser or Search panel.
2. Enter or select Batch.
The Condition:Batch window opens.
3. Select the desired operator from the Operator drop-down list. For example, these conditions.
4. Click Add Condition.
5. Select the condition from the Add Condition drop-down list. For example, Batch::Batch Set.
6. Click the available fields from the Available column and move them to the Selected column as
desired.
7. Click Apply.
8. (Optional) Click Add Logic Group to add a logic group. Logic groups are evaluated first and then
connected to other filter conditions or logic groups using AND / OR operators.
9. (Optional)Drag and drop conditions into logic groups as desired.
10. Click Apply on the Condition:Batch window.
Relativity applies your search conditions.
For more information about multiple object searching logic, see Multiple object searching.
5.8.2 Canceling queries
You can cancel a long-running search or view by clicking the Cancel button. This link appears when you
perform a keyword search, dtSearch, Analytics search, or use Pivot. It also appears when you filter or sort a
document or Dynamic Object list. It also appears when you perform other actions on item lists containing
documents or Dynamic Objects that initiate a query in the background.
When you click Cancel Request, Relativity stops the background query used to populate documents in an
item list. If you edit a search and click this link, your changes save, but the item list doesn't load. For
example, your changes save when you perform a mass edit on a list of documents in a search and then click
Cancel Request when the query is running to redisplay the updated list.
Note: Relativity creates an audit record in the History tab for canceled queries. The query description
displays the running time of the query and indicates that it was canceled. You must have the appropriate
permissions to view this tab.
The following table explains different scenarios in which you might cancel a running query and whether the
query actually cancels.
Scenario Result
You start a query and click Cancel Request or Cancel. The query is canceled.

User Guide 80
Scenario Result
You start a query and close the browser. The query is canceled.
You start a query and an system admin resets the IIS on the server. The query is not canceled.
You start a query and leave your browser idle for longer than the ses-
sion timeout specified in Relativity web.config, regardless of whether
you clicked OKor Cancel on the message from the webpage pop-
up.
The query is not canceled.
You start a query and click Cancel on the message from the
webpage pop-up within the session timeout specified in Relativity
web.config.
The query is canceled.
You start a query and click OK on the message from webpage pop-
up within the session timeout specified in Relativity web.config.
The query continues to run. Relativ-
ity returns you back to the waiting
screen (see the first row of this
table).
You start a query and paste a different URLinto your browser, or you
refresh the page.
The query is canceled.
5.8.3 Frequently asked searching questions
This section includes frequently asked questions from Relativity users.
5.8.3.1 Multiple terms in dtSearch queries
Why would I receive an error message saying my query is too complex?
Relativity can't return precise results when a query includes search conditions that are too complex due to
the use of multiple search terms. To avoid this error message, simplify your search criteria. For example,
search for 10 instead of 50 terms in your query. You can save and tag your search results from each simpler
query. With this approach you can search on the required terms, while providing better results.
5.8.3.2 Proximity searches in dtSearch queries
Why are terms in my proximity search highlighted even when they don't match my defined W/N criteria?
Relativity highlights terms that meet the requirements of your proximity search as well as the individual
search terms. This behavior doesn't affect the results of your proximity search, which returns the
appropriate documents. For example, the results of a proximity search for instances of law within three
words of order (that is "law W/3 order") includes highlighted terms of "law" and "order" when they aren't
within three words of each other. To accommodate this behavior, focus only on the results that match the
proximity search criteria, and disregard the other highlighted terms.
5.8.3.3 Using reserved characters in dtSearch queries
Can Iuse a reserved character such as ampersand (&) in my dtSearch queries?
The following characters have special meaning in dtSearch, and must be treated with care when they
appear in your queries: ?, *, %, ~, #, =, :, &, (). Use the dictionary to explore syntax options if necessary.
If you want to make any of these characters searchable, you must add them to the alphabet file and, in some
cases, use Regular Expressions in your search. For more information, see the Searching Guide.
5.8.3.4 Multiple conditions
Why do my searches run slowly when I use multiple conditions?

User Guide 81
When you add multiple search conditions to a query, Relativity searches on these conditions relative to
each other, which slows down the return of your results. For example, you experience slow performance
when running a query on all email messages received "after June 1" and "before June 30" of the same year.
You can improve performance by using as few conditions as possible, such as excluding the condition
"before June 30". Run the query with only the condition "after June 1", and then sort or filter your results to
display messages received between the desired dates.
5.8.3.5 Nesting searches
Can I nest multiple searches in a saved search?
For performance reasons, we don't recommend nesting multiple searches in a saved search. You can
select a search as a condition, but using multiple searches as conditions slows down the return of your
results. See the Searching guide for more information.

User Guide 82
6 Tabs
A workspace contains tabs that provide you with easy access to different Relativity features, including
documents, search terms reports, views, and other default functionality. Relativity is a highly customizable
platform. Commonly used tabs can be added to the Sidebar so that they can conveniently be accessed at
any time.
Note: RelativityOne includes a tool that allows you to choose a workspace to use as a source template for
tab structure and then lets you apply that template across multiple workspaces in your instance.
You can also apply any workspace template with a tabs arrangement that best serves your review needs.
Some workspace templates also include custom tabs for specialized functionality.
You can add custom tabs in workspaces or at Home. Users with admin rights also have access to a Tabs
tab from Home. The functionality of this Tabs tab is the same as the Tabs tab in a workspace.
In addition, Relativity automatically creates a tab when you add a new object type.
6.1 Creating and editing tabs
To create or edit a tab, follow these steps:
1. Click the Tabs tab.
2. Click New Tab. If you're editing an existing tab, click the Edit icon in the row of the tab you would like
to edit.
3. Complete the fields on the form. See Fields below.
4. Click Save.
6.2 Fields
Information on the fields in the Tab Information and Tab location are described below.

User Guide 83
6.2.1 Tab Information
n
Name - the tab’s name. This field must be between 1 and 50 characters. Be as concise as possible
when naming tabs.
n
Tab Type - determines the type of tab you want to create:
o
Object - creates a tab for a non-document object in your workspace.
o
Parent - establishes the tab as a parent tab. Existing tabs can then be set as children of the par-
ent tab, which causes them to display in the Sidebar's fly-out menu or in the Tab strip when the
parent tab is currently selected. Selecting this option changes the layout by hiding the Object
Type and Set as Default fields.
o
External - link to any URL or object type in Relativity.
Note: Selecting External from the Link Type menu causes the Link field to appear below
the Parent field. In the Link field, you can enter a web address to link to a URL.
You can create a link from a tab to an Relativity Dynamic Object (RDO) or a script, using either
an Artifact ID or GUID. To create links to other objects, you must use their GUIDs. For
information about working with objects that don't have GUIDs, see Tabs on the previous page.
Use the following token to link to an object: ObjectArtifactIdentifier=[identifier], where
[identifier] is the GUID of the object, or in the case of RDOs and scripts, the GUID or Artifact ID.
For example, you would use the format ObjectArtifactIdentifier=736b1c1f-d22f-43cf-9094-
cc8acf94c60 to create a link from a tab to the object with this GUID.
Use the following case insensitive text replacement options to customize the URL, allowing you to display
current details about your workspace:
Text Replacement Option Replacement Text
%AppID% AppID=<Current Workspace ID>

User Guide 84
Text Replacement Option Replacement Text
%ApplicationPath% The actual application path
%ArtifactTypeID% ArtifactTypeID=<Current ArtifactTypeID>
%AssociatedArtifactID% AssociatedArtifactID=<Current Instance Artifact ID>
%AuthenticationToken% AuthenticationToken=<New Authentication Token>
%ConnectorfieldArtifactID% ConnectorFieldArtifactID=<Current Connector Field Artifact ID>
%ParentArtifactID% ParentArtifactID=<Current Parent ArtifactID>
%SystemID% SystemID=<Current System ID>
%SelectedSearchArtifactID% SelectedSearchArtifactID =<Current Search Artifact ID>
n
Object Type - determines which object’s information is displayed in the tab for those specified as
Link Type = Object.
n
Set as Default Tab - toggle on to make this tab serve as the workspace’s default tab. Reviewers log-
ging in to the workspace are taken to the default tab. If a reviewer does not have access to the default
tab, he or she is directed to the Documents tab instead.
n
Visible - toggle on to display this tab from the Sidebar, Tab strip, and/or Quick nav.
n
Relativity Applications - add this tab to a Relativity application. Clicking the Select button brings up
a list of available applications.
6.2.2 Tab Location
n
Show in Sidebar - toggle on to add this tab to the Sidebar. Depending on the number of tabs that
have already been added to the Sidebar, the Order value assigned to this tab, and your browser's res-
olution, the tab may be displayed in the More menu if it does not fit into the current Sidebar.
n
Parent - select a parent tab to assign the current tab as a child tab. The current tab will display in the
fly-out menu for the parent tab.
n
Order - represents the position of the tab by a numerical value. It can be any positive or negative
integer. You cannot use decimals in this field. The lowest-numbered tab displays at the top of the
Sidebar. The highest-numbered tab displays at the bottom of the Sidebar or in the More menu. Items

User Guide 85
that share the same value are sorted in alphanumeric order.
Note: It's always a good idea to set tab order by 10's, starting with 10, then 20, then 30, etc. By
numbering in groups of 10 you can insert an item into any position later in the workspace, without
the need to reorder (for example, you can use 10, 20, 25, 30, 40 to insert a new tab between 20 and
30).
6.3 Nesting children tabs
You may prefer to nest several tabs within a parent to reduce clutter in your Relativity interface and make
tabs easier to locate. You must first specify a tab as a parent (step 1) and then specify children tabs (steps
2-4).
1. Create a new tab with a Tab Type of Parent or edit an existing tab.
2. Click the Edit icon next to the tab you want to nest.
3. Choose the parent tab name under the Parent drop-down menu.
4. Click Save.
Repeat for each child tab you wish to nest. Hover your cursor over the parent tab to display the nested child
tabs in a fly-out menu.

User Guide 86
7 Viewer
The Review Interface displays workspace documents. You can use the Viewer type tabs to toggle the
loaded formats of documents, such as Native Viewer, Image Viewer, Extracted Text Viewer, or Productions
Viewer. Using the Viewer, you can control the form of document that displays in the interface. If a document
has not been imaged, you can image documents on-the-fly in the Viewer.
Note: Using your internet browser to zoom to any size other than 100% while using the Viewer is not
supported and can cause unexpected behavior.
If you do not see the document in the Viewer, it either has not been loaded to the workspace, its conversion
failed, or you do not have permission to see it.

User Guide 87
7.1 Native Viewer

User Guide 88
Note: In the Native Viewer, you can expand the email header to display full email addresses. If you col-
lapse or expand an email header, the Viewer maintains the expanded or collapsed state as you navigate
through documents in the set.

User Guide 89
The Native Viewer displays an HTML rendering of the document that is as close to the original version of the
document as possible. With the Native Viewer, you can:
n
Navigate through a single document and between documents in a document set.
n
Conduct text searching.
n
Highlight text to copy and paste.
n
Zoom, arrange, and save pages that you review in the Native Viewer.
n
Print single documents by saving the document as a PDF. To learn more, see Create PDF.
Note: The Viewer displays PDF text by mapping the character codes to Unicode in most cases. To check
whether PDF text has been properly encoded and will display correctly in the Viewer, copy the text in the
original PDF file and paste it into another application like Microsoft Word or Notepad. If the pasted text
does not display correctly, the PDF is not properly encoded. If the pasted text displays correctly in another
application but not in the Viewer, contact Support for assistance.
7.1.1 Navigating the Native Viewer
The Native Viewer offers several ways of viewing and working with documents. There are options available
in the following sections of the Viewer:
1.
Native Viewer toolbar options
2.
Left drawer Viewer options
3.
Document actions menu
4.
Viewer settings menu

User Guide 90
5.
Viewer breadcrumbs
6.
Right drawer Viewer options
Each of these options and menus is described in more detail in the sections below.
7.1.1.1 Native Viewer toolbar options
The following toolbar options are available in the Native Viewer:
n
Zoom Out/In —zooms out and in on the current document in increments of 10% within
a range of 10% to 4,000%. If you attempt to zoom out to a percentage lower than 10%, the Viewer
automatically sets the display to 10%. If you attempt to zoom in to a percentage higher than 4,000%,
the Viewer automatically sets the display to 4,000%. Your zoom setting persists as you navigate
through a document set. This means that if you have set one document to 150% and you go to the
next document, the next document defaults to 150% zoom.
To specify a zoom percentage without using the zoom out/in toolbar buttons, type the number in the
percentage field and press the Enter key.
n
Reset Zoom —resets the zoom to 100%.
n
Fit Width —increases the size of the document to fit the maximum width of the Viewer. This set-
ting persists when you re-size the window.
n
Fit Page —fits the entire document into the total size of the page. Clicking this zooms out the doc-
ument and reduces the font size.
n
Fit Actual - fits the document display to the actual size it was in its native application. By default,
this resets the zoom percentage to 100%.
n
Layout Mode —select one of the following options to determine how documents that are more
than one page long display in the Viewer.
o
Single —one page of a document will display at a time. Use the page navigation options at
the bottom of the Viewer to adjust which page you view.
o
Single Continuous —displays the pages in the document stacked vertically so you can
scroll up and down to view them.
o
Facing Continuous —displays the pages in the document in a row horizontally so you can
scroll left and right to view them.
n
Draft Mode —click to begin Draft Mode which automatically contrasts text from the background,
help you identify poorly drawn redactions, and identify corrupt OCR text. This option is only available
on the Native Viewer and PDF Viewer with rendered documents.

User Guide 91
n
Go To Next/Previous Highlight —moves through previous and next highlighted terms in the
document.
n
Rotate All Pages —rotates all pages in a document clockwise 90 degrees. This option is only
available for documents that have been paginated.
n
Redact Markup Visibility - this option determines how markups display in the Viewer.
It only displays if you have the Redact application installed and open a PDF or spreadsheet document
in the Native Viewer.
Click the Redact Markup Visibility icon to toggle between the following modes:
o
Solid - Markups in the document are fully visible and cover text underneath.
o
Transparent - Markups in the document are partially visible so that you can still see the text
underneath.
o
Hidden - Markups in the document are not visible.
n
Create PDF —click to save the current native document as a PDF file. When you click this option,
the Create PDF pop-up displays. The document then opens in a new window in your browser as a
PDF where you can then choose to save or print the document image.
7.1.1.2 Searchable PDF Improvements per Configuration
When you Create PDF from the Native Viewer or using the Mass PDF Operations bar, most types of
searchable PDFs will now have significantly smaller file sizes. More specifically, images without
highlights, but configured to be searchable and stamped, will benefit from the most dramatic
decrease in file size. But overall, the Create PDF feature now generates reduced file saves for a wide
range of configurations when creating searchable PDFs. In order to accomplish this for previously
unknown file-types and mixed TIFF and JPEG Create PDF jobs, Relativity now treats each page
individually, instead of treating the entire document as a whole, allowing for the best file-size-
reduction technique possible for each page.
Image Format Redactions Highlights File Size Reduction
TIFF Yes No Up to 76%
TIFF Yes Yes Up to 43%

User Guide 92
Image Format Redactions Highlights File Size Reduction
JPEG Yes No Up to 43%
JPEG Yes Yes Up to 43%
After you click Create PDF, a copy of the document converts to a PDF file you can save from your
web browser downloads. Relativity assigns a GUID for Create PDF file names.
n
Search Bar —searches for terms in the current document and nav-
igates through the hits.
o
Entering a term and either clicking the left or right arrow button or pressing Enter in this text
box scrolls to and highlights the text of the next instance of the term, from the placement of the
cursor.
o
Searching in this text box is not case sensitive.
o
Searching supports dtSearch and so proximity, fuzziness, and stemming can be used.
o
You can remove a term you previously searched for or all of the terms you have recently
searched for from the Persistent Highlight Pane. Removing a term or terms will also remove
any highlights they generated in the document. To remove a term or terms, hover your cursor
over the row of the term or recent searches you wish to remove and then click on on the
right side of the row.
n
Show/Hide Hidden Cells —displays or hides all hidden cells in a Microsoft Excel spreadsheet.
This functionality is only available for Excel files and does not work on imaged documents because
Relativity only images unhidden cells.
7.1.1.3 Left drawer Viewer options
The following options are available in the left drawer of the review interface:
n
Persistent Highlighting—displays or hides a panel containing all recent searches from the criteria
entered in the Search Bar and any persistent highlight sets in the workspace. Only terms in the sets
and recent searches that are in the current document will display in the pane.
Additionally, you can control which highlights display in the current document by clicking on either the
persistent set to only display highlights from that set or you can click on a specific term to only see
that term highlighted in the document.

User Guide 93
n
Thumbnail—click to expand the left drawer and display the Thumbnail Viewer. Each page of the doc-
ument you are reviewing has its own numbered thumbnail in the Thumbnail Viewer.
n
Sentiment—click to expand or collapse the left drawer and display sentiment analysis highlights in
the Viewer.
n
aiR for Review Analysis—click to expand or collapse the left drawer and display aiR for Review res-
ults. You can also enable or disable aiR for Review highlights.
7.1.1.4 Right drawer Viewer options
The following options are available in the right drawer:
n
Hidden Content—displays or hides all hidden cells in a Microsoft Excel spreadsheet. This
functionality is only available for Excel files and does not work on imaged documents because
Relativity only images unhidden cells.
n
Contextual Search—click to expand the right drawer and display the Contextual Search card. This
feature allows you to quickly navigate to matching search terms in a document which is useful in
longer documents or ones that have many matching search terms. The Contextual Search card has
the same functionality as the Search Bar. To learn more about the Search Bar's functionality, see
Search Bar. Additionally, each search term match is displayed in a box that includes both words
before and after the search term match to make it easy for you to view the context of each one.
Enter a term or terms in the search box and press Enter on your keyboard to highlight in yellow any
matches in the current document. You can click on a desired search term box in the pane to jump to
that place in the document. The active search term box will display with a blue border and the
matching search term in the document will be highlighted in blue to make it easy to find.
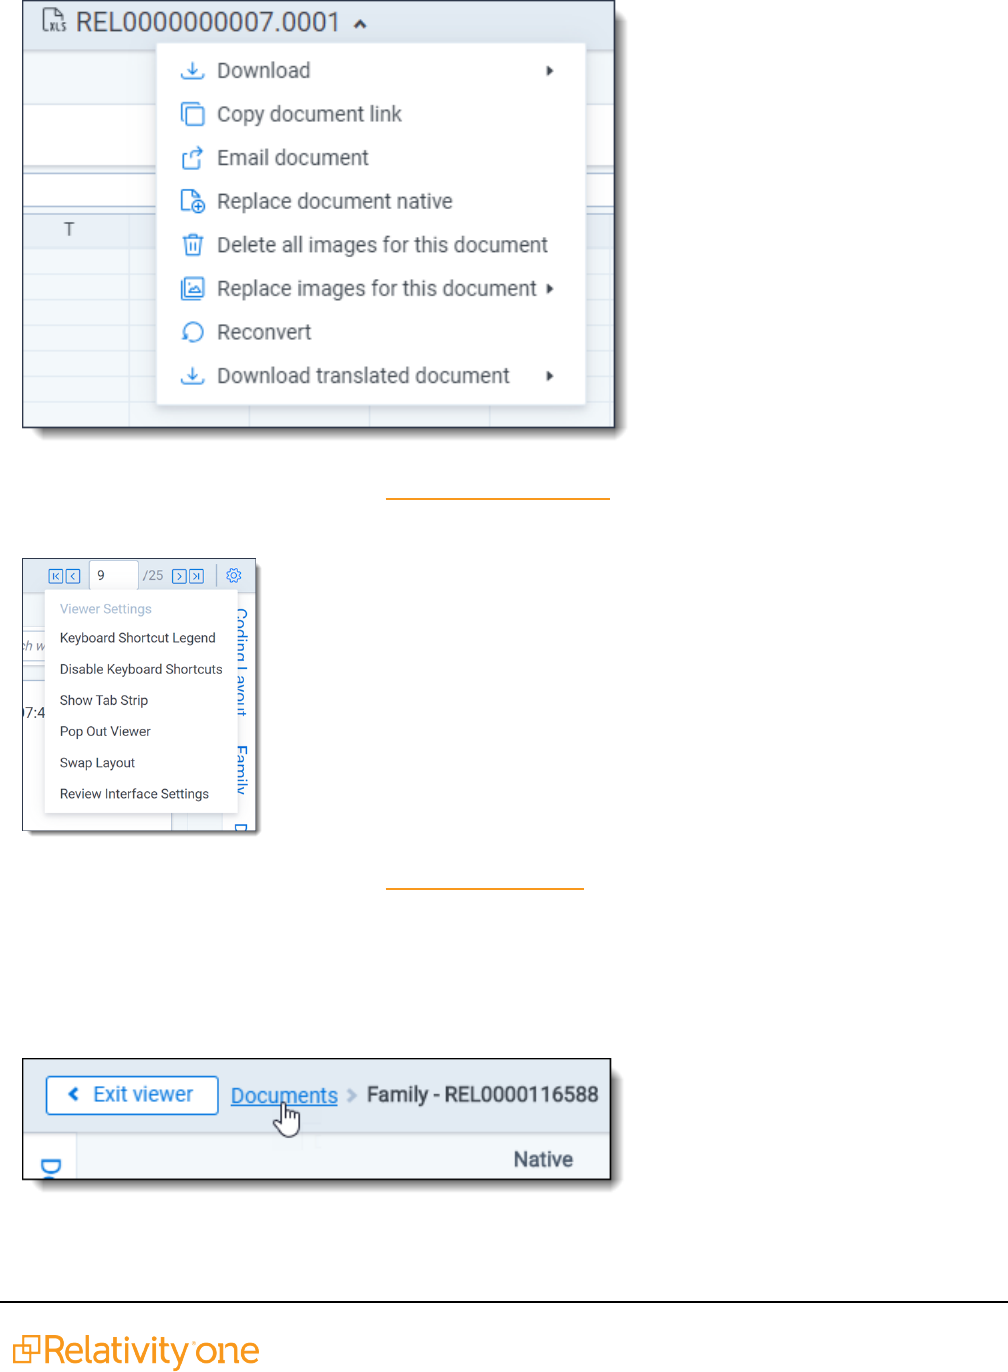
User Guide 94
7.1.1.5 Document actions menu
To learn more about these options, see Document actions menu.
7.1.1.6 Viewer settings menu
To learn more about these options, see Viewer settings menu.
7.1.1.7 Viewer breadcrumbs
The Viewer breadcrumbs help you track your current location while browsing documents in the Related
items card. The information on your current location updates as you navigate. If Documents is an active link,
you can click it to return to the document you were viewing before browsing documents in the Related items
card.

User Guide 95
Additionally, to exit the Viewer and return to the page you were previously on, you can click the Exit viewer
button at any time.
7.1.2 Copying text in the Viewer
While viewing a document in the Native Viewer, you have several right-click options, including the Copy
option. Use this option to copy text from the document you are currently viewing and then paste it into
another application.
To do this:
1. Highlight the text you want copied.
2. Right-click, and then select Copy from the menu.
You cannot copy text if you:
n
Have not highlighted any text.
n
Do not have permission to the Local Access option on the Document object. This is the same per-
mission that permits you to open the file in its native application. For more information, see Object list
in Relativity Admin guide.
Note: If you don't have permission to the Local Access option on the Document object, you can't use the
Ctrl+C or Ctrl+Ins options in either the Native Viewer or the Extracted Text Viewer.
7.1.3 Streaming audio and video files
Audio and video files can be streamed in the Native Viewer. Audio and video file type compatibility varies
depending on your internet browser.
Note: If an audio or video file has not been opened in the Native Viewer, it may display with a value of No
for the Supported by Viewer field. Once a file has been successfully opened by the Viewer, the Supported
By Viewer field displays Yes.

User Guide 96
The audio and video controls that display in the Viewer depend on your internet browser.
Browser Audio Controls Video Controls

User Guide 97
Browser Audio Controls Video Controls
7.1.3.1 Waveform audio
Note: Audio files that are longer than 30 minutes cannot be opened in the Native Viewer.
Waveform is a visualization of sound that you can view while listening to an audio file in the Native Viewer.
Click the Show/Hide Waveform icon to display the Waveform visualization. The visualization tracks the
volume and intensity of sound to help you avoid audio inactivity. You can use the audio controls to skip
these sections. The visualization also scrolls with a time scale along the bottom to help you identify when a
particular audio event occurs.
Note: Waveform audio is not compatible with the Pop-Out Viewer.

User Guide 98
7.1.4 Document Intelligence
Document Intelligence notifies you that there is hidden or annotated content, including a pivot table or a
filtered pivot table, present in the current document in the Native Viewer. This hidden content are the
annotations and modifications tracked in certain document formats. For more information on the file types,
see Tracking annotations. When hidden content is found in a document, a pop-up modal appears in the
lower-right corner. Highlighting and bordering is also visible in the Viewer where the changes were made
and a annotation bar is available to sort and view each annotation. Once the notifications appear, you can
then choose whether or not to view tracked changes, hidden text and comments in the Viewer.
7.1.4.1 Tracking annotations
The various file types each have distinct annotations that are tracked. Below is each file type that is
supported and the related tracked changes:
File type
File exten-
sions
Annotation type Tracked changes
Excel .xls, .xlsx,
.xlsb
Tracked Changes, formulas, hidden
pages/columns/rows, Comments
Inserted cell, moved cell,
modified cell, cleared cell
Inserted column, deleted

User Guide 99
File type
File exten-
sions
Annotation type Tracked changes
column
Inserted row, deleted row
Inserted sheet, renamed sheet
Word .doc, .docx Tracked Changes, comments, hidden text Insertions, deletions, moves
PowerPoint .ppt, .pptx Speaker notes, comments, hidden slides
PDF .pdf Comments
7.1.4.2 Using notifications and the annotation bar
When using Document Intelligence, an orange pop-up modal appears in the bottom right corner of the
Viewer when hidden content exists. Click on the pop-up modal to see the hidden content on that document.
If there is no hidden content found, the modal will say so. If there is hidden content found, it lists each piece
of content. Click Show these items to open the annotation bar.
A hidden content icon is available when a supported file type is in the Native Viewer. Click the Hidden
Content icon to open or close the annotations bar. If you are viewing an unsupported file type, the icon is
not available. For supported file types, see the Tracking annotations.
Annotation bar
The annotation bar is for sorting and viewing the hidden content found with Document Intelligence. Each
annotation has a card that lists the tracked change, a description of the change, time and date, and author of
the change.
If there are multiple annotation cards in the annotation bar, then you can sort them in multiple ways. Click
the Sort By drop down menu for these options:
n
Location
n
Author A-Z
n
Author Z-A
n
Oldest first
n
Newest first
n
Annotation type

User Guide 100
Annotation types and highlights
Each type of annotation comes with its distinct highlight in the Native Viewer. Below is a table that lists each
annotation type with its highlight in the Viewer:
File type Modification Annotation
Excel Inserted cell Green dotted border around cell.
Excel Deleted cell Red dotted border around cell.
Excel Modified cell Purple dotted border around cell.
Excel
Moved cell
Red dotted border around original location; green dotted border around
new location.
Excel Inserted row Green shading in the row header.
Excel Deleted row Red shading with "DEL"in the row header. If the row is added then
deleted, the shading is purple.
Excel Inserted column Green shading in column header.
Excel Deleted column Red shading with "DEL"in the column header. If the row is added then
deleted, the shading is purple.
Excel Inserted sheet Green shading in the sheet tab.
Excel Hidden sheet Grey text in the sheet tab.
Excel Modified sheet Purple shading on the sheet tab.
Word Comments Blue background on text and note bubble in document.
Word Insertions Green shading behind text.
Word Deletions Red shading behind text.
Word Moves Purple shading behind text.
Word Hidden text Red shading behind text.
PowerPoint Speaker notes Page under sheet.
PowerPoint Comments Note bubble in presentation.
PowerPoint Hidden slide Hidden icon in bottom left corner of slide.
PDF Comments Note bubble in document.
Leader lines
Clicking on an annotation in the Viewer connects the selected annotation to the related annotation tile in the
annotation bar. Click on another annotation to view the leader line to that annotation card. One grey
connector line is available at a time, unless you moved a cell. In this case, there is a leader line where the
cell was originally located and a leader line in the cell's new location. Click the same annotation to remove
the leader line.

User Guide 101
Note: The Has Hidden Data field is populated during Processing. The hidden content that the Viewer
finds may not be perfectly in-sync with the hidden data that the Processing engine finds.
7.2 Image Viewer
When you switch to the Image Viewer, a .tiff or .jpeg version of the document displays. You can highlight
and redact images in this mode. The Image Viewer is only available if you have loaded an imaged version of
the document in the Viewer or if you have manually imaged the file using the Image on the fly option in the
Document actions menu. For more information, see Imaging on the fly.
The redactions that are burned into a produced image are the redactions that were on the image at the time
that you produced it. If you add or remove redactions from an image after you have produced it, then the
image and the produced version of that image will be out of sync.
7.2.1 Navigating the Image Viewer
The Image Viewer offers several ways of viewing and working with documents.
Note: If you used the Basic Imaging profile to produce images of a PDF file, please note that the Viewer
displays PDF text by mapping the character codes to Unicode in most cases. To check whether PDF text
has been properly encoded and will display correctly in the Viewer, copy the text in the original PDF file
and paste it into another application like Microsoft Word or Notepad. If the pasted text does not display
correctly, the PDF is not properly encoded. If the pasted text displays correctly in another application but
not in the Viewer, contact Support for assistance.
There are options available in the following sections of the Viewer:

User Guide 102
1.
Image Viewer toolbar options
2.
Left drawer Viewer options
3.
Document actions menu
4.
Viewer settings menu
5.
Viewer breadcrumbs
Each of these options and menus is described in more detail in the sections below.
7.2.1.1 Image Viewer toolbar options
The Image Viewer displays the following icons in the toolbar:
n
Zoom Out/In —zooms out and in on the current document in increments of 10%
within a range of 10% to 4,000%. If you attempt to zoom out to a percentage lower than 10%, the
Viewer automatically sets the display to 10%. If you attempt to zoom in to a percentage higher than
4,000%, the Viewer automatically sets the display to 4,000%. Your zoom setting persists as you nav-
igate through a document set. This means that if you have set one document to 150% and you go to
the next document, the next document defaults to 150% zoom.
To specify a zoom percentage without using the zoom out/in toolbar buttons, type the number in the
percentage field and press the Enter key.
n
Reset Zoom —resets the zoom to 100%.

User Guide 103
n
Fit Width —increases the size of the document to fit the maximum width of the Viewer. This set-
ting persists when you re-size the window.
n
Fit Page —fits the entire document into the total size of the page. Clicking this zooms out the doc-
ument and reduces the font size.
n
Fit Actual —fits the document display to the actual size it was in its native application. By default,
this resets the zoom percentage to 100%.
n
Layout Mode —select one of the following options to determine how documents that are more
than one page long display in the Viewer.
o
Single —one page of a document will display at a time. Use the page navigation options at
the bottom of the Viewer to adjust which page you view.
o
Single Continuous —displays the pages in the document stacked vertically so you can
scroll up and down to view them.
o
Facing Continuous —displays the pages in the document in a row horizontally so you can
scroll left and right to view them.
n
Rotate all pages —rotates all pages in a document clockwise 90 degrees.
n
Rotate current page —rotates only the current page clockwise 90 degrees.
Note: Image rotation is persistent. Any pages that you rotate will be rotated the next time you
return to them in the Viewer and for other users who view them after you rotate them. Rotation is
also applied when you run the production containing the images.
n
Selector —select within a document.
n
Markup Visibility —changes the visibility mode of the markups between full visibility, transparent
and hidden. By default, this is set to Solid, which means all highlights and redactions appear as solid
as you applied them.
n
Highlight - <Color> —highlights the selected text with the color you specify from the drop-
down menu. The default color is blue. Select from the following:
o
Blue
o
Green
o
Orange
o
Pink

User Guide 104
o
Purple
o
Yellow
n
Redaction Mode - Basic Redact —enables the basic redaction tool. For more information, see
Creating inverse redactions on page30.
n
Redaction Mode - Full page —enables the full-page redaction tool. The drop-down menu for
this redaction type offers the same options as the basic Redact icon, except that the redaction you
choose is applied to the entire page. For example, if you select White, the entire page becomes
white. For more information, see Creating full-page redactions on page31.
n
Redaction Mode - Inverse —enables the inverse redaction tool. For more information, see Creat-
ing inverse redactions on page30.
n
Redaction Mode - Mass Redact —apply a full-page redaction across all images or a range of
images in the document. For more information, see Creating mass redactions on page31.
n
Redaction Type - <Style> —enables single redaction tool. For more information on redacting,
see Creating basic redactions on page29. Select from the following types of redactions:
o
Black —applies a solid black box to the selected text.
o
Cross —applies a white box with an X in the middle of it over the selected text.
o
Text —applies a box over the selected text, in which you can add text such as "Privileged"
or "Redacted."
o
White —applies a solid white box over the selected text.
n
Font Size —change the font size of the text within a text box redaction.
n
Delete Highlights —mass delete markups from any or all images in the document. For more
information, see Mass deleting markups on page36.
n
Create PDF —gives you the option of saving the image as a PDF. For more information, see Sav-
ing an image as a PDF.
7.2.1.2 Left drawer Image Viewer options
The following options are available in the left drawer:

User Guide 105
n
Thumbnail—click to expand the left drawer and display the Thumbnail Viewer. Each page of the doc-
ument you are reviewing has its own numbered thumbnail in the Thumbnail Viewer. To learn more,
visit Thumbnail Viewer.
n
aiR for Review Analysis—click to expand or collapse the left drawer and display aiR for Review res-
ults. You can also enable or disable aiR for Review highlights.
7.2.1.3 Document actions menu
To learn more about these options, see Document actions menu.
7.2.1.4 Viewer settings menu
To learn more about these options, see Viewer settings menu.

User Guide 106
7.2.1.5 Viewer breadcrumbs
The Viewer breadcrumbs help you track your current location while browsing documents in the Related
items card. The information on your current location updates as you navigate. If Documents is an active link,
you can click it to return to the document you were viewing before browsing documents in the Related items
card.
Additionally, to exit the Viewer and return to the page you were previously on, you can click the Exit viewer
button at any time.
7.2.2 Saving an image as a PDF
Clicking the icon brings up the following window, in which you can specify your PDF settings:
n
PDF Profile—select the desired PDF profile to determine how the PDF will be customized.
n
Page Range—select from the following standard print range options:
o
All pages—saves all pages in the document.
o
Current Page—saves only the page you are currently on.
o
Pages—saves a range of pages that you specify in the text box to the right.
7.3 Extracted Text Viewer
When you switch to Extracted Text Viewer in the Viewer type tabs, you can access a drop-down menu on
the right side of the Extracted Text tab where all extracted text and all long text fields on the field

User Guide 107
edit/creation page are available. Creating fields in the Admin guide. The drop-down menu lists long-text
fields that contain text for the current document open in the Viewer and those you have permissions to.
Notes: Relativity displays all long text fields made available in the Viewer in the drop-down menu, regard-
less of whether that field contains text for the current document. If you select a long text field from the
drop-down list, and the current document does not have text for that field, the Viewer displays a message
stating, "This page is empty".
The Viewer displays PDF text by mapping the character codes to Unicode in most cases. To check
whether PDF text has been properly encoded and will display correctly in the Viewer, copy the text in the
original PDF file and paste it into another application like Microsoft Word or Notepad. If the pasted text
does not display correctly, the PDF is not properly encoded. If the pasted text displays correctly in another
application but not in the Viewer, contact Support for assistance.
7.3.0.1 Navigating the Extracted Text Viewer
The Extracted Viewer offers several ways of viewing and working with documents. There are options
available in the following sections of the Viewer:
1.
Extracted Text Viewer toolbar options
2.
Left drawer Viewer options
3.
Document actions menu
4.
Viewer settings menu
5.
Viewer breadcrumbs
Each of these options and menus is described in more detail in the sections below.
7.3.0.2 Extracted Text Viewer toolbar options
The Extracted Text Viewer provides the following options:

User Guide 108
n
Zoom Out/In —zooms out and in on the current document in increments of 10%
within a range of 10% to 4,000%. If you attempt to zoom out to a percentage lower than 10%, the
Viewer automatically sets the display to 10%. If you attempt to zoom in to a percentage higher than
4,000%, the Viewer automatically sets the display to 4,000%. Your zoom setting persists as you nav-
igate through a document set. This means that if you have set one document to 150% and you go to
the next document, the next document defaults to 150% zoom.
To specify a zoom percentage without using the zoom out/in toolbar buttons, type the number in the
percentage field and press the Enter key.
n
Reset Zoom —resets the zoom to 100%.
n
Go To Next/Previous Highlight —moves through previous and next highlighted terms in the
document.
n
Tab character size —select an option from the drop-down menu to determine the
amount of space that is taken when the Tab key was used in the current document. This option can
help you ensure that the spacing in a spreadsheet document is aligned and works best when the Tab
key is used after each column in the spreadsheet.
n
Toggle WordWrap —determines whether the text in the current document will wrap so that it fits
on the current page or not.
o
Enabled—text in the current document will be forced onto the next line if it cannot display in
the current window size. You cannot scroll horizontally with Toggle WordWrap enabled.
o
Disabled—text in the current document will not be forced onto the next line will display in more
horizontal fashion. You can scroll horizontally to control to view the desired text.
n
Search Bar —searches for terms in the current document and navigates
through the hits.
o
Entering a term and either clicking the left or right arrow button or pressing Enter in this text
box scrolls to and highlights the text of the next instance of the term, from the placement of the
cursor.
o
Searching in this text box is not case sensitive.
o
Searching supports dtSearch and so proximity, fuzziness, and stemming can be used.
Note: If you don't have permission to the Local Access option on the Document object, you can't use the
Ctrl+C or Ctrl+Ins options in either the Native Viewer or the Extracted Text Viewer.
7.3.0.3 Left drawer Viewer options
The following options are available in the left drawer:

User Guide 109
n
Persistent Highlighting—displays or hides a panel containing all Recent Searches from the criteria
entered in the Search Bar and any persistent highlight sets in the workspace. Only terms in the sets
and recent searches that are in the current document will display in the panel.
Additionally, you can control which highlights display in the current document by clicking on either the
persistent set to only display highlights from that set or you can click on a specific term to only see
that term highlighted in the document.
n
Sentiment—click to expand or collapse the left drawer and display sentiment analysis highlights in
the Viewer.
n
aiR for Review Analysis—click to expand or collapse the left drawer and display aiR for Review res-
ults. You can also enable or disable aiR for Review highlights.
7.3.0.4 Right drawer Viewer options
The following option is available in the right drawer:
n
Contextual Search—click to expand the right drawer and display the Contextual Search card. This
feature allows you to quickly navigate to matching search terms in a document which is useful in
longer documents or ones that have many matching search terms. The Contextual Search card has
the same functionality as the Search Bar. To learn more about the Search Bar's functionality, see
Search Bar. Additionally, each search term match is displayed in a box that includes both words
before and after the search term match to make it easy for you to view the context of each one.
Enter a term or terms in the search box and press Enter on your keyboard to highlight in yellow any
matches in the current document. You can click on a desired search term box in the pane to jump to
that place in the document. The active search term box will display with a blue border and the
matching search term in the document will be highlighted in blue to make it easy to find.

User Guide 110
7.3.0.5 Document actions menu
To learn more about these options, see Document actions menu.
7.3.0.6 Viewer settings menu
To learn more about these options, see Viewer settings menu.
7.3.0.7 Viewer breadcrumbs
The Viewer breadcrumbs help you track your current location while browsing documents in the Related
items card. The information on your current location updates as you navigate. If Documents is an active link,
you can click it to return to the document you were viewing before browsing documents in the Related items
card.

User Guide 111
Additionally, to exit the Viewer and return to the page you were previously on, you can click the Exit viewer
button at any time.
7.4 Productions Viewer
When you switch to the Productions Viewer in the Viewer type tabs, you can access a drop-down menu on
the right side of the Productions Viewer tab that displays available production sets that contain the current
document. For information about creating production sets, see Production sets in the Admin guide.
Note: The redactions that are burned into a produced image are the redactions that were on the image at
the time that you produced it. If you add or remove redactions from an image after you've produced it,
then the image and the produced version of that image will be out of sync.
Select a production set from the drop-down menu to see how a document was produced in the selected
production. If a document is not included in a production, the productions mode option is unavailable.
7.4.1 Navigating the Productions Viewer
The Productions Viewer offers several ways of viewing and working with documents. There are options
available in the following sections of the Viewer:
1.
Productions Viewer toolbar options
2.
Left drawer Viewer options
3.
Document actions menu
4.
Viewer settings menu
5.
Viewer breadcrumbs
Each of these options and menus is described in more detail in the sections below.
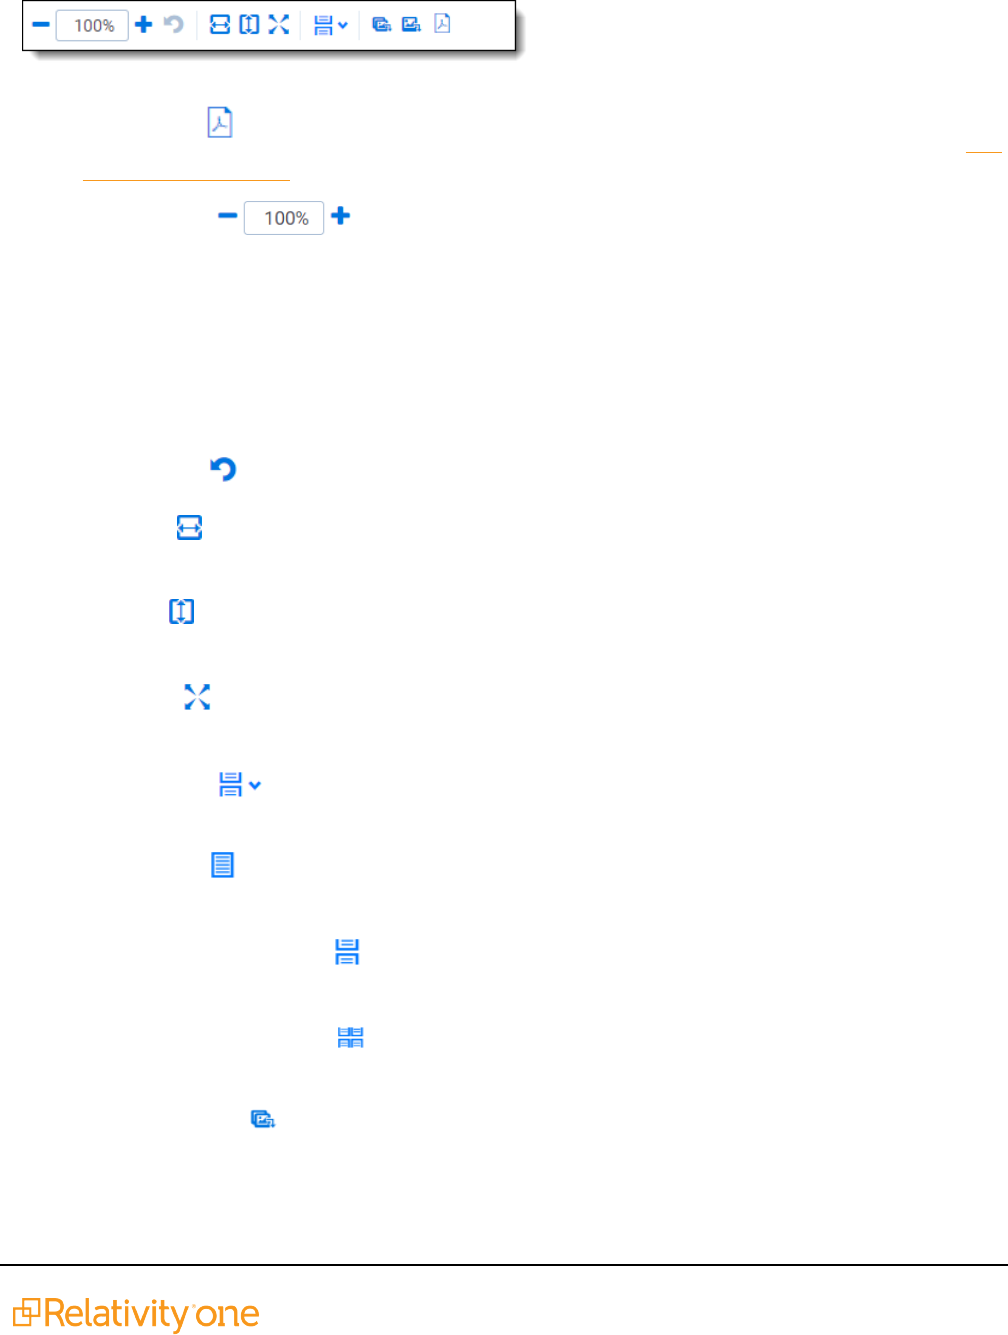
User Guide 112
7.4.1.1 Productions Viewer toolbar options
Productions Viewer provides the following options:
n
Create PDF —gives you the option of saving the image as a PDF. For more information, see Sav-
ing an image as a PDF.
n
Zoom Out/In —zooms out and in on the current document in increments of 10%
within a range of 10% to 4,000%. If you attempt to zoom out to a percentage lower than 10%, the
Viewer automatically sets the display to 10%. If you attempt to zoom in to a percentage higher than
4,000%, the Viewer automatically sets the display to 4,000%. Your zoom setting persists as you nav-
igate through a document set. This means that if you have set one document to 150% and you go to
the next document, the next document defaults to 150% zoom.
To specify a zoom percentage without using the zoom out/in toolbar buttons, type the number in the
percentage field and press the Enter key.
n
Reset Zoom —resets the zoom to 100%.
n
Fit Width —increases the size of the document to fit the maximum width of the Viewer. This set-
ting persists when you re-size the window.
n
Fit Page —fits the entire document into the total size of the page. Clicking this zooms out the doc-
ument and reduces the font size.
n
Fit Actual —fits the document display to the actual size it was in its native application. By default,
this resets the zoom percentage to 100%.
n
Layout Mode —select one of the following options to determine how documents that are more
than one page long display in the Viewer.
o
Single —one page of a document will display at a time. Use the page navigation options at
the bottom of the Viewer to adjust which page you view.
o
Single Continuous —displays the pages in the document stacked vertically so you can
scroll up and down to view them.
o
Facing Continuous —displays the pages in the document in a row horizontally so you can
scroll left and right to view them.
n
Rotate all pages —rotates all pages in a document clockwise 90 degrees.

User Guide 113
n
Rotate current page —rotates only the current page clockwise 90 degrees.
Note: Image rotation is persistent. Any pages that you rotate will be rotated the next time you
return to them in the Viewer and for other users who view them after you rotate them. Rotation is
also applied when you run the production containing the images.
7.4.1.2 Left drawer Productions Viewer options
The following options are available in the left drawer:
n
Thumbnail—click to expand the left drawer and display the Thumbnail Viewer. Each page of the doc-
ument you are reviewing has its own numbered thumbnail in the Thumbnail Viewer. To learn more,
visit Thumbnail Viewer.
n
aiR for Review Analysis—click to expand or collapse the left drawer and display aiR for Review res-
ults. You can also enable or disable aiR for Review highlights.
7.4.1.3 Document actions menu
To learn more about these options, see Document actions menu.

User Guide 114
7.4.1.4 Viewer settings menu
To learn more about these options, see Viewer settings menu.
7.4.1.5 Viewer breadcrumbs
The Viewer breadcrumbs help you track your current location while browsing documents in the Related
items card. The information on your current location updates as you navigate. If Documents is an active link,
you can click it to return to the document you were viewing before browsing documents in the Related items
card.
Additionally, to exit the Viewer and return to the page you were previously on, you can click the Exit viewer
button at any time.
7.4.2 Imaging on the fly
You can image a single document in the Viewer by selecting the Image on the fly option from the Document
actions menu at the top-center of the page.
Using this feature, you can select any imaging profile you have permissions to view and use it to image the
document.
Note: If the source file of the document you are imaging is changed during the conversion process, for
example through overlay, that document becomes undeliverable and you receive an error. To resolve this
error, refresh the page or re-image the document.
After imaging a document on the fly, you can access thumbnail renderings of the imaged pages of the
document.
Imaging some file formats can cause problems. Consider the following:
n
Many PDFs render and image very well. However, you may have problems rendering and imaging
some PDFs due to the variety of their content.

User Guide 115
n
While most Microsoft Office documents render and image well, you may experience issues when ima-
ging documents with embedded files.
n
You may have problems rendering and imaging vector-based documents like Visio and CAD.
7.5 PDF Viewer
The PDF Viewer allows you to view PDF files in the Review Interface.
Notes: You may experience slowness if you try to open PDF documents that are larger than 300 mega-
bytes.
The Viewer displays PDF text by mapping the character codes to Unicode in most cases. To check
whether PDF text has been properly encoded and will display correctly in the Viewer, copy the text in the
original PDF file and paste it into another application like Microsoft Word or Notepad. If the pasted text
does not display correctly, the PDF is not properly encoded. If the pasted text displays correctly in another
application but not in the Viewer, contact Support for assistance.
There are options available in the following sections of the Viewer:
1.
PDF Viewer toolbar options
2.
Left drawer Viewer options
3.
Document actions menu
4.
Viewer settings menu
5.
Viewer breadcrumbs
6.
Right drawer Viewer options

User Guide 116
Each of these options and menus is described in more detail in the sections below.
7.5.0.1 PDF Viewer toolbar options
The PDF Viewer provides the following options:
n
Zoom Out/In —zooms out and in on the current document in increments of 10% within
a range of 10% to 4,000%. If you attempt to zoom out to a percentage lower than 10%, the Viewer
automatically sets the display to 10%. If you attempt to zoom in to a percentage higher than 4,000%,
the Viewer automatically sets the display to 4,000%. Your zoom setting persists as you navigate
through a document set. This means that if you have set one document to 150% and you go to the
next document, the next document defaults to 150% zoom.
To specify a zoom percentage without using the zoom out/in toolbar buttons, type the number in the
percentage field and press the Enter key.
n
Reset Zoom —resets the zoom to 100%.
n
Fit Width —increases the size of the document to fit the maximum width of the Viewer. This set-
ting persists when you re-size the window.
n
Fit Page —fits the entire document into the total size of the page. Clicking this zooms out the doc-
ument and reduces the font size.
n
Fit Actual - fits the document display to the actual size it was in its native application. By default,
this resets the zoom percentage to 100%.
n
Layout Mode —select one of the following options to determine how documents that are more
than one page long display in the Viewer.
o
Single —one page of a document will display at a time. Use the page navigation options at
the bottom of the Viewer to adjust which page you view.
o
Single Continuous —displays the pages in the document stacked vertically so you can
scroll up and down to view them.
o
Facing Continuous —displays the pages in the document in a row horizontally so you can
scroll left and right to view them.
n
Draft Mode —click to begin Draft Mode which automatically contrasts text from the background,
help you identify poorly drawn redactions, and identify corrupt OCR text. This option is only available
on the Native Viewer and PDF Viewer with rendered documents.
n
Go To Next/Previous Highlight —moves through previous and next highlighted terms in the
document.

User Guide 117
n
Redact Markup Visibility - this option determines how markups display in the PDF Viewer.
Click the Redact Markup Visibility icon to toggle between the following modes:
o
Solid - Markups in the document are fully visible and cover text underneath.
o
Transparent - Markups in the document are partially visible so that you can still see the text
underneath.
o
Hidden - Markups in the document are not visible.
7.5.0.2 Left drawer Viewer options
The following options are available in the left drawer:
n
Show/Hide Persistent Highlighting—displays or hides a panel containing all Recent Searches
from the criteria entered in the Search Bar and any persistent highlight sets in the workspace. Only
terms in the sets and recent searches that are in the current document will display in the pane.
Additionally, you can control which highlights display in the current document by clicking on either the
persistent set to only display highlights from that set or you can click on a specific term to only see
that term highlighted in the document.
n
Thumbnail—click to expand the left drawer and display the Thumbnail Viewer. Each page of the doc-
ument you are reviewing has its own numbered thumbnail in the Thumbnail Viewer.
n
Sentiment—click to expand or collapse the left drawer and display Sentiment Analysis Highlights in
the Viewer.
n
aiR for Review Analysis—click to expand or collapse the left drawer and display aiR for Review res-
ults. You can also enable or disable aiR for Review highlights.
7.5.0.3 Right drawer Viewer options
The following options are available in the right drawer:

User Guide 118
n
Hidden Content —displays or hides all hidden cells in a Microsoft Excel spreadsheet. This
functionality is only available for Excel files and does not work on imaged documents because
Relativity only images unhidden cells.
n
Contextual Search—click to expand the right drawer and display the Contextual Search card. This
feature allows you to quickly navigate to matching search terms in a document which is useful in
longer documents or ones that have many matching search terms. The Contextual Search card has
the same functionality as the Search Bar. To learn more about the Search Bar's functionality, see
Search Bar. Additionally, each search term match is displayed in a box that includes both words
before and after the search term match to make it easy for you to view the context of each one.
Enter a term or terms in the search box and press Enter on your keyboard to highlight in yellow any
matches in the current document. You can click on a desired search term box in the pane to jump to
that place in the document. The active search term box will display with a blue border and the
matching search term in the document will be highlighted in blue to make it easy to find.
7.5.0.4 Document actions menu
To learn more about these options, see Document actions menu.

User Guide 119
7.5.0.5 Viewer settings menu
To learn more about these options, see Viewer settings menu.
7.5.0.6 Viewer Breadcrumbs
The Viewer Breadcrumbs help you track your current location while browsing documents in the Related
items card. The information on your current location updates as you navigate. If Documents is an active link,
you can click it to return to the document you were viewing before browsing documents in the Related items
card.
Additionally, to exit the Viewer and return to the page you were previously on, you can click the Exit viewer
button at any time.
7.6 Document actions menu
The following options are available in the Document actions menu:

User Guide 120
n
Download—hover your cursor over this option and select one of the following:
o
ActiveProduction—select to download a copy of the produced document. A user must be
granted the Documents - Local Access (Download, Copy Text) permission to use this option.
Note: This option is not currently available to RelativityOne Government users because it is
part of the facade redactions update.
o
Documentnative—select to download a copy of the current document. A user must be gran-
ted the Documents - Local Access (Download, Copy Text) permission to use this option.
If you cannot download a copy of the document, this option is grayed out. Hover your cursor
over this option to view a tooltip that contains an explanation why this option is disabled.
A system or case administrator can determine which native file types users can and cannot
download by doing the following:
o
Navigate to the Native Types tab.
o
Click the Edit icon in the row of the desired file type.
o
On the Prevent Native Download field, select Yes to prevent users from downloading
it or No to allow users to download it.

User Guide 121
o
PDF—select to download a copy of the stored PDF of the current document. To create a stored
PDF, use Mass PDF. A user must be granted the Documents - Local Access (Download, Copy
Text) permission to use this option.
If you cannot download a copy of the document, this option is grayed out. Hover your cursor
over this option to view a tooltip that contains an explanation why this option is disabled.
n
Copy document link—select to copy the URL to the current document to your clipboard.
n
Email document—select to open an email in your default email application with the URL to the cur-
rent document included in the body of the email. The subject of the email will include the name of the
workspace and the current document.
n
Replace document native—select to replace the native file of the current document with a new file.
n
Image on the fly/Delete all images for this document—Image on the fly will display if the current
document has not been imaged. If the current document has been imaged, delete all images for this
document will display instead.
o
Delete all images for this document—select to delete all images associated with the current
document.
o
Image on the fly—to image the current document from the Viewer, hover your cursor over this
option and the Image Profile options will display. Select the desired profile option to begin the
imaging process.
A system or case administrator can determine which native file types can or cannot be imaged
using Image on the fly by doing the following:
o
Navigate to the Native Types tab.
o
Click the Edit icon in the row of the desired file type.
o
On the Restricted From Imaging By Default field, select Yes to prevent users from
using this option to image the native type or No to allow users to image the native file
type.
n
Replace images for this document—to replace the images for the current document using an ima-
ging profile, hover your cursor over this option and select the desired Imaging Profile option to begin
the imaging process.
n
Reconvert—select to clear your internet browser's cache and reload the current document for
review.

User Guide 122
n
Download translated document—hover your cursor over this option and select the desired lan-
guage to download a copy of the document in the selected language. This option only displays if a
document has been translated.
7.7 Viewer settings menu
The following options are available in the Viewer settings menu:
n
Keyboard Shortcut Legend—select to open the Keyboard Shortcut Legend pop-up modal to view
the current keyboard shortcuts available in the Viewer.
n
Enable/Disable Keyboard Shortcuts—select to enable or disable the keyboard shortcuts feature
while in the Viewer.
n
Show/Hide Tab Strip—select to show or hide the sidebar and tab strip in the Native Viewer.
n
Pop Out Viewer—select to open the Viewer in a new window in your browser. To learn more, visit
Pop Out Viewer.
n
Swap Layout—select to move the coding layout and the document card to the opposite side of the
Viewer from where they are currently located.
n
Review Interface Settings—Allows a third-party developer to temporarily enable or disable other
extensions and settings in the Review Interface while they are developing their extension. This option
only displays in the Viewer Settings menu if a user has the Document - Review Interface Settings per-
mission. This permission is disabled by default for all users other than System Administrators.
You can toggle instance settings, persistent highlighting, and extensions on or off for the current user
to help troubleshoot problems. Settings that are edited only apply to the current user and do not
impact settings across the instance. If you edit any of the options on this page, a message displays at
the top of the Viewer indicating that the settings have been changed. You may need to refresh your
browser for the changes to be reflected in the Viewer. Any changes made do not persist across user
sessions and once you log out, the Viewer will return to the state prior to editing the Review Interface
Settings.
If you would like to return to the prior Viewer state, click Reset Default Settings at the bottom of the
page to restore the settings back to their original values.

User Guide 123
7.8 Pop Out Viewer
You can open the Viewer in a new window in your browser using the Pop Out Viewer. The Document card
and the Coding card remain in the previously opened browser window. They can be expanded to a greater
width to take advantage of the space freed up by the Pop Out Viewer. The Pop Out Viewer retains the same
functionality as the Viewer. For example, you can switch Viewer types and view highlights or the Thumbnail
Viewer as desired.
To open the Pop-Out Viewer in a new browser window, select the Pop Out Viewer option from the Viewer
settings menu in the upper-right corner.

User Guide 124
To return the Viewer to the previous browser window where the Document card and Coding card are
located, you can click either the Pop In Viewer button on the previous browser window or you can select the
Pop In Viewer option from the Viewer settings menu in the upper-right.

User Guide 125
Alternatively, if you close the browser window that the popped out Viewer is in, the Viewer pops in to the
Review Interface or in other words, returns to the original browser window.
7.8.1 Standalone Viewer
To view a document in a separate browser window, click the file icon in the Document list or in the Viewer on
the Documents card or Family card. Launching the Standalone Viewer from either the Documents and
Family card launch the Review interface.

User Guide 126
Note: Keyboard shortcuts are available for use in the Standalone Viewer. For example, if you execute the
shortcut for Save & Next in the Standalone Viewer, each window performs the operation and moves to the
next document.
7.8.2 Document preview panel
The Document preview panel allows you to view documents in the document list before launching the
Viewer. It also allows you to filter the list and quickly view documents in the results which makes the process
of finding documents more efficient. To learn more, visit

User Guide 127
7.9 Related items card
The related items card is located at the bottom-right corner of the Viewer. Related items are customizable
groups of documents within a workspace. Common examples are family groups, duplicates, or similar
documents.
The Edit field will be available in the Related items card if you add it to the Relational card view.
The related items toolbar includes the following:
n
Related items —displays a group of documents related to the active doc-
ument. Options vary within the workspace. Hover over each icon to display the name of the item.
Examples include: family group, duplicates, and thread group.
n
Document history —displays a history of actions taken on the current document. You may not
have access to document history. If you store your audits in Data Grid, this displays the field name,
old value, and new value.
Note: In the Document History card, you can click the Details link to display a pop-up with the audit
history for the document. Click Run Details to display information about document imaging jobs,
including the name of the imaging profile and the formatting options used during mass imaging or
imaging on the fly.

User Guide 128
n
Production —displays all productions in which the document was included. You may not have per-
missions to view production information.
n
Linked —displays all linked records on the active document.
n
Search results —displays the results of an Analytics search.
n
Batch sets —shows all the batch sets for the active record. See Batches in the Admin manual.
You may not have permissions to view this section.
When a coding decision is made, the information in the Related Items card automatically refreshes. If there
are two or more reviewers on the same document, a user can refresh this card by clicking on the Menu icon
and selecting Refresh card.
The Related items card can be opened in a separate browser window. Click the Menu icon and select Pop
out card to open the card in its own window. Click the Menu icon and select Pop in card to close the
browser window and return the card to the Viewer.
7.9.0.1 Document actions in the related items card
You can use the related items card to quickly identify documents related to the active document. You can
also use this card to act on those groups of related items.
For instance, in the example of the Related items card below, you can select some or all of the documents in
the Related items card and click Edit. This opens a window for you to access all of your active layouts – the
same layouts available in the layouts pane. Using these layouts, you can make coding decisions and apply
them to the selected documents using mass editing. Alternatively, you can mass PDF, Save as List, Image,
or Tally/Sum/Average. To learn more, see Mass operations in the Admin guide.

User Guide 129
If you add the Edit field to your relational card view, you can click the Edit icon in the row of a document and
immediately open that document in the Viewer with the layout ready to be edited.
7.10 Document and Production History card
The Document History and Production History card is located in the bottom-right of the Viewer. This card
displays either the document history or the production history, depending on which you have selected. The
Document History card displays information about the most recent actions taken by users with the current
document. The Production History card displays information on any productions that the current document
was included in.
You can filter the columns to help find information or export the information in the Document History card to
a .csv file.
You can refresh this card by clicking on the Menu icon and selecting Refresh card.
The Document History card can be opened in a separate browser window. Click the Menu icon and select
Pop out card to open the card in its own window. Click the Menu icon and select Pop in card to close the
browser window and return the card to the Viewer.

User Guide 130
7.11 Documents card
The Documents card contains the document list so you can conveniently navigate from document-to-
document without having to leave the Viewer. The fields that display in the card are based on which view is
selected in the document list. Each time that you save a coding decision in the Viewer, the Documents card
refreshes to show the latest results. The highlighted document in the document list now updates when you
navigate from document-to-document to make tracking even easier.
If you're using Review Center, the Documents panel shows the documents in your current queue. For more
information, see Reviewing documents using Review Center in the Review Center guide.

User Guide 131
7.11.1 Email thread visualization tool
When you have installed and run an email threading structured analytics set for documents, you can use the
email thread visualization tool. Launch the Email Thread Visualization pane, click theemail thread
visualization ( ) icon in the lower right corner of the displayed document in the Viewer. The email thread
visualization pane expands and shows the thread group for the selected email in the Viewer.
Using this tool, you can visually examine email threads and how they are coded. You can also easily
perform mass editing from this tool. See Email thread visualization in the Analytics guide for more
information.
7.12 .eml and .msg header dates and times in the Viewer
.eml and .msg documents have header dates and times in Coordinated Universal Time (UTC) format. The
Relativity Native Time Zone Offset field determines how the Viewer handles time zones for .eml, .msg, and
RSMF documents.
Note: Relativity does not automatically account for Daylight Savings Time. If you need the Viewer to
account for Daylight Savings Time, deploy the Set Native Timezone Offset with DST script. You must be a
Relativity admin to deploy this script.

User Guide 132
7.13 Thumbnail Viewer
When in the Native Viewer, Image Viewer, or Productions Viewer, you can access and browse thumbnail
renderings of a document's pages. Quickly scan, locate, and navigate to pages in an open document.
To open the Thumbnail Viewer, click Thumbnail icon in the left drawer. The left drawer expands and
displays the Thumbnail Viewer. Scroll up and down to navigate all pages in the open document and click a
page to view it. As you scroll through the document, the thumbnail viewer scrolls simultaneously to keep the
viewed pages in focus.
The Thumbnail Viewer is compatible with word processor, presentation, vector image, and raster image file
types.
Note: The Thumbnail Viewer may not be available in the Native Viewer for document types that do not
paginate such as spreadsheets or plain text.
7.14 Document compare
You can use Document Compare to view the key differences between the extracted text of two documents.
To access Document Compare, you must first add the Relativity Compare system field to a view. See Views
in the Admin guide.
(Click to expand)

User Guide 133
To compare two documents in Relativity from the document list:
1.
Click to open the Document Compare selection window. By default the document identifier of the
selected document populates the Document Compare window.
2.
Click by the With field to select a document with which to compare it. A Select Item pop-up
window displays.
Note: You can change the value of either of the fields at any time while in the Document Compare
window.
3. Select the desired document from the list and click Set. The Document Compare window displays the
selected document in the With field.
4. Click Compare. The window displays the similarities and differences between the documents.
5.
The similarities and differences between the documents are reflected in the legend at the bottom of
the window:
n
Inserted - text appears in the "With" document but doesn't appear in the "Compare" document.
n
Deleted - text appears in the "Compare" document but doesn't appear in the "With" document.
n
Unchanged -text appears in both documents.
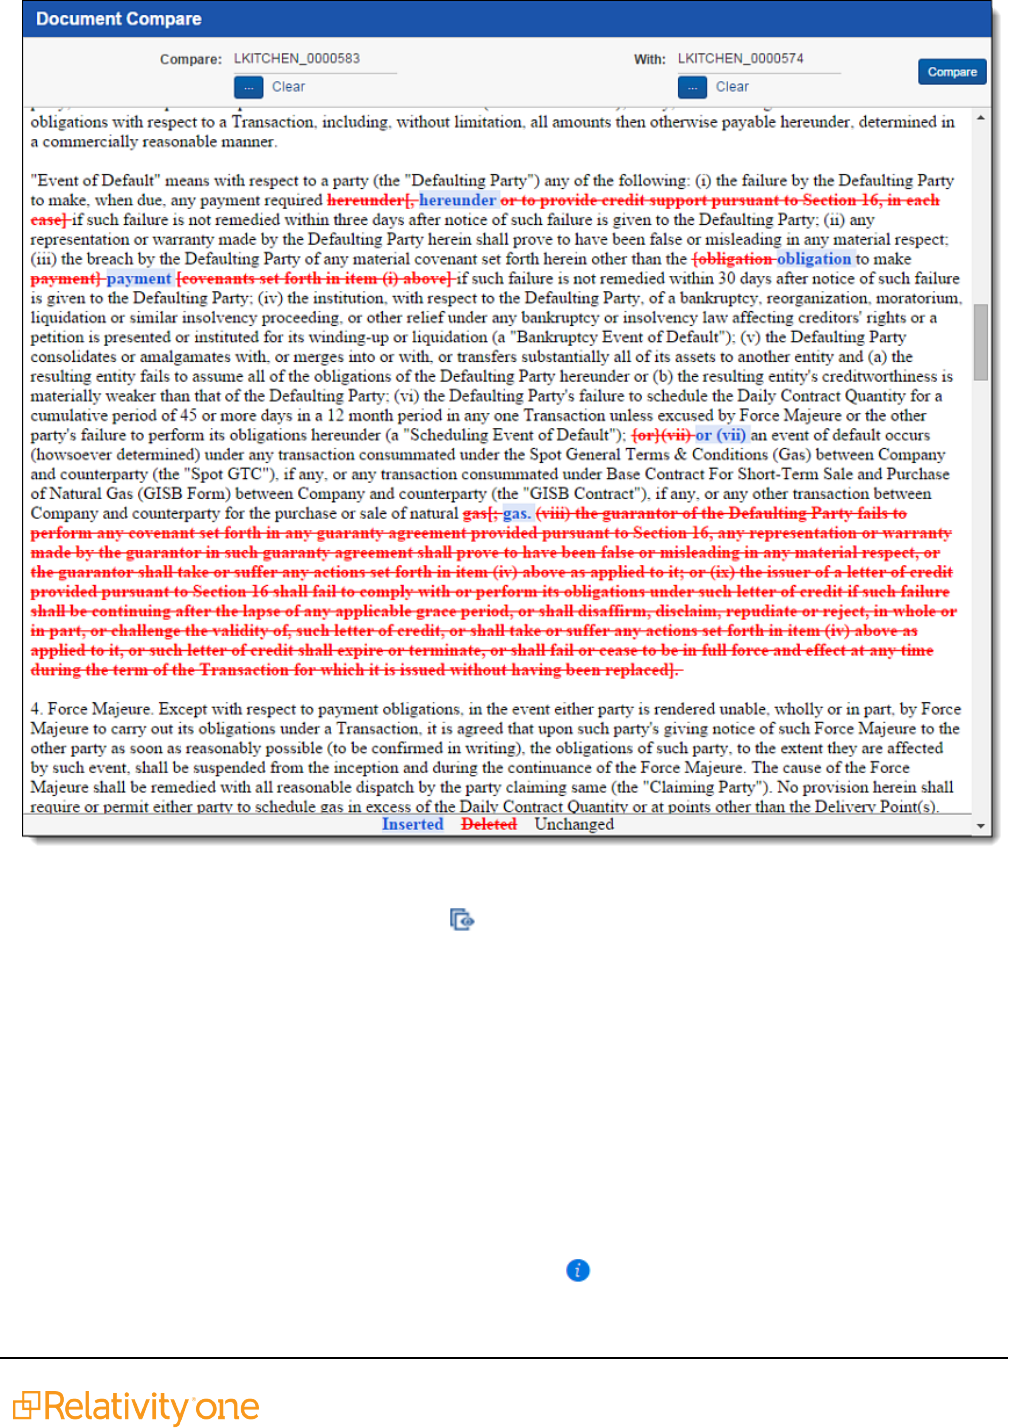
User Guide 134
You can also compare related documents from within the viewer. To compare related documents in the
viewer, open the Related Items pane and click next to the document you want to compare. The
Document Compare selection window opens. The document you select from the Related Items pane
automatically populates in the With field, while the document open in the viewer automatically populates the
Compare field.
7.15 Viewer-supported file types
Relativity uses the Viewer to display rendered versions of native files. Reviewers can see how the file
looked in its native application without opening the file in that native application.
When converting email file types such as EML, the Viewer will not download images from the internet. Any
linked images will display as a gray box in the Viewer.
This document provides a comprehensive list of files types supported by the Viewer. Find out which Viewer
version you have, by navigating to your Viewer and clicking .

User Guide 135
See the Admin guide for more information on the Viewer.
Note: Relativity does not support any third-party applications after the user downloads a file. This
includes specific browser and media-player combinations, such as Internet Explorer and Windows Media
Player.
7.15.1 Text only designation
Some file types have a "text only" designation. When viewing these files in the Native Viewer, the
document's text is the only data that renders. For Microsoft Project files and XML files, the view doesn't
display items such as Gantt charts, icons, or other graphics. There is typically no formatting (bold, italics,
fonts, etc.) of the text.
7.15.2 File IDonly designation
Some file types have a "file IDonly" designation. The Viewer is able to identify the file ID correctly, but it
returns an error message indicating that the file format is not supported. Despite returning an error
message, the Viewer identifies the file so that you can easily locate it and open it in an alternate application.
7.15.3 Supported File ID-only file types
The Viewer supports file ID-only functionality the following native file types. The supported file types are
listed by category.
Program/File Type Category Type/Version
File Exten-
sion
Microsoft Access Report Snapshot Database 2000-2003
IBM Lotus Notes NSF Email 7.x, 8.x
DICOM Multimedia
Flash Multimedia 9, 10
Real Media Multimedia
MPEG-1 Video V 2 Multimedia .mpg
MPEG-1 Video V 3 Multimedia .mpg
MPEG-2 Audio Multimedia .mpg
Windows Media Playlist Multimedia
AOL Messenger Other
Microsoft InfoPath Other 2007
Microsoft Office Theme files Other 2007-2013
Microsoft Windows Compiled Help Other .chm
Microsoft Windows Explorer Command Other .scf
Microsoft Windows Help Other .hlp
Microsoft Windows Shortcut Other .ink

User Guide 136
Program/File Type Category Type/Version
File Exten-
sion
Trillian XMLLog File Other 4.2
Adobe Photoshop PSD Raster
TrueType Font Other .ttf, .ttc
WebP Raster
XHTML Text and
Markup
1.0
Visio XML VSX Vector Image 2007
Microsoft Publisher Word Pro-
cessing
2003-2007
Samsung JungUm Global Word Pro-
cessing
Strict Open XML - Presentation
Note: Relativity does not support the password
protected version for these three Strict Open XML file
formats.
Presentation 2013, 2016
Strict Open XML - Spreadsheet Spreadsheet 2013, 2016
Strict Open XML - Document Word Pro-
cessing
2013, 2016
7.15.4 Supported Text-only file types
The Viewer supports text-only functionality the following native file types. The supported file types are listed
by category.
Program/File Type Category Type/Version File Extension
Microsoft Access Database 1.0, 2.0, 95 - 2010 .accdb, .mdb
Flash Multimedia 6.x, 7.x, Lite .swf
Microsoft Excel for Windows Spreadsheet 2003 XML .xml
XML Text and markup .xml
Microsoft XPS Vector Image
Visio Vector Image 2013
Lotus WordPro Word processing 9.7, 96 - Millennium 9.8 .lwp, .mwp
Microsoft Word for Windows Word Processing 2003 XML

User Guide 137
7.15.5 Supported File types
The Viewer supports the following native file types. The supported file types are listed by category.
Program/File Type Category Type/Version
File Exten-
sion
7z
Note:BZIP2 and split archives are not supported.
Archive .7z
7z Self Extracting exe
Note:BZIP2 and split archives are not supported.
Archive .exe
LiveNote Evidence File Archive .lef
LZA Self Extracting Compress Archive .lza
LZH Compress Archive .lzh
Microsoft Office Binder Archive 95, 97 .obd
Microsoft Cabinet (CAB) Archive .cab
PKZip Archive .zip
RAR Archive 1.5, 2.0, 2.9 .rar
TextMap Evidence File Archive .xmef
UNIX Compress Archive .z
UNIX GZip Archive .gz
UNIX tar Archive .tar
Uuencode Archive .uue
Zip Archive PKZip, WinZip .zip
DataEase Database 4.x .dba
DBase Database III, IV, V .dbf
First Choice DB Database Through 3.0 .fol
Framework DB Database 3.0
Microsoft Access Database 2007/2010 .accdb
Microsoft Works DB for DOS Database 2.0 .wdb
Microsoft Works DB for Macintosh Database 2.0 .wdb
Microsoft Works DB for Windows Database 3.0, 4.0 .wdb
Microsoft Works DB for DOS Database 1.0 .wdb
Paradox for DOS Database 2.0 - 4.0 .db
Paradox for Windows Database 1.0 .db
Q&A Database Database Through 2.0 .db

User Guide 138
Program/File Type Category Type/Version
File Exten-
sion
R:Base Database R:Base 5000,
R:Base System V
.rb1, .rb2,
.rb3
Reflex Database 2.0 .rdx
SmartWare II DB Database 1.02 .db
Apple Mail Message (EMLX) Email 2.0 .emlx
Encoded mail messages Email
n
MHT
n
Multi Part
Alternative
n
Multi Part
Digest
n
Multi Part
Mixed
n
Multi Part
News
Group
n
Multi Part
Signed
n
TNEF
EMLwith Digital Signature
Note: .EML files that have a password or are
encrypted are not supported in the Viewer. These
documents will display the attachment but the body
will appear blank.
Email SMIME .eml
IBM Lotus Notes Domino XML Language DXL Email 8.5 .xml
IBMLotus NotesNSF (Win32, Win64, Linux x86-32
and Oracle Solaris 32-bit only with Notes Client or
Domino Server)
Email 8.x .nsf. .ntf
MBOXMailbox
Email RFC 822 .mbox

User Guide 139
Program/File Type Category Type/Version
File Exten-
sion
Note: Any MBOX file that is ingested into Relativity
using the Relativity Desktop Client will display as an
archive, regardless of how many messages it may
have or what extension it might have. An MBOX file
is characterized as a text file with the string
"From<space>email address<space>date string".
When a file of this nature is viewed in Relativity, it
may appear to only show summaries of messages.
Essentially, if that "from" line is at the top of the
document, Relativity treats it as MBOX and displays
it as an archive.
Microsoft Outlook (MSG) Email 97 - 2013 .msg
Microsoft Outlook (OST ) Email 97 - 2010, 2013 .ost
Microsoft Outlook (PST) Email 97 - 2013 .pst
Microsoft Outlook Express (EML) Email .eml
Microsoft Outlook Forms Template (OFT) Email 97 - 2013 .oft
Microsoft Outlook OLM for Mac Email 2011
Microsoft Outlook PST (Mac) Email 2001 .pst
MSGwithDigitalSignature
Note: .MSG files that have a password or are
encrypted are not supported in the Viewer. If you
open an .MSG file that is encrypted in the Viewer,
the body of the document will be blank and the
contents of the encrypted data is placed into a single
attachment with a .p7m file extension.
Email SMIME .msg
Microsoft Live Messenger (via XMLfilter) Other 10.0
Microsoft OneNote
Other 2007, 2010, 2013 .one
Microsoft Outlook, Google Calendar, and Apple Cal-
endar
Other .ics
Microsoft Project (sheet view only, Gantt Chart, Net-
work Diagram, and graph not supported)
Other 98-2013 .mpp
Microsoft Project (sheet view only, Gantt Chart, Net-
work Diagram, and graph not supported)
Other 2007, 2010, 2013 .mpp
Microsoft Windows DLL Other .dll
Microsoft Windows Executable Other .dll
Trillian Text Log File (via text filter) Other 4.2 .txt

User Guide 140
Program/File Type Category Type/Version
File Exten-
sion
vCalendar Other 2.1 .vcs
vCard Other 2.1 .vcf
Yahoo! Messenger Other 6.x – 8 .yps
Apache Office Draw (ODF 1.2) Presentation 3.x, 4.x
Apache Office Impress (ODF 1.2) Presentation 3.x, 4.x
Apple iWork Keynote (MacOS, text and PDFpreview) Presentation 09 .key, .key-
note
Harvard Graphics Presentation DOS Presentation 3.0 .prs
IBM Lotus Symphony Presentations Presentation 1.x
Kingsoft WPS Presentation Presentation 2010
Libre Office Draw (ODF 1.2) Presentation 3.x, 4.x
Libre Office Impress (ODF 1.2) Presentation 3.x, 4.x
Lotus Freelance Presentation 1.0 - Millennium
9.8
.prz
Lotus Freelance for OS/3 Presentation 2
Lotus Freelance for Windows Presentation 95, 97, SmartSuite
9.8
Microsoft PowerPoint for Macintosh Presentation 4.0 - 2011 .ppt
Microsoft PowerPoint for Windows Presentation 3.0 – 2013 .ppt
Microsoft PowerPoint 2016
Note: Beginning in Relativity 12.2.190.4 (Prairie
Smoke 1), .pptx files that have Ink drawings are
supported in the Native and Image Viewer. Any
documents with Ink drawings that were imported
prior to Relativity 12.2.190.4 will need to be
reconverted to take advantage of this new
functionality.
Presentation 2016 .pptx
Microsoft PowerPoint for Windows Slideshow Presentation 2007-2013 .ppt
Microsoft PowerPoint for Windows Template Presentation 2007-2013 .pot
Novell Presentations Presentation 3.0, 7.0 .shw
OpenOffice Impress Presentation 1.1, 3.0 .sdd
Oracle Open Office Impress Presentation 3.x .odp
StarOffice Impress Presentation 5.2 - 9.0 .sda, .sdd

User Guide 141
Program/File Type Category Type/Version
File Exten-
sion
WordPerfect Presentations Presentation 5.1 - X5
Adobe Photoshop Raster image 4.0 .psd
Adobe Photoshop XMPonly Raster image 8.0 - 10.0 (CS 1-5)
CALS Raster (GP4) Raster image Type I-II .cg4, .cal
Computer Graphics Metafile Raster image ANSI, CALS,
NIST
.cgm
Encapsulated PostScript (EPS) Raster image TIFF Header only .eps
GEM Image (Bitmap) Raster image .bmp
Graphics Interchange Format (GIF) Raster image .gif
IBM Graphics Data Format (GDF) Raster image 1.0 .gdf
IBM Picture Interchange Format Raster image 1.0 .pif
HEIC Image file Raster image .heic
JBIG2 Raster image Graphic Embed-
dings in PDF
JFIF (JPEG not in TIFF format) Raster image .jfif
JPEG Raster image .jpg
JPEG 2000 Raster image JP2
Kodak Flash Pix Raster image .fpx
Kodak Photo CD Raster image 1.0 .pcd
Lotus PIC Raster image .pic
Lotus Snapshot Raster image
Macintosh PICT Raster image BMP only .bmp
Macintosh PICT2 Raster image BMP only .bmp
MacPaint Raster image .pntg
Microsoft Windows Bitmap Raster image .bmp
Microsoft Windows Cursor Raster image
Microsoft Windows Icon Raster image .ico
OS/2 Bitmap Raster image
OS/2 Warp Bitmap Raster image
Paint Shop Pro (Win32 only) Raster image 5.0, 6.0 .psp
PC Paintbrush (PCX) Raster image .pcx

User Guide 142
Program/File Type Category Type/Version
File Exten-
sion
PC Paintbrush DCX (multi-page PCX) Raster image .dcx
Portable Bitmap (PBM) Raster image .pbm
Portable Graymap PGM Raster image .pgm
Portable Network Graphics (PNG) Raster image .png
Portable Pixmap (PPM) Raster image .ppm
Progressive JPEG Raster image .jpg, .jpeg,
.jpe
StarOffice Draw Raster image 6.x - 9.0
Sun Raster Raster image .srs
TIFF Raster image Group 5 & 6 .tif, .tiff
TIFF CCITT Raster image Group 3 & 4
TruVision TGA (Targa) Raster image 2.0 .tga
WBMP wireless graphics format Raster image
WebP
Note: WebP files are only available in the Native
Viewer.
Raster image
Word Perfect Graphics Raster image 1.0 .wpg
WordPerfect Graphics Raster image 2.0 – 10.0 .wpg, .wpg2
X-Windows Bitmap Raster image x10 compatible .xbm
X-Windows Dump Raster image x10 compatible .xdm
X-Windows Pixmap Raster image x10 compatible .xpm
Apache Office Calc (ODF 1.2) Spreadsheet 3.x, 4.x
Apple iWork Numbers(MacOS, text, and PDF pre-
view)
Spreadsheet 09 .numbers
Cellebrite Excel Report File Spreadsheet .xlsx
Cellebrite Encrypted Excel Report File Spreadsheet .xlsx
Enable Spreadsheet Spreadsheet 3.0 - 4.5
First Choice SS Spreadsheet Through 3.0
Framework SS Spreadsheet 3.0
IBM Lotus Symphony Spreadsheets Spreadsheet 1.x
Kingsoft WPS Spreadsheets Spreadsheet 2010

User Guide 143
Program/File Type Category Type/Version
File Exten-
sion
Libre Office Calc (ODF 1.2) Spreadsheet 3.x, 4.x
Lotus 1-2-3 Spreadsheet Through Mil-
lennium 9.8
.wk1, .wk3,
.wk4, .wks
Lotus 1-2-3 Charts (DOS and Windows) Spreadsheet Through 5.0 .wk1, .wk3,
.wk4, .wks
Lotus 1-2-3 for OS/2 Spreadsheet 2.0
Microsoft Excel Charts Spreadsheet 2.x - 2007 .xlsx, .xls
Microsoft Excel for Macintosh Spreadsheet 98 – 2011 .xlsx, .xls
Microsoft Excel for Windows
Note: Excel files with slicers will convert and display
normally in the Viewer, but slicer elements in those
files will not display.
Spreadsheet 3.0 - 2016 .xlsx, .xls
Microsoft Excel for Windows (.xlsb) Spreadsheet 2007-2013 (Bin-
ary)
.xlsb
Microsoft Works SS for DOS Spreadsheet 2.0 .wks
Microsoft Works SS for Macintosh Spreadsheet 2.0 .wks
Microsoft Works SS for Windows Spreadsheet 3.0, 4.0 .wks
Multiplan Spreadsheet 4.0 .sylk
Novell PerfectWorks Spreadsheet Spreadsheet 2.0 .wpw
OpenOffice Calc Spreadsheet 1.1-3.0 .sdc
Oracle Open Office Calc Spreasheet 3.x .sdc
Office Calc (ODF 1.2) Spreadsheet 4.x
PFS: Plan Spreadsheet 1.0
QuattroPro for DOS Spreadsheet Through 5.0 .wb1
QuattroPro for Windows Spreadsheet Through X5 .qpw, .wb3,
.wb2, .wb1
Quattro Pro Win Spreadsheet X7 .qpw
SmartWare II SS Spreadsheet 1.02 .def
SmartWare Spreadsheet Spreadsheet .def
StarOffice Calc Spreadsheet 5.2 – 9.0 .sdc
SuperCalc Spreadsheet 5.0 .cal
Symphony Spreadsheet Through 2.0 .wrk

User Guide 144
Program/File Type Category Type/Version
File Exten-
sion
VP-Planner Spreadsheet 1.0
ANSI Text Text and
markup
7 & 8 bit .ans
ASCII Text Text and
markup
7 & 8 bit .asc
DOS character set Text and
markup
EBCDIC Text and
markup
HTML (CSS rendering not supported) Text and
markup
1.0 – 4.0 .html
IBM DCA/RFT Text and
markup
Macintosh character set Text and
markup
Rich Text Format (RTF) Text and
markup
.rtf
Unicode Text Text and
markup
3.0, 4.0 .txt
UTF-8 Text and
markup
Wireless Markup Language Text and
markup
.wml
Adobe Illustrator Vector image 4.0 – 7.0, 9.0
Adobe Illustrator (PDF Preview only) Vector image 9.0, CS1-6 .pdf
Adobe Illustrator XMP Vector image 11 – 13 (CS 1 - 5)
Adobe InDesign XMP Vector image 3.0 – 5.0 (CS 1 - 5)
Adobe InDesign Interchange XMP only Vector image
Adobe PDF Vector image 1.0 – 1.7 (Acrobat
1 - 10)
.pdf
Adobe PDF Package Vector image 1.7 (Acrobat 8 -
10)
.pdf
Adobe PDF Portfolio Vector image 1.7 (Acrobat 8 -
10)
.pdf
Ami Draw Vector image SDW .sdw

User Guide 145
Program/File Type Category Type/Version
File Exten-
sion
Apple iWork Keynote File Preview Vector 09 .key, .key-
note
Apple iWork Keynote Numbers File Preview Vector 09 .numbers
Apple iWork Pages File Preview Vector 09 .pages
AutoCAD Drawing Vector image 2.5, 2.6, 9.0-14.0,
2000i -2012
.dwg
AutoCAD Drawing Vector 2013 .dwg
AutoShade Rendering Vector image 2 .rnd
Corel Draw Vector image X4 - X7 .cdr
Corel Draw Clipart Vector image 5.0, 7.0 .cmx
Enhanced Metafile (EMF) Vector image .emf
Escher Graphics Vector image .egr
FrameMaker Graphics (FMV) Vector image 3.0 – 5.0 .fmv
Gem File (Vector) Vector image .img
Harvard Graphics Vector 98 .cht
Harvard Graphics Chart DOS Vector image 2.0 – 3.0 .ch3
Harvard Graphics for Windows Vector image .prs
HP Graphics Language Vector image 2.0 .hp, .hpg
IGES Drawing Vector image 5.1 – 5.3 .iges
Micrografx Designer Vector image Version 6 .dsf
Micrografx Designer Vector image Through 3.1 .drw
Micrografx Draw Vector image Through 4.0 .drw
Novell PerfectWorks Draw Vector image 2.0
OpenOffice Draw Vector image 1.1 – 3.0 .sda
Oracle Open Office Draw Vector image 3.x .sda
SVG(processed as XML, not rendered) Vector image .xml
Microsoft Visio:
n
Stencil
n
Template
n
Macro Enabled Drawing
n
Macro Enabled Stencil
Vector image 5.0 – 2007, 2013 .vsd

User Guide 146
Program/File Type Category Type/Version
File Exten-
sion
n
Macro Enabled Template
Visio (Page Preview mode WMF/EMF) Vector image 4.0 .wmf, .emf
Windows Metafile Vector image .vmf
Adobe FrameMaker (MIF only) Word pro-
cessing
3.0 - 6.0 .mif
Adobe Illustrator Postscript Word pro-
cessing
Level 2 .eps
Ami Word pro-
cessing
Ami Pro for OS2 Word pro-
cessing
.sam
Ami Pro for Windows Word pro-
cessing
2.0, 3.0 .sam
Apache Office Writer (ODF 1.2) Word pro-
cesser
3.x, 4.x
Apple iWork Pages (MacOS, text and PDF preview) Word pro-
cessing
09 .pages
DEC DX Word pro-
cessing
Through 4.0 .dx
DEC DX Plus Word pro-
cessing
4.0, 4.1 .dx, .wpl
Enable Word Processor Word pro-
cessing
3.0 - 4.5
First Choice WP Word pro-
cessing
1.0, 3.0 .pfx
Framework WP Word pro-
cessing
3.0
Hangul Word pro-
cessing
97 - 2010 .hwp
IBM DCA/FFT Word pro-
cessing
.dca, .fft
IBM DisplayWrite Word pro-
cessing
2.0-5.0 .rft, .dca
IBM Writing Assistant Word pro-
cessing
1.01 .iwa
Ichitaro Word pro- 5.0, 6.0, 8.0 - 13.x, .jtd

User Guide 147
Program/File Type Category Type/Version
File Exten-
sion
cessing 2004 - 2014
JustWrite Word pro-
cessing
Through 3.0 .jw
Kingsoft WPS Writer Word pro-
cessing
2010 .wps
Legacy Word pro-
cessing
1.1 .leg
Libre Office Writer (ODF 1.2) Word pro-
cessor
3.x, 4.x
Lotus Manuscript Word pro-
cessing
Through 2.0 .manu
MacWrite II Word pro-
cessing
1.1 .mcw
Mail Rule DXL Word pro-
cessing
Mass 11 Word pro-
cessing
Through 8.0 .m11
Microsoft Word for DOS Word pro-
cessing
4.0 – 6.0 .doc
Microsoft Word for Macintosh Word pro-
cessing
4.0-6.0, 98 - 2016 .doc
Microsoft Word for Windows Word pro-
cessing
1.0 – 2016 .doc, .docx
Microsoft WordPad Word pro-
cessing
.rtf
Microsoft Works WP for DOS Word pro-
cessing
2.0 .wps
Microsoft Works WP for Macintosh Word pro-
cessing
2.0 .wps
Microsoft Works WP for Windows Word pro-
cessing
3.0, 4.0 .wps
Microsoft Write for Windows Word pro-
cessing
1.0 – 3.0 .wri
MultiMate Word pro-
cessing
Through 4.0 .dox
MultiMate Advantage Word pro-
cessing
2.0 .dox

User Guide 148
Program/File Type Category Type/Version
File Exten-
sion
Navy DIF Word pro-
cessing
.dif
Nota Bene Word pro-
cessing
3.0 .nb
Novell PerfectWorks Word Processor Word pro-
cessing
2.0 .wpw
OfficeWriter Word pro-
cessing
4.0-6.0
OpenOffice Writer Word pro-
cessing
1.1 - 3.0 .sdw
Oracle Open Office Writer Word pro-
cessing
3.x .sdw
PC File Doc Word pro-
cessing
5.0
PFS: Write Word pro-
cessing
A, B .pfs
Professional Write for DOS Word pro-
cessing
1.0, 2.0
Professional Write Plus for Windows Word pro-
cessing
1.0
Q&A Write Word pro-
cessing
2.0, 3.0 .jw
Samna Word IV Word pro-
cessing
1.0 – 3.0 .sam
Samna Word IV+ Word pro-
cessing
.sam
Signature Word pro-
cessing
1.0
SmartWare II WP Word pro-
cessing
1.02 .def
Sprint Word pro-
cessing
1.0 .spr
StarOffice Writer Word pro-
cessing
5.2 – 9.0 .sdw
Total Word Word pro-
cessing
1.2
Wang IWP Word pro- Through 2.6 .iwp

User Guide 149
Program/File Type Category Type/Version
File Exten-
sion
cessing
WordMarc Composer Word pro-
cessing
WordMarc Composer+ Word pro-
cessing
WordMarc Word Processor Word pro-
cessing
WordPerfect for DOS Word pro-
cessing
4.2 .wpd
WordPerfect for Macintosh Word pro-
cessing
1.02 - 3.1 .wpd
WordPerfect for Windows Word pro-
cessing
5.1 – X5 .wpd
Wordstar 2000 for DOS Word pro-
cessing
1.0 - 3.0 .wsd
Wordstar for DOS Word pro-
cessing
3.0 - 7.0 (none
defined)
Wordstar for Windows Word pro-
cessing
1.0 .ws1
XyWrite Word pro-
cessing
Through III+ .xy
Note: Program/file types listed with text only or PDFpreview only can be reviewed in the Viewer as listed.
If PDFpreview only, a PDF file saved as part of the native will be viewed. Text only will just display the text
without any formatting.
7.15.6 Viewer audio and video-supported file types
Relativity can stream audio and video files within the Viewer.
This document provides a comprehensive list of files types supported by the Viewer. Certain file types may
not be compatible with your internet browser, refer to the sections below to learn more about browser
compatibility. Find out which Viewer version you have, by navigating to your Viewer and clicking .
See the Admin guide for more information on the Viewer.
Note: Relativity does not support any third-party applications after the user downloads a file. This
includes specific browser and media-player combinations, such as Internet Explorer and Windows Media
Player.

User Guide 150
7.15.7 Troubleshooting errors
If an audio or video file cannot be streamed in the Viewer, one of the following messages will display:
To resolve the error, ensure that your internet browser can play the selected file type. If that does not
resolve the error, check the MaximumNativeSizeForViewerForMediaFilesinMegaBytes instance setting
to ensure that the file type is not too big for the Viewer to stream.
7.15.8 Supported audio file types
Note: Safari works with Mac OSX only.
File Format
Container - Audio
Codec
Chrome Firefox
Internet
Explorer
Safari
FI_RIFFWAVE wave - pcm √ √ √
Quicktime Movie mov - aac √ √ √ √
Quicktime Movie mov - vorbis √
MPEG Layer3 ID3 Ver
1.x
mp3 - mp3 √ √ √
MPEG Layer3 ID3 Ver
2.x
mp3 - mp3 √ √ √ √
FI_MPGAV2L3 mp3 - mp3 √ √ √
MPEG-4 file mp4 - aac √ √ √ √
MPEG-4 file mp4 - opus √
MPEG-4 file mp4 - vorbis √
MPEG-1 audio - Layer 3 mov - mp3 √ √ √
MPEG-1 audio - Layer 2 mp4 - mp2 √ √

User Guide 151
File Format
Container - Audio
Codec
Chrome Firefox
Internet
Explorer
Safari
MPEG-1 audio - Layer 3 mp4 - mp3 √ √ √
Ogg Opus ogg - opus √ √
Ogg Vorbis ogg - vorbis √ √
7.15.9 Supported video file types
Note: Safari works with Mac OSX only.
File Format
Container - Video Codec - Audio
Codec
Chrome Firefox
Internet
Explorer
Safari
Quicktime
Movie
mov - h264 - aac √ √ √
Quicktime
Movie
mov - h264 - dolby_digital √ √
Quicktime
Movie
mov - h264 - mp2 √ Video-
only
Quicktime
Movie
mov - h264 - mp3 √ √ √
Quicktime
Movie
mov - h264 - vorbis √ √
Quicktime
Movie
mov - h264 - wma1 √ √
Quicktime
Movie
mov - h264 - wma2 √ √
Quicktime
Movie
mov - mpeg4 - aac Audio-only Audio-
only
√
Quicktime
Movie
mov - mpeg4 - mp3 Audio-only Audio-
only
Quicktime
Movie
mov - mpeg4 - vorbis Audio-only √
Quicktime
Movie
mov - theora - aac √ Audio-
only
Quicktime
Movie
mov - theora - dolby_digital √
Quicktime
Movie
mov - theora - mp2 √

User Guide 152
File Format
Container - Video Codec - Audio
Codec
Chrome Firefox
Internet
Explorer
Safari
Quicktime
Movie
mov - theora - mp3 √ Audio-
only
Quicktime
Movie
mov - theora - vorbis √
Quicktime
Movie
mov - theora - wma1 √
Quicktime
Movie
mov - theora - wma2 √
MPEG-4 file mp4 - h264 - aac √ √ √
MPEG-4 file mp4 - h264 - dolby_digital √ √ √
MPEG-4 file mp4 - h264 - mp2 √ √ √
MPEG-4 file mp4 - h264 - mp3 √ √ √ √
MPEG-4 file mp4 - h264 - opus √ √
MPEG-4 file mp4 - h264 - vorbis √ √ √
MPEG-4 file mp4 - mpeg4 - aac Audio-only √
MPEG-4 file mp4 - mpeg4 - mp2 Audio-only Audio-
only
√
MPEG-4 file mp4 - mpeg4 - mp3 Audio-only Audio-
only
√
MPEG-4 file mp4 - mpeg4 - opus Audio-only √
MPEG-4 file mp4 - mpeg4 - vorbis Audio-only √
MPEG-4 file mp4 - vp9 - aac √ √
MPEG-4 file mp4 - vp9 - dolby_digital Audio-only Audio-
only
MPEG-4 file mp4 - vp9 - mp2 √ √
MPEG-4 file mp4 - vp9 - mp3 √ √
MPEG-4 file mp4 - vp9 - opus √
MPEG-4 file mp4 - vp9 - vorbis √ √
Ogg Theora
Opus
ogg – theora - opus √ √
Ogg Theora Vor-
bis
ogg – theora - vorbis √ √
Ogg VP8 Opus ogg – vp8- opus √ Audio-
only

User Guide 153
File Format
Container - Video Codec - Audio
Codec
Chrome Firefox
Internet
Explorer
Safari
Ogg VP8 Vorbis ogg – vp8 - vorbis √
Audio-
only

User Guide 154
8 Workspaces
In Relativity, a workspace provides a secure data repository for documents used in cases or for applications
developed with dynamic objects. You can store all types of documents, such as productions, witness
testimony, and so on, in a workspace to facilitate searching, organizing, and categorizing content. In
addition, you can use granular security settings to grant or deny permissions to specific content stored in the
workspace.
At the workspace level, you can also define views, layouts, fields, and choices. These features streamline
workflows, as well as simplify the processes for organizing and categorizing content. Views support filtering
on item lists, while layouts, fields, and choices are used for categorizing documents.
n
Project Type – A categorization for workspaces. Assign a project type to simplify monitoring,
management, and exploration of your projects in Cost Explorer (coming soon).
Note: Do not enter confidential customer or personal information.
Pre-defined values for your project type are listed below:
o
Litigation
o
Regulatory Requests
o
Third-Party Subpoenas
o
Internal Investigations
o
Contract Reviews
o
Contract Lifecycle Management
o
Merger & Acquisition (M&A) Due Diligence
o
Freedom of Information Act (FOIA) Requests
o
Data Subject Access Requests (DSARs)
o
Data Breach Response
o
Personal Data Identification and Anonymization
o
Invoice Review
o
Operational Efficiency
o
‘Other’ option with free-form text

User Guide 155
8.1 Viewing workspace details
On the Workspace Details tab, Relativity displays read-only workspace fields, history information, Relativity
Utilities console, Production Restrictions, and the Workspace Admin Group field. You can update the
Production Restrictions field when you edit a workspace. See Workspaces on the previous page.
Note: Once a workspace is created, only System Administrators and Client Domain Administrators can
make updates to the Matter object. Even users with full permissions for Matters and Clients will not have
the ability to modify this object unless they are System Administrators or Client Domain Administrators.
8.2 Migrating and retrieving workspaces to and from cold storage
8.2.1 Migrate workspaces to cold storage
You must have the security permissions to edit the workspace and the Admin Operation called Manage
Cold Storage to migrate workspaces to cold storage.
To migrate workspaces to cold storage, follow these steps:
1. Navigate to the Workspace Details tabs.
2. Click Migrate to Cold Storage in the Relativity Utilities console. The Cold Storage Confirmation dia-
log box displays.

User Guide 156
3. Click Migrate Workspace to migrate the workspace to cold storage.
Note: Migrating a workspace to cold storage is immediate and will not affect any potential client
related due date charges.
1. The Storage Status column on the workspace view displays the status of the workspace as Cold Stor-
age.

User Guide 157
Notes:
n
A workspace in cold storage cannot be used as a template.
n
A workspace in cold storage cannot be used by Import/Export or Integration Points.
n
A cold storage Workspace will be considered an active standard workspace for billing pur-
poses in any calendar month where it is accessed. This includes accessing the cold work-
space through Relativity APIs or for auditing or reporting purposes.
n
Workspaces in cold storage can be archived directly using ARM without having to be moved to
an active state before archiving. See the ARMcontent on the RelativityOne documentation
site for more information.
8.2.2 Retrieve workspaces from Cold Storage
You must have the security permissions to edit the workspace and the Admin Operation called Manage
Cold Storage to retrieve workspaces from cold storage.
To retrieve workspaces from cold storage, follow these steps:
1. Navigate to the Workspaces tab.
2. Click the workspace name of the workspace you want to retrieve from cold storage. The Cold Storage
Retrieval page displays.

User Guide 158
3. Click Retrieve Workspace to retrieve the workspace from cold storage. The Cold Storage Retrieval
Confirmation pop-up displays.
4. Click Retrieve Workspace to retrieve the workspace from cold storage. The Cold Storage Retrieval
confirmation page displays.

User Guide 159
Notes:
n
Workspace retrievals are not instantaneous, after clicking Retrieve Workspace, it could take up to
24 hours to resume operations in that workspace.
n
The user who sent the retrieval request will receive an email notification once the retrieval of the
workspace is complete.
n
Cold Storage Case Retrieval Agent needs to be present and running for workspaces to be
retrieved from cold storage.
n
Migration and retrieval actions are audited.
n
You can archive workspaces in cold storage directly using ARM without having to be moved to an
active state before archiving. See the ARMcontent on the RelativityOne documentation site for more
information.
8.3 Workspace admin group
A system admin can assign any group in Relativity to have full admin rights over a particular workspace. A
workspace admin has full control over all objects within the workspace, but members of the group do not
have the script permissions available only to system admins.
Use the following steps to set a designate a workspace admin group:
1. Click Edit on the Workspace Details tab.
2. Click Select in the Workspace Admin Group field.
3. Select the group you want to set as the workspace admin group.
4. Click Ok.
Note: You can only designate one group per workspace as a workspace admin group.
8.4 Document and item list navigation
The workspace offers several ways to view documents and items. Using the Browsers panel, you can
navigate from folder to folder to see the documents contained within each. The Document Preview panel
allows you to view specific documents from the document list. Additionally, you can also sort and filter the
document or item list based on any fields in the current view or using the search panel.
8.4.1 Browsers panel
The Browsers panel is located on the left side of the workspace. Depending on your permissions, you may
not see the Browsers panel.
The Browsers panel may contain the following options for browsing through your documents:
n
Folders
n
Field Tree
n
Saved Searches

User Guide 160
No matter which of these options you use, there are several display options you can use to customize your
workspace.
The Browsers panel opens by default. Hide or expand the Browsers panel by clicking the carrot to the left of
Browsers. If both the Browsers and Search Conditions panels are hidden, click on the Browsers icon to
display it. You can also re-size the Browsers panel by hovering over the line separating the panel from the
other panel or document list until the line is highlighted. You may then click-and-drag the line to the desired
dimensions.

User Guide 161
8.4.1.1 Document browser menu
The Document browser menu is located directly below the Browsers panel. Click on one of the menu’s
options to display that mode of the browser:
Icon Name Description
Folders Navigate the folder hierarchy for your workspace.
Field Tree Browse your documents according to how they were coded or grouped.
Saved
Searches
Create a new search, or browse previously saved searches.See Saved Search in
the Searching Guide.
Folders
Click on the Folders icon to navigate the folder hierarchy for your workspace. The folder structure is set
when documents are imported. It can be based on the document’s source, or according to a folder structure
set by your Relativity administrator. Clicking on a folder displays that folder’s documents in the document
list.
Note: To ensure stable performance, we recommend creating no more than 250,000 folders in a
workspace and having 15 sub-folders or less within each folder.
A folder often has multiple sub-folders. Click on the folder to view the sub-folders. Click on the arrow next to
the folder to hide the sub-folders.
To change the folder scope, click on the This folder and subfolders or Only this folder icon.

User Guide 162
Field tree
Click on the Field Tree icon to display the field tree in the browser. Selected single and multiple-choice list
fields and their choices appear in a tree structure.
Each single and multiple-choice field has its own choice folder in the field tree. The field’s choices appear as
sub-folders. Each field also has a [Not Set] choice, which displays null values for the field.
You can click on a choice in the field tree to display all the documents in the document list that have the
selected choice value and meet the criteria of the active view.
Sending email links to choices
You can send an email with a link to a view that contains the choice, a choice folder, or the document list that
appears when the field tree is open. In the field tree, right-click on a choice or a choice folder and select the
Email Link option.

User Guide 163
The subject line of the email pre-populates with the following text: Relativity Review - <Workspace Name> -
<Choice Name: Value>. If you send an email link to a choice folder, the subject line displays the folder name
instead of choice name and value.
When the recipient clicks on the link, the documents associated with the choice or folder appear in the
document list. If the recipient does not have required permissions for the choice folder or field associated
with the choice, a permissions denied message displays instead.
Alternatively, you can select Copy Link to Clipboard to copy a link to a view that contains the choice, a
choice folder, or the document list that appears when the field tree is open.
8.4.2 View bar
The View bar consists of the following elements:
n
New documents—click to upload new documents using Simple File Upload. If the Transcripts applic-
ation is installed in this workspace, this icon is replaced with a drop-down menu that allows you to
choose between uploading a new document or a new transcript.
n
Views drop-down menu—click to select a view.
o
New view—click to create a new view from within the view drop-down menu. This icon only dis-
plays if you have permission to add a new view. If the icon is not present, contact your Relativ-
ity administrator to add a view.

User Guide 164
o
Edit view icon—click to edit a view that displays within the view drop-down menu. This icon
only displays if you have permission to edit the view. If the icon is not present, contact your
Relativity administrator to edit the current view.
n
Include Related Items drop-down menu—returns documents related to the documents currently in
the view. The options vary by workspace, but may include email family groups, duplicates, or similar
documents.
n
Add Widget—click to add a custom widget to your document list dashboard.
n
Dashboard drop-down menu—select a custom dashboard to view in the document list.
SeeDashboards in theNavigation section of the Admin Guide for more information.
o
New view—click to create a new dashboard from within the dashboard drop-down menu. This
icon only displays if you have permission to add a new dashboard. If the icon is not present,
contact your Relativity administrator to add a dashboard.
o
Edit dashboard icon—click to edit a dashboard that displays within the dashboards drop-
down menu. This icon only displays if you have permission to edit the dashboard. If the icon is
not present, contact your Relativity administrator to edit the current dashboard.
n
Export Dashboard—click and select a dashboard widget to download to your workstation as an edit-
able Excel file. See Dashboards in theAdmin Guide for more information.
For more information, see the Views chapter of the Admin guide.
8.4.3 Document Preview panel
The Document Preview panel allows you to view documents similarly to the Viewer, while remaining on the
document list. This allows you to filter the document list as desired and view the results without leaving the
Documents tab. You can view and navigate through highlight hits for any previously created persistent
highlight sets as well. However, you cannot search or create search terms in the Document Preview panel.
Additionally, searching for terms in the document list will not create highlights in a document you are viewing
in the Document Preview panel.
To access the Document Preview panel, the EnableDocumentPreview instance setting should be set to
True. The Show Document Preview Panel icon will then display in the upper-right. Additionally, users
must have the Document Preview permission in Other Settings assigned to use this feature.
Note: The Document Preview panel does not support viewing hidden content, creating or modifying
markups, or editing coding decisions. Open the document in the Viewer instead to perform these tasks.

User Guide 165
8.4.3.1 Navigating the Document Preview panel
The Document Preview panel can be re-sized at any time by clicking on the edge of the panel and dragging
your cursor to the desired size.
The Document Preview panel can be moved from the right or left side of the document list to the other side
as well. To move the preview panel, click in the upper-left corner and drag the window to the blue strip on
the other side of the screen.
The following options are available in the Document Preview panel:
n
Persistent Highlighting—displays or hides a panel containing any persistent highlight sets in the
workspace. Only terms that are in the current document will display in the pane. Additionally, you can
control which highlights display in the current document by clicking on either the persistent set to only
display highlights from that set or you can click on a specific term to only see that term highlighted in
the document.

User Guide 166
n
Document preview panel Viewers—click on the name of the Viewer in which you would like to view
the document. Viewer names that are displayed in black indicate that the document is available for
viewing. The Viewer that is currently open is bold with an orange underline underneath the name. If a
name appears in italics, that Viewer is not available for the current document.
n
Markup set—displays the active markup set in a drop-down menu. Choose a markup set from the
drop-down menu to make a different set active. This menu only appears when viewing a document in
the Image Viewer of the Document Preview panel.
n
Page navigator—use any of the following options to help you navigate the pages in the document
you are previewing:
Option Description
Click to move to the first page in the document.
Click to move to the previous page in the document.
Click to move to the next page in the document.
Click to move the last page in the document.
8.4.4 Item list
The item list contains items as well as navigational and other controls for working with the list.

User Guide 167
Icon Description
Freeze/Un-
freeze columns
Click the blue snowflake icon to refreeze columns that were most recently frozen. If
the icon is orange, click it to unfreeze the columns. This option only displays if you
have already frozen a column this session.
Sampling If you have proper permissions, clicking the Sampling icon lets you create random
sample sets from the item list using three different methodologies from the pop-up
menu that appears.
Show/Hide fil-
ters
Click the blue filter icon to show filters for columns in the item list. Click the orange icon
to hide them.
Clear filters Click the blue clear filter icon to clear any filters applied to the item list.
Reset column
sizes
Click the blue Reset column sizes icon to return to the original settings for the
columns.
Turn Grid style
on/off
Click the blue grid icon to turn grid style on. This shrinks the row padding and altern-
ates row shading to make your data more compact and easier to read. Click the
orange icon to turn grid style off.
Use these navigational controls to navigate the pages in the document list.
The fields that appear in the item list are based on the selected view, which you can edit. You can also edit a
view to rearrange the order that the columns display. Contact your Relativity administrator to change the
fields in your view.
To change a column’s size, hover over the white line at the edge of the column header. A double arrow
appears, indicating that you can resize the column. Drag it in either direction to adjust the column width. The
other columns on the page automatically adjust to fill the rest of the window. Column data can be cut off. If
you wish to return to the original settings click the Reset Column Sizes icon.

User Guide 168
8.4.4.1 Freeze and unfreeze columns in a list
When viewing and interacting with items in a list, you can freeze one or more columns so that they are
locked in place which allows you to scroll to the right and view any columns in the list side-by-side with the
frozen columns.
To freeze a column or columns, do the following:

User Guide 169
1.
In the right-most column that you wish to freeze, hover your cursor over the column's title and click on
the ellipses.
2.
Select Freeze Columns.
The column, or columns, to the left of the one you selected are frozen and will remain static as you
scroll to the right and left in the list.
Note: Once you have frozen a column or columns, you can freeze additional columns to the right of
the frozen columns by repeating steps 1-2.
To unfreeze a column or columns, do either of the following:
n
Hover your cursor over the right-most frozen column, click on the ellipses, and select Unfreeze
Columns.
n
Click the unfreeze column icon in the upper-right section of the list.
8.4.4.2 Copy column values
You can copy up to 10,000 values in a single column to clipboard. If you would like to copy more than 10,000
columns, we recommend using Mass export to file.
To copy column values:
1.
In the column that you wish to copy, hover your cursor over the column's title and click on the ellipses.
2.
Select Copy column values.
A modal displays the total number of column values that were successfully copied to clipboard.
8.4.4.3 Saving a search from the Documents tab
You can save the conditions you have currently set up for the item list as a new search using the Save
Search button located next to the mass operations bar at the bottom of the item list.
8.4.4.4 Previewing a document
If you hover your mouse pointer over a record’s file icon, you can click to open a pop-up viewer showing the
record.
Note: If your item list does not contain the file icon, contact your Relativity administrator to add it.
8.4.4.5 Sorting
You can use any field in the view to sort all of the results in an item list.
Click any field heading once to sort the items in that field in ascending order, alphabetically. A down arrow
appears next to the heading name, as in the Responsive field below. Click a second time to sort the items in
descending order, alphabetically. An up arrow appears. Clicking the field name a third time clears the sort
and returns the field to its original order.
If you are not able to sort a particular field, contact your administrator to make sure the field has the Sort
option set to Yes.

User Guide 170
Proprietary Rights
This documentation (“Documentation”) and the software to which it relates (“Software”) belongs to
Relativity ODA LLC and/or Relativity’s third party software vendors. Relativity grants written license
agreements which contain restrictions. All parties accessing the Documentation or Software must: respect
proprietary rights of Relativity and third parties; comply with your organization’s license agreement,
including but not limited to license restrictions on use, copying, modifications, reverse engineering, and
derivative products; and refrain from any misuse or misappropriation of this Documentation or Software in
whole or in part. The Software and Documentation is protected by the Copyright Act of 1976, as amended,
and the Software code is protected by the Illinois Trade Secrets Act. Violations can involve substantial
civil liabilities, exemplary damages, and criminal penalties, including fines and possible imprisonment.
©2024. Relativity ODALLC. All rights reserved. Relativity® is a registered trademark of Relativity
ODA LLC.
