
Tips, Tools, and Troubleshooting
PeopleSoft Travel & Expense
Procurement & Payment Services
October 1, 2019

• Understanding the workflow
• Getting Started
• Creating, updating, and tracking a
report
• Tips/Tools
• Copying an existing report
• Using the Expense Type Category
shortcut
Topics of discussion

• Tips/Tools
• Utilizing Quick Fill
• Copying expense lines
• Applying default funding
• Notifying a traveler
• Withdrawing a report
• Exporting report details to excel
Topics of discussion

• Troubleshooting
• Lodging Expense error
• Turn off Autocomplete
• Unable to approve
• Accessing report to Approve
• Valid Budget status
• Accounting Date
Topics of discussion

Understanding the workflow
• “Stops” in the workflow include:
• Traveler (or delegate) – same “stop”
• HR Supervisor
• Department expense manager
• College/Division expense manager (optional)
• Grants & Contracts (if grant funded)
• Pre-pay auditor (Procurement & Payment Services)
Traveler
(Delegate)
HR Supervisor
Department
Expense Mgr
College/Division
Expense Mgr
Grants &
Contracts
P&PS

Understanding the workflow
• Workflow impact of corrections
• Report enters the approval workflow AFTER the
traveler submits the report
• Any change within the approval process and the
report needs to be returned to start the workflow
over
Traveler
(Delegate)
HR Supervisor
Department
Expense Mgr
College/Division
Expense Mgr
Grants &
Contracts
P&PS
Correction

Getting Started
PeopleSoft (PS) Finance Module
• Login found:
• INFO FOR
• FACULTY & STAFF

Getting Started
PeopleSoft (PS)
Finance Module
• FINANCIAL
SERVICES
home page

Getting Started
PeopleSoft (PS) Module
• Requires Duo Authentication
• Expenses WorkCenter

Creating a Report
• Within the Expenses
WorkCenter
• Create/Edit Report
• Create/Edit can be
accessed by:
• Traveler/employee
• Delegate
• Click Add to begin the
report

Creating a Report
Header info includes:
• Business purpose (select from
dropdown list)
• Destination Location
• Use the lookup & select
• Report Description

Creating a Report
• Add a line for each
expense incurred
• Available expense types
are listed alphabetically
• Use one line & combine
miscellaneous travel

Creating a Report
• One expense line per Lodging Receipt
(will require that you document the number of nights)
• One expense line for EAC H DAY of meals
• Update start time first day & stop time last day
• One expense line for round trip mileage

Creating a Report
Lodging Expenses
• One expense line per receipt
• Enter number of nights stayed
• Merchant information
• Always Non-Preferred
• Name of merchant is required
• May need to justify the cost (excess of per diem)
Defaults from Profile
Pulls in from information
entered in header

Creating a Report
• Meal lines will include a
start and stop time
• Update start time on 1
st
day and end time
on last day of travel
• Per diem is based on a full
day. Any meals not being
claimed will simply be
deducted.
Meal Expenses

Creating a Report
• A report number is assigned once the report is
saved
• Can Save for Later and return to complete
• Confirm that amounts are correct & all
supporting documentation is attached
• Once complete, go to Summary and Submit
• Submission must be completed by the traveler

Creating a Report
To submit the report:
• On the Summary page, the traveler must:
• Check the box certifying the accuracy and
compliance of all expenses reported
• Click the Submit Expense Report
• Greyed out till box is checked
• Is considered the digital signature of the
traveler

Updating a Report
To update an existing report that has not
been submitted
• Create/Edit Report
• Find an Existing Value
• Leave Criteria blank
• Click Search

Updating a Report
Submitted reports cannot be updated by
the traveler/delegate unless:
• Report is withdrawn by the traveler
• Report is returned to the traveler
• Reminder – delegate does not receive
an email when a report is returned

Tracking a Report
To locate a submitted report
• Review Report
• Search by criteria – or leave blank for all reports

Tracking a Report
Report opens on summary page
• Track progress on workflow bar
• Green checkmark on completed “stops”
• View approval history in details below the
including Date/Time of the completed action

Tracking a Report
Review Report only to view
• Cannot edit/make changes when in Review Report
• Traveler cannot submit from Review Report
• Notifications from Review Report will put recipient
into Review Report NOT Create/Edit
Accessed from
WorkCenter
Accessed from
email notification

Tips/Tools – Copy an Existing Report
Short cut in the Quick Start:
• Select An Existing Report
• Copies the information from a
previous expense report
• Update the expense dates and
other details

Tips/Tools – Copy an Existing Report
• A list of available reports is provided
• Narrow the search by using the date
fields

Tips/Tools – Copy an Existing Report
• Click a report ID number to see the details
that will be copied.

Tips/Tools – Copy an Existing Report
• Click Select to choose a report to copy

Tips/Tools – Copy an Existing Report
• ALL information from the selected
report will be duplicated (Attachments are not
duplicated - new attachments for new report)
• Update the header information
• Update the expense lines
• Make sure to correct the date and all other
pertinent details on each expense line
• Remove any unnecessary expense lines
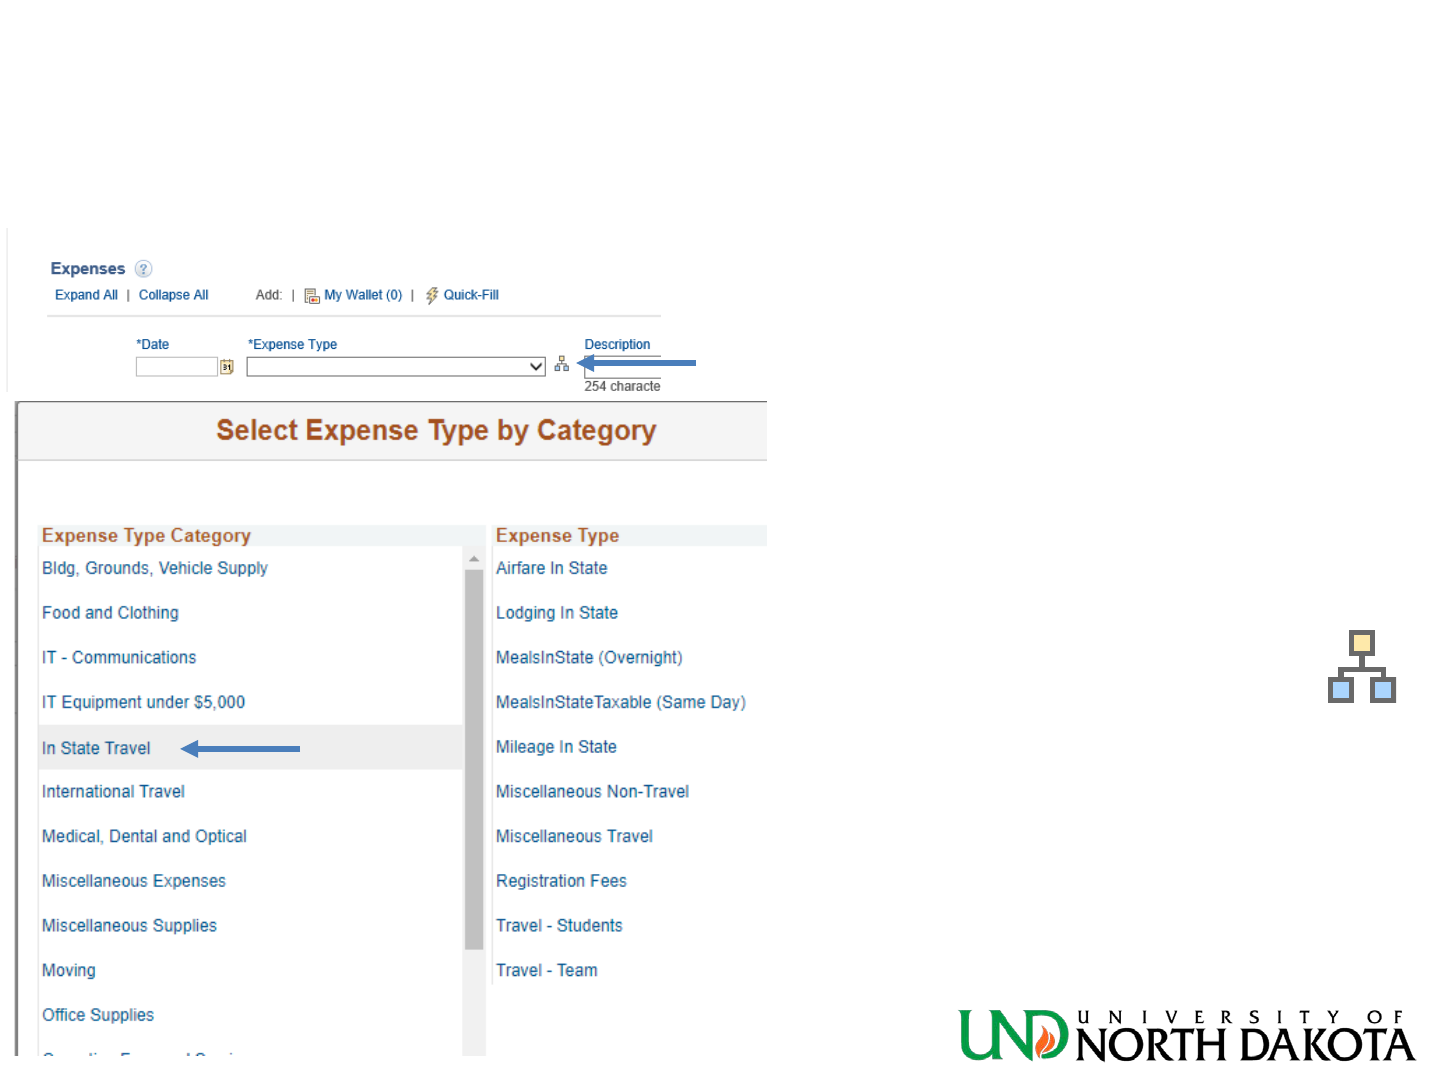
Tips/Tools – Expense Type Category
When entering
expense lines
• Use the Expense Type
Category icon to
narrow selection.
• Example: In State
Travel

Tips/Tools – Quick-Fill
Create all your expense lines at one time
• Select the Quick-Fill
• Enter the dates for your trip

Tips/Tools – Quick-Fill
• Scroll & select
expense types
• Check the box in the
One Day column for
one line and All Days
column for multiple
lines – one line for
each day of travel

Tips/Tools – Quick-Fill
• Results

Tips/Tools – Copy Expense Lines
Duplicate previous expense line
• Must have at least one expense line
entered
• Choose from Actions drop down list

• Select Copy Expense Lines
• Click GO
• Select Expense line to copy and date(s) to
copy to
Tips/Tools – Copy Expense Lines

Tips/Tools – Default Funding for Report
Enter/Update funding for entire report
• Must have at least one expense line
entered
• Choose from Actions drop down list

Tips/Tools – Default Funding for Report
• Select Default
Accounting For Report
• Click GO
• May add additional
lines
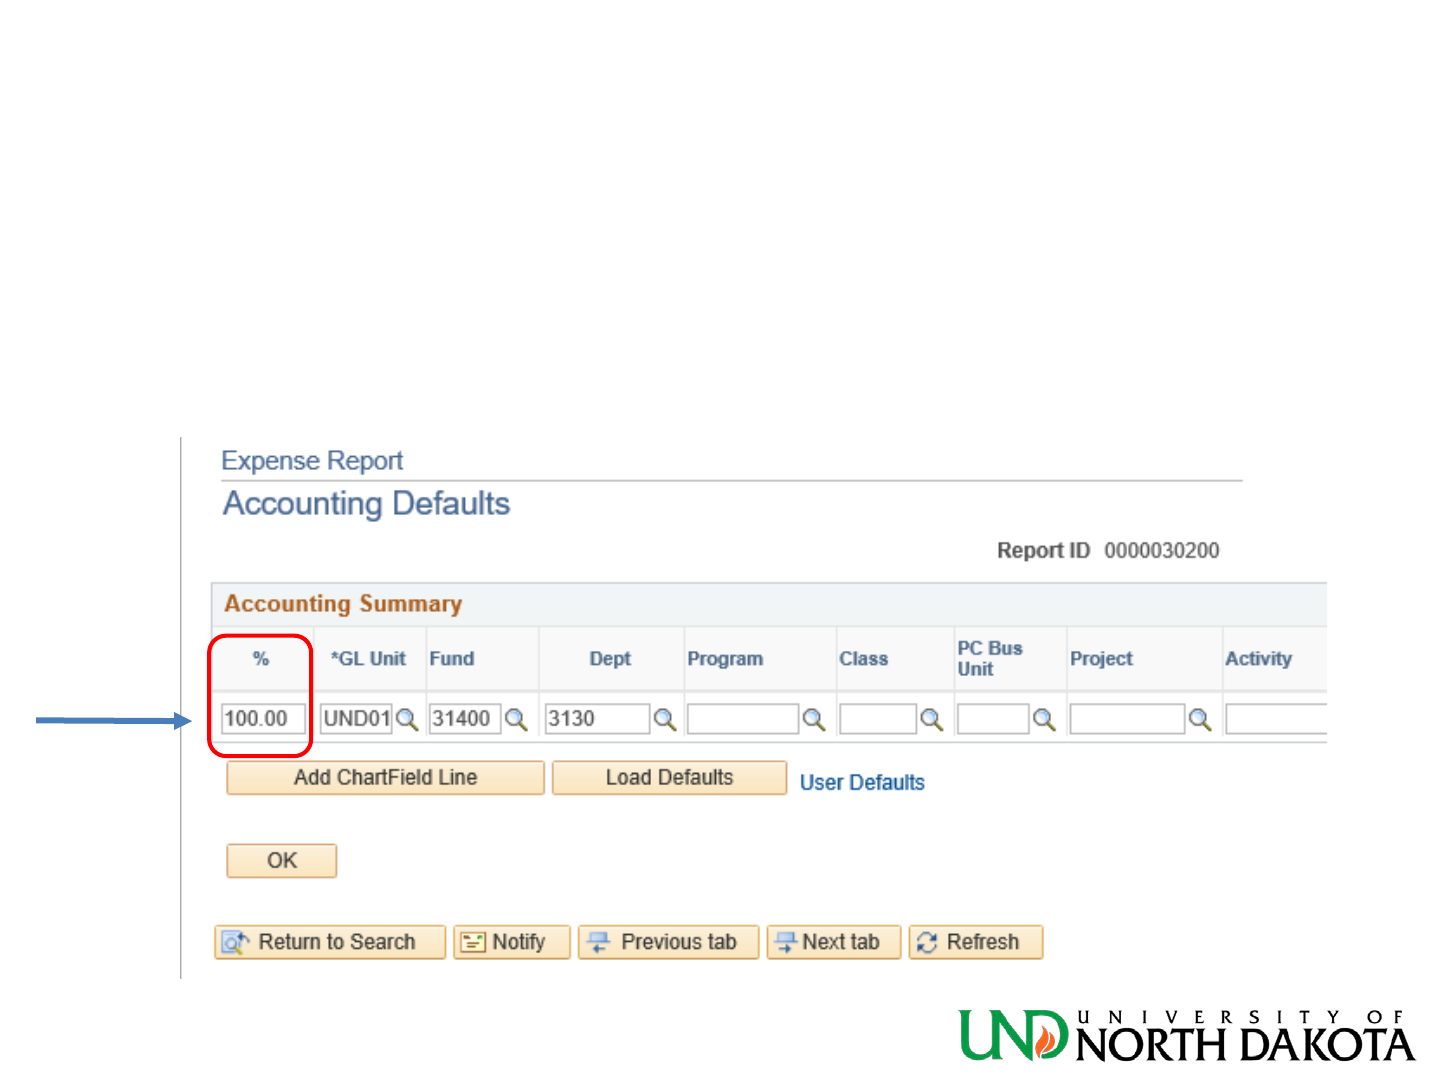
Tips/Tools – Default Funding for Report
• Each line is based on the percentage of
the funding

Tips/Tools – Using the Notify Button
As a delegate, upon completion of the
report, notify the traveler the report is
ready to submit

Tips/Tools – Using the Notify Button
• Clicking Notify opens an email template
• Enter the recipient’s email address
• a lookup is available
• Enter a subject
• Leave the Template
as is (contains link)
• Enter a detailed
message
• CC to yourself is
recommended

Tips/Tools – Using the Notify Button
• BE CAREFUL Notify is available in
Create/Edit and in Review
• Sent from Create/Edit Report recipient
can edit and submit when accessing from
the embedded link
• Sent from Review Report recipient
cannot update or submit when accessing
from the link

Tips/Tools – Using the Notify Button
• Create/Edit Report
• Review Report

Tips/Tools – Withdrawing a Report
To Withdraw a report
• Select Review Report from
Expenses WorkCenter
• Use Realtime Search tab
• Leave criteria blank to
search all reports
• Narrow search by one or
more selected criteria

Tips/Tools – Withdrawing a Report
• Select report from list of available reports
• All reports will show – those that have
passed the HR supervisor stop cannot
be withdrawn – button is greyed out
• Click Withdraw Expense Report

Tips/Tools – Exporting to Excel
Export report details to an Excel
Spreadsheet
• From these menu options:
• Create/Entry
• Review Report
• Review Expense History
• Search and select a report

Tips/Tools – Exporting to Excel
• Choose an Action
• Export to Excel
• Click the spreadsheet icon

Tips/Tools – Exporting to Excel
• Reports details download to an Excel
spreadsheet

Troubleshooting – Lodging Expense
Lodging Expenses
• Red Flags
• Red Triangle

Troubleshooting – Lodging Expense
Lodging Expenses
• Click Red Triangle
• Justification for
exceeding the
authorized amount

Troubleshooting – Autocomplete
Default Location is changing
• Default location in the header or on
subsequent expense lines is changing to
another state
• May change to the first alphabetical option

Troubleshooting – Autocomplete
• To avoid, turn off the Autocomplete
in your profile
• Click the NavBar Icon
• (upper right corner)
• Scroll down to My Preferences

Troubleshooting – Autocomplete
• Expand Navigation Personalizations
• Set Autocomplete to “No”

Troubleshooting – Approving a Report
• Approve buttons is greyed out
• How is the approver accessing the
report?
• From the email link?
• We recommend logging into the
WorkCenter to access Approve
Transactions

Troubleshooting – Approving a Report
• Within the Expenses
WorkCenter
• Select Approve
Transactions
• View the list of
transactions requiring
your approval

Troubleshooting – Approving a Report
• View the list of transactions requiring
your approval
• Double click a report to select and
approve

Troubleshooting – Approving a Report
• Report must have a valid budget status to
approve
• Budget checking process runs three times
a day (7:15 am, 11:15 am, and 3:15 pm)

Troubleshooting – Approving a Report
• Not Budget Checked
• Approve button greyed out

Troubleshooting – Approving a Report
• Error in Budget Check
• Approve button greyed out

Troubleshooting – Approving a Report
• Error – Review expense details funding
• Correct the funding error
• Or return to have the traveler/delegate
correct the error

Troubleshooting – Approving a Report
• Accounting date is in a previous month
• Defaults to date submitted

Troubleshooting – Approving a Report
• Accounting date highlighted
• Change accounting date to current date
• Report will need to be budget checked
again

Troubleshooting – Approving a Report
• Option 1
• Save changes
• Budget check will run at scheduled
time
• Report can then be approved

Troubleshooting – Approving a Report
• Option 2
• Process a budget check
• Click Budget
Options
• Select Budget
Check

Troubleshooting – Approving a Report
• Click OK
• Budget check process will run
• Updated status will be displayed

Questions???

Thank you for coming and
have a great week!
