
KillDisk
USER MANUAL
ver. 24
Updated: 24 Jan 2024
|Contents|ii
Contents
Introduction.....................................................................................................4
Sanitization Types...............................................................................................................................................................................4
Sanitization Standards......................................................................................................................................................................5
Erase Confidential Data................................................................................................................................................................... 6
Wipe Confidential Data................................................................................................................................................................... 7
Data Recovery......................................................................................................................................................................................7
Overview.........................................................................................................8
System Requirements....................................................................................................................................................................... 9
Software Licensing...........................................................................................................................................................................10
Register Online.............................................................................................................................................................................10
Register Offline.............................................................................................................................................................................12
Deactivate License.......................................................................................................................................................................14
Software Updates.............................................................................................................................................................................16
Getting Started............................................................................................. 16
Installation.........................................................................................................................................................................................17
Navigation...........................................................................................................................................................................................18
Disk Explorer...................................................................................................................................................................................... 20
Create a Boot Disk..........................................................................................................................................................................21
Usage Scenarios............................................................................................ 22
Disk Erase............................................................................................................................................................................................22
Disk Area to Erase...................................................................................................................................................................... 27
Disk Wipe............................................................................................................................................................................................ 27
Resume Erase.....................................................................................................................................................................................30
Secure Erase.......................................................................................................................................................................................32
Processing Summary...................................................................................................................................................................... 34
Certificates, Labels and Reports................................................................................................................................................ 37
Erase Certificates......................................................................................................................................................................... 37
Disk Labels..................................................................................................................................................................................... 41
XML Reports..................................................................................................................................................................................44
Helper Features.................................................................................................................................................................................46
Map Network Shares.................................................................................................................................................................46
Set Disk Serial Number............................................................................................................................................................ 47
Reset Hidden Areas....................................................................................................................................................................48
Property Views............................................................................................................................................................................. 49
Command Line and Batch Mode..............................................................................................................................................52
Command Line Mode............................................................................................................................................................... 52
Batch Mode................................................................................................................................................................................... 55
Advanced Tools.............................................................................................56
File Browser........................................................................................................................................................................................ 56
Disk Viewer.........................................................................................................................................................................................57
©
1999 - 2024 LSoft Technologies Inc.
|Contents|iii
Preferences.................................................................................................... 60
General Settings............................................................................................................................................................................... 61
Disk Erase............................................................................................................................................................................................63
Secure Erase.......................................................................................................................................................................................64
Disk Wipe............................................................................................................................................................................................ 65
Erase Certificate................................................................................................................................................................................66
Company Information.................................................................................................................................................................... 69
Technician Information.................................................................................................................................................................. 70
Processing Report............................................................................................................................................................................71
Processing CSV Log........................................................................................................................................................................73
Disk Label Presets............................................................................................................................................................................74
Disk Viewer.........................................................................................................................................................................................79
Error Handling...................................................................................................................................................................................80
E-mail Notifications.........................................................................................................................................................................80
Troubleshooting............................................................................................82
Common Tips.................................................................................................................................................................................... 82
Application Log.................................................................................................................................................................................83
Hardware Diagnostic File..............................................................................................................................................................85
Appendix........................................................................................................86
How Fast Erasing Occurs?............................................................................................................................................................86
Erase Disk Concepts....................................................................................................................................................................... 90
Wipe Disk Concepts....................................................................................................................................................................... 94
Erase Methods.................................................................................................................................................................................. 99
KillDisk and PXE............................................................................................................................................................................. 101
Config File KILLDISK.INI..............................................................................................................................................................106
Customizing Boot Disk................................................................................................................................................................110
Name Tags........................................................................................................................................................................................113
Virtual Disks.....................................................................................................................................................................................115
Disk Hidden Zones....................................................................................................................................................................... 116
Glossary............................................................................................................................................................................................. 118
Legal Statement..........................................................................................126
©
1999 - 2024 LSoft Technologies Inc.

|Introduction|4
Introduction
As a relatively new technology an overwhelming majority of people, businesses and organizations do not
understand the importance of security in digital data storage. The average hard drive stores thousands of
files written on it and many of them contain sensitive information. Over the course of a hard drives lifetime
the likelihood for recoverable remnants of sensitive information left on a hard drive at its end of life is very
high. To see this just try out KillDisk's File Browser on your system drive. You'll be surprised to see what you
find!
The modern storage environment is rapidly evolving. Data may pass through multiple organizations,
systems, and storage media in its lifetime. The pervasive nature of data propagation is only increasing as
the Internet and data storage systems move towards a distributed cloud-based architecture. As a result,
more parties than ever are responsible for effectively sanitizing media and the potential is substantial
for sensitive data to be collected and retained on the media. This responsibility is not limited to those
organizations that are the originators or final resting places of sensitive data, but also intermediaries who
transiently store or process the information along the way. The efficient and effective management of
information from inception through disposition is the responsibility of all those who have handled the data.
The application of sophisticated access controls and encryption help reduce the likelihood that an
attacker can gain direct access to sensitive information. As a result, parties attempting to obtain sensitive
information may seek to focus their efforts on alternative access means such as retrieving residual data on
media that has left an organization without sufficient sanitization effort having been applied. Consequently,
the application of effective sanitization techniques and tracking of storage media are critical aspects of
ensuring that sensitive data is effectively protected by an organization against unauthorized disclosure.
Protection of information is paramount. That information may be on paper, optical, electronic or magnetic
media.
An organization may choose to dispose of media by charitable donation, internal or external transfer, or by
recycling it in accordance with applicable laws and regulations if the media is obsolete or no longer usable.
Even internal transfers require increased scrutiny, as legal and ethical obligations make it more important
than ever to protect data such as Personally Identifiable Information (PII). No matter what the final intended
destination of the media is, it is important that the organization ensure that no easily recoverable residual
representation of the data is stored on the media after it has left the control of the organization or is no
longer going to be protected at the confidentiality categorization of the data stored on the media.
Sanitization refers to a process that renders access to target data on the media infeasible for a given level of
effort.
Note:
Additionally, try formatting a USB drive with files on it and browse it with KillDisk's File Browser as
well. Data leakages are not limited to hard drives!
Sanitization Types
Sanitization Types
NIST 800-88 international security standard (Guidelines for Media Sanitization) defines different types of
sanitization.
Regarding sanitization, the principal concern is ensuring that data is not unintentionally released. Data is
stored on media, which is connected to a system. Simply data sanitization applied to a representation of the
data as stored on a specific media type.
When media is re-purposed or reaches end of life, the organization executes the system life cycle
sanitization decision for the information on the media. For example, a mass-produced commercial software
©
1999 - 2024 LSoft Technologies Inc.

|Introduction|5
program contained on a DVD in an unopened package is unlikely to contain confidential data. Therefore,
the decision may be made to simply dispose of the media without applying any sanitization technique.
Alternatively, an organization is substantially more likely to decide that a hard drive from a system that
processed Personally Identifiable Information (PII) needs sanitization prior to Disposal.
Disposal without sanitization should be considered only if information disclosure would have no impact
on organizational mission, would not result in damage to organizational assets, and would not result in
financial loss or harm to any individuals. The security categorization of the information, along with internal
environmental factors, should drive the decisions on how to deal with the media. The key is to first think
in terms of information confidentiality, then apply considerations based on media type. In organizations,
information exists that is not associated with any categorized system. Sanitization is a process to render
access to target data (the data subject to the sanitization technique) on the media infeasible for a given
level of recovery effort. The level of effort applied when attempting to retrieve data may range widely. NIST
SP 800-88 Rev. 1 Guidelines for Media Sanitization Clear, Purge, and Destroy are actions that can be taken
to sanitize media. The categories of sanitization are defined as follows:
Clear
Clear applies logical techniques to sanitize data in all user-addressable storage locations for protection
against simple non-invasive data recovery techniques; typically applied through the standard Read and
Write commands to the storage device, such as by rewriting with a new value or using a menu option to
reset the device to the factory state (where rewriting is not supported).
For HDD/SSD/SCSI/USB media this means overwrite media by using organizationally approved and
validated overwriting technologies/methods/tools. The Clear pattern should be at least a single write
pass with a fixed data value, such as all zeros. Multiple write passes or more complex values may
optionally be used.
KillDisk supports Clear sanitization type through the Disk Erase command for all R/W magnetic types of
media, more than 20 international sanitation methods including custom patterns implemented and can
be used.
Purge
Purge applies physical or logical techniques that render Target Data recovery infeasible using state of the
art laboratory techniques.
For HDD/SSD/SCSI/USB media this means ATA SECURE ERASE UNIT, ATA CRYPTO SCRAMBLE EXT, ATA
EXT OVERWRITE, ATA/SCSI SANITIZE and other low-level direct controller commands.
KillDisk supports Purge sanitization type through the Secure Erase command only for media types
supporting ATA extensions.
Destroy
Destroy renders Target Data recovery infeasible using state of the art laboratory techniques and results in
the subsequent inability to use the media for storage of data due to physical damages.
For HDD/SSD/SCSI media this means Shred, Disintegrate, Pulverize, or Incinerate by burning the device in
a licensed incinerator.
It is suggested that the user categorize the information, assess the nature of the medium on which it
is recorded, assess the risk to confidentiality, and determine the future plans for the media. Then, the
organization can choose the appropriate type(s) of sanitization. The selected type(s) should be assessed
as to cost, environmental impact, etc., and a decision should be made that best mitigates the risk to
confidentiality and best satisfies other constraints imposed on the process.
International Standards in Data Destruction
KillDisk works with dozens of international sanitizing standards for clearing and sanitizing data including
the US DoD 5220.22-M and NIST 800-88 standards. You can be sure that once you erase a disk with
KillDisk all the sensitive information is destroyed forever.
KillDisk is a professional security application that destroys data permanently from any computer that can
be started using a boot USB or CD/DVD. Access to the drive's data is made on the physical level via the
BIOS (Basic Input-Output Subsystem) bypassing the operating system’s logical drive structure organization.
Regardless of the operating system, file systems or machine types, this utility can destroy all data on all
©
1999 - 2024 LSoft Technologies Inc.

|Introduction|6
storage devices. It does not matter which operating systems or file systems are located on the machine
which disks being sanitized.
Supported Sanitizing Standards:
• US DoD 5220.22-M
• US DoE M205.1-2
• Canadian CSEC ITSG-06
• Canadian OPS-II
• British HMG IS5 Baseline
• British HMG IS5 Enhanced
• Russian GOST p50739-95
• US Army AR380-19
• US Air Force 5020
• NAVSO P-5329-26 RL
• NCSC-TG-025
• NSA 130-2
• NIST 800-88
• German VSITR
• Bruce Schneier
• Peter Gutmann
• Australian ISM-6.2.93
User Defined Erase Method
KillDisk offers User Defined erase method where user indicates the number of times the write head
passes over each sector. Each overwriting pass is performed with a buffer containing user-defined or
random characters. User Defined method allows to define any kind of new erase algorithms based on user
requirements.
Secure Erase for SSD
KillDisk offers low-level ATA Secure Erase method for Solid State Drives (SSD). According to National
Institute of Standards and Technology (NIST) Special Publication 800-88: Guidelines for Media Sanitation,
Secure Erase is "An overwrite technology using firmware based process to overwrite a hard drive. Is a
drive command defined in the ANSI ATA and SCSI disk drive interface specifications, which runs inside
drive hardware. It completes in about 1/8 the time of 5220 block erasure." The guidelines also state that
"degaussing and executing the firmware Secure Erase command (for ATA drives only) are acceptable methods
for purging." ATA Secure Erase (SE) is designed for SSD controllers. The SSD controller resets all memory
cells making them empty. In fact, this method restores the SSD to the factory state, not only deleting data
but also returning the original performance. When implemented correctly, this standard processes all
memory, including service areas and protected sectors.
Related information
Erase Methods on page 99
Erase Confidential Data
Modern methods of data encryption are deterring network attackers from extracting sensitive data from
stored database files.
Attackers (who want to retrieve confidential data) become more resourceful and look for places where
data might be stored temporarily. For example, the Windows DELETE command merely changes the files
attributes and location so that the operating system will not look for the file located on FAT/exFAT volumes.
The situation with NTFS file system is similar.
©
1999 - 2024 LSoft Technologies Inc.

|Introduction|7
One avenue of attack is the recovery of data from residual data on a discarded hard drive. When deleting
confidential data from hard drives, removable disks or USB devices, it is important to extract all traces of the
data so that recovery is not possible.
Most official guidelines regarding the disposal of confidential magnetic data do not take into account the
depth of today's recording densities nor the methods used by the OS when removing data.
Removal of confidential personal information or company trade secrets in the past might have been
performed using the FORMAT command or the FDISK command. Using these procedures gives users a
sense of confidence that the data has been completely removed.
When using the FORMAT command Windows displays a message like this: Formatting a disk
removes all information from the disk.
Actually the FORMAT utility creates new empty directories at the root area, leaving all previous data on the
disk untouched. Moreover, an image of the replaced FAT tables is stored so that the UNFORMAT command
can be used to restore them.
FDISK merely cleans the Partition Table (located in the drive's first sector) and does not touch anything else.
Moreover, most of hard disks contain hidden zones (disk areas that cannot be accessed and addressed on a
logical access level). KillDisk is able to detect and reset these zones, cleaning up the information inside.
Related information
Disk Erase on page 63
Erase Disk Concepts on page 90
Disk Hidden Zones on page 116
Wipe Confidential Data
You may have some confidential data on your hard drive in spaces where the data is stored temporarily.
You may also have deleted files by using the Windows Recycle Bin and then emptying it. While you are still
using your local hard drive there may be confidential information available in these unoccupied spaces.
Wiping the logical drive's deleted data does not delete existing files and folders. It processes all unoccupied
drive space so that recovery of previously deleted files becomes impossible. Installed applications and
existing data are not touched by this process.
When you wipe unoccupied drive space on the system disk, the process must be run under operating
system booted from CD/DVD/USB disk. As a result the wipe or erase process uses an operating system that
is outside the local hard drive and is not impeded by Windows system caching. This means that deleted
Windows system records can be wiped clean.
KillDisk wipes unused data residue from file slack space, unused sectors and unused space in system
records or directory records.
Wiping drive space can take a long time, so do this when the system is not being actively used. For
example, this can be done overnight.
Related tasks
Disk Wipe on page 27
Related information
Wipe Disk Concepts on page 94
Data Recovery
Advances in data recovery have been made such that data can be reclaimed in many cases from hard drives
that have been wiped and disassembled. Security agencies use advanced applications to find cybercrime
related evidence. Also there are established industrial spy agencies using sophisticated channel coding
©
1999 - 2024 LSoft Technologies Inc.

| Overview |8
techniques such as PRML (Partial Response Maximum Likelihood), a technique used to reconstruct the
data on magnetic disks. Other methods include the use of magnetic force microscopy and recovery of data
based on patterns in erase bands.
Although there are very sophisticated data recovery systems available at a high price. Almost all the data
can also be easily restored with an off-the-shelf data recovery utility like Active@ File Recovery, making
your erased confidential data quite accessible.
Using KillDisk all data on your hard drive or removable device can be destroyed without the possibility
of future recovery. After using KillDisk the process of disposal, recycling, selling or donating your storage
device can be done with peace of mind.
Related information
Getting Started on page 16
Usage Scenarios on page 22
Erase Disk Concepts on page 90
Overview
Active@ KillDisk
Active@ KillDisk is a powerful and portable software that allows you to destroy all data on Hard Disks,
Solid State Disks (SSD) & USB drives, excluding any possibility of deleted files and folders data recovery.
KillDisk advanced features include:
• Enhanced visualization of physical disks and erase processes
• Improved handling of disks with controller malfunctions
• Stable handling of hot-swappable and dynamic disks
• Sound notifications for completed erase jobs with different results
• Auto hibernate or shutdown the system after all jobs are completed
• Enhanced certificates and reports for disk erase and wipe
• Advanced Disk Viewer with flexible Search for low-level disk inspection
• Customizable file names for certificates & XML reports
• Unique Computer ID can be displayed in certificates/reports
• Disk health - SMART information can be displayed and monitored
• Customizable look & feel: four different application styles included
• ATA Secure Erase option for SSD (Linux and Console packages only)
New features for version 24 include:
• Added Barcodes and QR codes to labels and certificates
• Export erase results to CSV log
• Minor bug fixes and functionality improvements
• Latest kernel version 14.1.17 including many improvements
New features for version 23 include:
• Improved output to certificates and application log
• Improved submitting online requests
• Improved work with NTFS volumes formatted with large cluster size
• Latest kernel including bug fixes and improvements
New features for version 15 include:
• Dark application style by default
• Configurable dynamic disks (LDM\LVM) reconstruction
©
1999 - 2024 LSoft Technologies Inc.

| Overview |9
• Device view filtering improved
• Bug fixes and performance improvements
• Latest kernel including bug fixes and improvements
New features for version 14 include:
• Added context help
• Dialogs adopted for low-resolution monitors (800x600)
• Secure e-mail notifications provided (added SSL & TLS support for SMTP)
• Improved Console functionality to support the latest hardware
• Latest kernel including bug fixes and improvements
New features for version 13 include:
• Resume Disk erase action to continue interrupted disk erase due to disk malfunction or errors
• Digitally signed PDF certificate with optional encryption and visual signature presentation
• Secure Erase (ATA command) implementation for Solid State Drives (SSD)
• Enhanced faulty disks detection and handling
• Bug fixes and major performance improvements
New features for version 12 include:
• Customizable Printable Labels
• Customizable Sound Notifications
• Redesigned and improved printable Certificates and Reports
• Disk Serial Number can be properly detected for most scenarios, including disks connected via USB
• Many other enhancements and stability improvements while working with unstable disks
This release is available as an executable to run in your desktop environment, or in a bootable environment
with the help of the Active@ Boot Disk Creator - the bootable disk creation tool included in the
installation package.
Related information
Erase Methods on page 99
System Requirements
KillDisk runs on Microsoft Windows, Linux and Apple macOS/OS X operating systems with the following
minimum requirements:
Workstation:
• PC: x64 (64-bit) or x86 (32-bit)
• CPU: Intel or AMD
• RAM: 512 Mb (Windows), 1 Gb (Linux), 1GB (macOS)
• Disk: 100Mb of disk space
Video:
• VGA (1024x768) or better resolution
Operating System:
• Windows XP to Windows 11, Windows Servers 2003 to 2022
• Linux Kernel 2.x or later (all Linux family: Ubuntu, Debian...)
• Apple macOS / OS X 10.12 or later
©
1999 - 2024 LSoft Technologies Inc.

| Overview |10
Drive Storage:
• CD/DVD/Blu-Ray optical drive (for applicable boot disk features)
• USB 1.0 / 2.0 / 3.0 / 3.1 / 3.2 storage device (for applicable boot disk features)
• Disk types supported:
• HDD via IDE, ATA, SATA I, SATA II, SATA III, SAS
• SSD via SATA I, SATA II, SATA III, SAS
• External eSATA & USB disks
• SCSI & iSCSI devices
• Onboard NVMe M.2 (SATA & PCI-E types)
• Removable media (USB drive, MemoryStick, SD card, Compact Flash, Floppy Disk, Zip Drive)
KillDisk supports all drives visible by the OS with read/write access, additional drivers can be loaded onto
the boot disk for drivers not included by default in the bootable environment.
Related information
Installation on page 17
Software Licensing
KillDisk is licensed per concurrent use of the software and for each concurrent disk being erased or
wiped outlined in the EULA. The maximum number of disks erased in parallel corresponds to the number
of purchased licenses.
One corporate license grants you an ability to run the software on one machine and erase one disk at any
given time. To run on several machines in an office (or to erase multiple drives in parallel on one machine)
you require the corresponding number of licenses.
Site and Enterprise licenses grant the license holder use of the software in one geographical location and
worldwide respectively.
This licensing is maintained through software registration and activation. Once the commercial version of
KillDisk is purchased the license holder will receive an email with their Registered Name and Registration
Key . Every machine that needs to use the fully-functional version of the software needs to be activated with
this key.
Activations are limited to the number of licenses held. To transfer from one machine to another they must
be deactivated from decommissioned hardware first.
For boot disks containing KillDisk the Active@ Boot Disk Creator must be registered with a registration
key.
Register Online
For this task you require an active internet connection for the PC you wish to register the product on.
After installation Active@ KillDisk still starts as a FREE (unregistered) version having limited functionality.
You need to register it first to have all professional features activated. To register the software:
1. Start registration wizard
On application first start Registration & Licensing dialog launched by default. If freeware software has
already been registered, the dialog does not appear at start. In this case click Registration menu item
from Help menu.
©
1999 - 2024 LSoft Technologies Inc.

| Overview |11
2. Select register option
Select the Register or Upgrade Software radio button. Read the License agreement and activate
the check box to agree to the Terms and Conditions of the license. Click Next to proceed with the
registration.
Figure 1: Registration Dialog
3. Type registration info
Type your name into Registration Name field, then copy & paste your 30-digit registration key obtained
after software purchase into the Registration Key field. Registration and network activation should be
completed automatically. You should receive a response that the software has been registered. The
registration is now complete. You may click Next to go to the final confirmation and click Finish to
close registration wizard.
Figure 2: Registration Complete
©
1999 - 2024 LSoft Technologies Inc.

| Overview |12
Now you have access to all professional features of the application.
Note: If your registration key is too long you are using the key for an earlier version. Ensure you
update to the latest version by making sure your support and updates are active and use the key to
this latest version. This can be done through your client profile.
Register Offline
For this method of activation, you need another PC with a web browser and active Internet connection and
a USB flash disk for transferring activation data.
Note: Use this method only if the computer you are activating does not have Internet access.
In some cases such as security reasons or corporate firewalls you may not have access to an Internet
connection on the machine you wish to install the software on.
For product registration and activation offline:
1. Start registration wizard
On application first start Registration & Licensing dialog launched by default. If freeware software has
already been registered, the dialog does not appear at start. In this case click Registration menu item
from Help menu.
2. Select register option
Select the Register or Upgrade Software radio button. Read the License agreement and activate
the check box to agree to the Terms and Conditions of the license. Click Next to proceed with the
registration.
Figure 3: Registration Dialog
©
1999 - 2024 LSoft Technologies Inc.

| Overview |13
3. Type registration info
Type your name into Registration Name field, then copy & paste your 30-digit registration key obtained
after software purchase into the Registration Key field. The Activation Request and Activation Response
boxes will appear:
Figure 4: Offline Activation Request
Click Save... to store registration request to a file. Copy this file to a USB drive.
©
1999 - 2024 LSoft Technologies Inc.

| Overview |14
4. Activate via internet
Bring the USB drive to a computer with an active Internet connection.
Open Web browser and navigate to https://www.lsoft.net/act/
Import the request file using the Choose File button and click Load
Click Process! to generate the Activation Response
Save the response to your USB drive by clicking Save to *.licenseActivated
Figure 5: Activate in Browser
5. Complete activation
Bring the USB drive to the PC with KillDisk installed and where activation request for offline activation
was created.
Click Load... button to import activation response from .licenseActivated file to the registration window
and click Activate button to complete and store offline activation.
Click Next and Finish buttons to confirm and close registration wizard.
You have now activated the software on your machine than does not have active internet connection.
Deactivate License
To transfer licenses from one machine to another you need to free up (remove) your activation on the
licensed machine. You may do this by deactivating the registration from within the KillDisk application:
1. Start registration wizard
Click Registration menu item from Help menu.
©
1999 - 2024 LSoft Technologies Inc.

| Overview |15
2. Select deactivate option
Select the Deactivate Registration radio button. Click Next to proceed with the registration.
Figure 6: Registration Dialog
3. Deactivate registration
Click Deactivate Registration button to complete online license deactivation.
Figure 7: Deactivating Registration
Click Next and Finish buttons to confirm and close registration wizard.
Your active license is now revoked from your PC and may be used to activate a different computer.
Note: Uninstalling the application from the computer using the uninstaller will also deactivate your
license.
©
1999 - 2024 LSoft Technologies Inc.

|Getting Started|16
Software Updates
KillDisk has a built-in update feature to ensure you always have an access to the latest version of the
application. To check for updates, use the file menu bar to navigate to Help > Check for Updates
Figure 8: Check for Updates
Update dialog contains history of previously installed versions and updates.
If a new version or update is detected it can be downloaded and installed on the next wizard steps.
Click Next button to proceed with an update, if exists. Software download and installation will start
automatically.
Note:
KillDisk stores your previously installed versions so you may roll back to any of your older versions
at any time. To rollback to previous version, just select target version, mark Rollback to previously
installed version check box and click Next button.
Getting Started
This section describes key features of KillDisk and explains its basic functionality.
©
1999 - 2024 LSoft Technologies Inc.

|Getting Started|17
Related tasks
Disk Erase on page 22
Installation
After purchasing Active@ KillDisk a registration key will be emailed to you as well as a download link to
installation package named KILLDISK-<VERSION>-SETUP.EXE (Windows versions) , KillDiskLinux.run.tar.gz
(Linux version) or KillDiskMacOS.dmg (Apple macOS/OS X). This file contains everything you need to get
started - just double click the file and installation wizard will take you through the setup process. You need
to have Administrator's privileges to be able to install it properly.
Note: If you purchased the Ultimate version you receive installation executable file to
run on Windows. To access the Linux installation files install KillDisk on your Windows
machine and navigate to the application directory. In Linux sub-folder you will find
the Linux installation files. The path to the Linux application will look something like: C:
\Program Files\LSoft Technologies\Active@ KillDisk Ultimate\Linux
\KillDisk_Linux_Installer.tar.gz
After installation Active@ KillDisk still starts as a FREEWARE (unregistered) version having limited
functionality. You need to register it first to have all professional features activated.
The installed package contains two main applications:
• Active@ KillDisk - Run this application to inspect local disks and erase/wipe your data
• Active@ Boot Disk Creator - Create a bootable CD/DVD/BD/USB disk to boot from and run
KillDisk. Using KillDisk this way allows you to wipe out confidential data from the system volumes
©
1999 - 2024 LSoft Technologies Inc.

|Getting Started|18
while gaining exclusive use to partitions because the operating system runs outside the partition
that you are securing.
Windows versions:
In order to install the application double click KILLDISK-<VERSION>-SETUP.EXE file and follow the
instructions in the installation wizard.
Linux versions:
In order to install KillDisk make sure you found the Linux installation file as mentioned in the note above.
Double click KillDisk_Linux_Installer.tar.gz in your Linux environment and unpack the archive to a proper
location.
To start installation simply run the following command in the directory where the archive was unpacked:
sudo ./KillDisk_Linux_Installer.run
KillDisk will be installed to /opt/lsoft/KillDisk/ and menu shortcut will be created.
Apple macOS / OS X versions:
In order to install KillDisk make sure you found the installation file as mentioned in the note above. Double
click KillDiskMacOS.dmg and follow installation steps. Drag and drop Active@ KillDisk to Applications
folder.
KillDisk will be installed as /Applications/KillDisk.app and KillDisk shortcut appears in Applications in
Finder.
Note: Boot Disk Creator and Boot Disks are not supplied for macOS / OS X because newest Apple
M1/M2 processors much differ from Intel architecture and do not support Windows-based or
Linux-based bootable environments. If purchased commercial version, you can still request Boot
Disk Creator for macOS /OS X plus related Boot Disks from us, however prepared bootable media
will boot and erase the only legacy Intel-based Macs (not M1/M2).
Navigation
Once the KillDisk application is launched the main application's dashboard appears. From here you can use
any of KillDisk's tools. This section describes main components of the application and navigation. The full
functionality and features of these components are discussed in corresponding sections later.
©
1999 - 2024 LSoft Technologies Inc.

|Getting Started|19
Figure 9: KillDisk Dashboard
Where:
File Menu Bar
The file menu bar contains actions to perform nearly any operation in KillDisk such as accessing
Settings and Help sections, changing Views and what is visible in the dashboard, opening tools as well as
navigating between KillDisk's windows.
Tabbed Windows
Here you can navigate between KillDisk tabbed windows such as Disk Explorer, Application Log etc..
Command Toolbar
The command toolbar is a dynamic toolbar that allows the user to perform Tabbed Window-specific
actions (depending on the context).
Windowed View
Contains the window that is currently active. By default you can see here all HDD/SSD/USB disks attached
to the workstation.
Output Window
Contains the log of actions KillDisk has performed.
Advanced Tools Tabs
These tabs allow to navigate between the different Advanced Tools.
Advanced Tools Window
This window shows the data for the Advanced Tool selected. The window can be moved, popped out and
re-sized.
To browse through each of these Views click on the appropriate tab. You may also open a View from the
View menu:
©
1999 - 2024 LSoft Technologies Inc.

|Getting Started|20
Figure 10: Access to Views via Menu
To open any View being closed, just select it from the View menu.
The status bar at the bottom of the workspace shows the current status of the application or status of the
activity in progress.
Related information
Property Views on page 49
Disk Explorer
Disk Explorer is a default workspace for the KillDisk application. All attached HDD/SSD/USB disks are
visualized here and can be selected for different actions. Commands like Disk Erase can be initiated from
here as well as progress displayed for actions performed with disks.
Figure 11: Disk Explorer View
©
1999 - 2024 LSoft Technologies Inc.

|Getting Started|21
Related information
Preferences on page 60
Create a Boot Disk
Boot Disk Creator helps you to prepare a bootable CD/DVD/BD or USB storage device that you may use to
boot any PC and use KillDisk to destroy all data on the attached HDD and SSD.
To prepare a bootable disk:
1. Run Boot Disk Creator
Run application from the Windows Start menu on Windows platform. Boot Disk Creator wizard
appears.
2. Register software
This is an optional step: if software hasn't been registered yet, you need to register software first. Click
Registration link in the bottom-left corner.
3. Select bootable media
Select desired bootable media to be created: CD/DVD/Blu-ray Disc , USB Flash Drive or ISO Image File .
If several media disks are inserted, open Flash Drives combo box and choose a particular device. Click
Next to proceed to the next step.
Note: A USB Drive or blank CD/DVD/BD must be inserted and explicitly chosen on the first step
before you can proceed further.
Note: If inserted USB Flash Drive doesn't appear in drop-down list, click USB not listed:
Initialize Disk link. You should be able to find removable disk in list of all attached devices and
initialize it to make compatible with the application. Initialization process destroys all data on
the selected USB device.
4. Select target platform
Select the target platform for booting up: Windows-based Boot Disk , Linux-based LiveCD/LiveUSB or
Console-based Boot Disk (text mode application). Depending on version purchased one or more target
platforms are available for selection. Click Next to proceed to the next step.
5. Configure boot disk
Specify additional and customized boot disk options:
a) Configure System Boot Settings
To customize boot options click the System Boot Settings tab. You can change the default settings
to be used: Time Zone , Additional Language , Display Resolution , Display Scale , Default Application
Start and Auto-start Delay .
Network and Security sub-tabs allow to configure IP & Firewall settings, mapping a network
resource and protecting Boot Disk with a password.
b) Add your files
To add your custom files to the bootable media click User’s Files tab. Add files or folders with files
using the related buttons at the right side. Added items will be placed in the User_Files folder at the
root of bootable media.
c) Add extra drivers
To add specific drivers to be loaded automatically, click Add Drivers tab. Add all files for the
particular driver (*.INF, *.SYS, …). Added items will be placed in the BootDisk_Drivers folder at
©
1999 - 2024 LSoft Technologies Inc.

|Usage Scenarios |22
the root of bootable media. At boot time all *.INF files located in this folder will be installed (if
compatible with a platform).
d) Add scripts
To add specific scripts to be launched after Boot Disk is loaded, click Add Scripts tab. Add your
scripts (*.CMD files). Added files will be placed in the BootDisk_Scripts folder at the root of bootable
media. At boot time all *.CMD files located in this folder will be executed (if properly created for the
particular platform).
e) Add command line parameters
To add command line parameters for KillDisk start up, click Application Startup tab and type all
parameters required (read documentation first). This tab is only enabled when KillDisk has been set
up as a Default Application at Boot Disk start up.
f) Configure KillDisk environment
To specify paths for KillDisk Certificate Logo file (LPG/PNG/BMP), Settings file (XML), Digital
Signature file (PFX) and Volume name to store Certificates/Logs/Reports, click App Config tab
and enter configuration information. You can configure storing Erase Certificates and reports to a
mapped network share.
Click Next to proceed to the final step.
6. Create Boot Disk
Verify selected media, boot up environment and KillDisk configuration. Click Create button to start
bootable media creation process. A progress bar appears while the media is being prepared. Click Finish
to exit the wizard.
You can use prepared bootable media to boot up any 64-bit PC and erase/wipe all attached disks.
Note: Not all the additional boot disk options are accessible for all platforms. For example, Add
Drivers section is available to Windows Operating System only.
Related information
Software Licensing on page 10
Common Tips on page 82
Command Line Mode on page 52
Usage Scenarios
KillDisk is a powerful tool to provide disk erasure solutions for personal and corporate use. This section
describes the key features of KillDisk and how to use this software's many features. The software is highly
customizable and this guide will help get you started with configuring KillDisk for your system and using it
to the full potential.
Usage scenarios include: Disk Erase, Disk Wipe, Secure Erase, Certificates, Labels, Reports, Command Line
Mode and Batch Mode operations.
Disk Erase
KillDisk is a powerful tool for disk sanitation. Individual disks can be erased with just few clicks using many
international sanitizing standards.
Disk Erase complete process is described below.
©
1999 - 2024 LSoft Technologies Inc.

|Usage Scenarios |23
1. Select disks
Use mouse in Disk Explorer to select one or more physical disks. Selected disks displayed with orange
borders.
For multiple selection use Ctrl+Left Mouse click.
To select all attached disks, press Ctrl+A .
To select a particular partition or volume, click the object in the Local Devices view.
2. Start erase
Open Disk Erase dialog using one of the following methods:
• Click Erase Disk command on the action toolbar
• Click Actions > Erase Disk command from main menu
• Click Erase Disk command from disk's context menu
©
1999 - 2024 LSoft Technologies Inc.

|Usage Scenarios |24
3. Confirm erase options
Confirm sanitation options after Disk Erase dialog pops up:
Figure 12: Erase Options
Use tabbed views to adjust disk erasure options if necessary. Available options are:
• Disk Erase on page 63
• Erase Certificate on page 66
• Processing Report on page 71
If single disk is selected from Local Devices view, then exact area for the erase can be optionally
specified:
Figure 13: Area selection for Disk Erase
Select all disk space
©
1999 - 2024 LSoft Technologies Inc.

|Usage Scenarios |25
Entire surface of the disk will be erased
Select all volumes
Select for erase the only disk space where the live volumes located
Select all unallocated space
Select for erase the only disk unallocated area (the space where no live volumes exist)
Select exact disk area
Allows you to use sliders on the visualization of your disk to select a particular range of sectors for
erasure.
4. Start erase
Click Start button to go to the final Confirm Action dialog (depending on erase settings this dialog can
be skipped). This is an additional precaution measure. If you proceed with confirmation - all data on the
selected disk(s) or on selected disk area will be destroyed permanently - without any possibility to be
recovered.
Click OK button to confirm erase and start erase process.
5. Observe progress
After starting erase a progress bar is displayed at the disk area. The progress bar represents the
percentage of disk space being sanitized. As the procedure progresses the percentage increases and
time left recalculates.
To stop erase process, click Stop at any time (via action toolbar, main menu or context menu).
Figure 14: Disk Erase progress
©
1999 - 2024 LSoft Technologies Inc.

|Usage Scenarios |26
6. Verify erase completion
After erase is complete, the results ( Success, Failed, Canceled ) are displayed on top of the disks in
different colors.
Figure 15: Erase Completed
After erase completion there are options for reviewing results (logs, processing reports and attributes),
printing Erase Certificates and Disk Labels for processed disks.
Figure 16: Erase Summary
©
1999 - 2024 LSoft Technologies Inc.

|Usage Scenarios |27
Related information
Erase Methods on page 99
Processing Summary on page 34
Certificates, Labels and Reports on page 37
Disk Area to Erase
KillDisk has an option to specify a particular area on the disk to erase. To access this feature you have to
select the single disk first. In Local Devices view initiate the Erase Disk command.
Figure 17: Erase a Specific Area
Disk area options for the erase are:
Select all disk space
This is a default disk area option and applies to entire disk surface to be erased
Select all volumes
This option erases all existing volumes and partitions on the disk
Select all unallocated space
This option erases only unallocated disk areas, where volumes and partitions do not exist
Select exact disk area
Use sliders on the disk visualization in order to select a particular range of sectors. You can also click on
sector numbers and type particular sectors manually.
You may also click on individual partitions and they will be selected for erasure.
Disk Wipe
When you select a physical device the Wipe command processes all logical drives consecutively erasing
data in unoccupied areas (free clusters and system areas) and leaving existing data intact. Unallocated
space, where no partitions exists has been erased as well.
Note:
If you want to erase ALL data (both existing and deleted files) from the device permanently, use
Disk Erase.
©
1999 - 2024 LSoft Technologies Inc.

|Usage Scenarios |28
If KillDisk detects that a partition has been damaged, it does not wipe data in that area, because partition
might contain an important data. There are some cases where partitions on a device cannot be wiped.
Examples: an unknown or unsupported file system, a system volume or an application start up disk. In these
cases Wipe command is disabled. If you select a device and Wipe button is disabled, select individual
partitions (volumes) and wipe them separately.
Disk Wipe complete process is described below.
1. Select disks
Use mouse in Disk Explorer to select one or more physical disks. Selected disks displayed with orange
borders.
For multiple selection use Ctrl+Left Mouse click.
To select all attached disks, press Ctrl+A .
To select a particular partition or volume, click the object in the Local Devices view.
2. Start wipe
Open Disk Wipe dialog using one of the following methods:
• Click Actions > Wipe Disk command from main menu
• Click Wipe Disk command from the context menu for disk or volume
©
1999 - 2024 LSoft Technologies Inc.

|Usage Scenarios |29
3. Confirm wipe options
Use tabbed views to adjust Wipe options if necessary.
Available options are:
• Disk Wipe on page 65
• Erase Certificate on page 66
• Processing Report on page 71
• Error Handling on page 80
Figure 18: Wipe Options
If single disk is selected from Local Devices view, then exact area for the wipe can be optionally
specified:
Select all partitions
Select for wipe the only disk space where partitions located
Select all volumes
Select for wipe the only disk space where live volumes located
Select all unallocated space
Select for wipe the only disk unallocated area (the space where no live volumes exist).
4. Start wipe
Click Start button to reach the final step before wiping out deleted data. Click Yes to confirm Wipe
action and process starts.
©
1999 - 2024 LSoft Technologies Inc.

|Usage Scenarios |30
5. Monitor progress
The progress of the wiping procedure will be displayed on the disk or volume. To stop the process at any
time click the Stop button for the particular disk or volume. Click the Stop All button to cancel wipe for
all disks.
Figure 19: Disk Wipe Progress
6. Verify results
This is an optional step. Select the wiped volume and click Open in File Browser toolbar button to
inspect the work that has been done. KillDisk scans system records of the partition. The Browser tab
appears. Existing file/folder names appear with a multicolor icon and deleted file/folder names appear
with a gray-colored icon. If the wiping process completed correctly the data residue in these deleted file
clusters and the place these files hold in the directory/system records has been removed. You should not
see any gray-colored file names or folder names within the volume being wiped out.
You will see a confirmation dialog when the process is complete. Here you can check the Processing
Summary, print Labels and Certificates.
All deleted files and system records on wiped volumes became unrecoverable.
Note:
If there are any errors, for example due to bad sectors, these errors will be reported and placed to
the log file. If such a message appears you may cancel the operation or continue wiping out disks.
Related information
Disk Wipe on page 65
Processing Summary on page 34
Certificates, Labels and Reports on page 37
Resume Stopped or Interrupted Erase
Disk erase can be a time consuming task. Erasing larger disks (10TB+) with sanitizing standards including
several overwrite passes could last for hours. If something happens in a middle of erase (user stopped an
action, failing disk just turned off, computer re-booted, etc.) user has options:
• Start Erase for the disk all over again
©
1999 - 2024 LSoft Technologies Inc.

|Usage Scenarios |31
• Resume Erase from the point it stopped on a disk (time saving option)
When application starts all detected disks being analyzed for any erases interrupted previously, and if such
erases detected for one or more disks, Resume Erase button become active for these disks. Disks with
stopped or interrupted erase are marked with a red label Interrupted Erase .
Note:
If disks with interrupted erase being detected after program start, pop up dialog appears
automatically suggesting you to Resume Erase. You can run Resume Erase from here, or select the
particular disks later on.
Resume Erase complete process is described below:
1. Select disks
Select a particular disk or group of disks to launch Resume Erase for.
2. Resume erase
Open Resume Erase Disk dialog using one of the following methods:
• Click Resume Erase command on the action toolbar
• Click Actions > Resume Erase command from main menu
• Click Resume Erase command from disk's context menu
3. Confirm options
After Resume Erase Disk dialog appears, all disks where Resume Erase option is available will be
displayed. You can select more disks for resume erase (if available) or deselect some selected disks.
Figure 20: Resume Erase Options
Verify selected disks, certificate and report options and click Start button to resume interrupted erase.
Wait until erase is complete.
After erase completion there are options for reviewing results (logs, processing reports and attributes),
printing Erase Certificates and Disk Labels for processed disks.
Related tasks
Disk Erase on page 22
Related information
Processing Summary on page 34
Certificates, Labels and Reports on page 37
©
1999 - 2024 LSoft Technologies Inc.

|Usage Scenarios |32
Secure Erase
Most of Solid State Drives (SSD) support Secure Erase for the low-level purging of all memory blocks on the
media. KillDisk is able use SATA Secure Erase feature and perform fast unrecoverable erasure. By doing
this, you can increase the performance of SSDs for future use. All of the data will be lost without recovery
options. Before using this feature make sure user fully understands the concepts.
Warning:
100% FATAL DAMAGE GUARANTEED TO MEDIA IF THE PROCESS INTERRUPTED (POWER
OUTAGE, UNAUTHORIZED SSD EXTRACTION, ETC.)
Make sure your hardware setup is safe from sudden lost of power.
Do not interrupt the process of Secure Erase in any manner!
Note:
If there is a need to erase ALL data (existing and deleted) from the hard drive device permanently
with sanitation standards (US DoD 5220.22-M, Canadian OPS-II, NSA 130-2, etc.) use Disk Erase
feature.
Important:
Secure Erase is available for Linux-based packages only (KillDisk Industrial, Active@ KillDisk
Linux, KillDisk Console and KillDisk LiveCD in Active@ KillDisk Ultimate).
Secure Erase is not available in Windows-based packages, including applications running under
Active@ Boot Disk (which is based on WinPE). For security reasons Microsoft intentionally blocked
IOCTL_ATA_PASS_THROUGH function in all the latest Windows editions starting from Windows 8.
Secure Erase complete process is described below.
1. Select SSD disks
Select disks marked as in Local Devices view. You may select multiple disks to be erased
simultaneously.
2. Start secure erase
Open Secure Erase dialog using one of the following methods:
• Click Actions > Secure Erase command from main menu
• Click Secure Erase command from disk's context menu
3. Confirm options
Use tabbed views to adjust secure erase preferences if necessary.
Available preferences are:
• Secure Erase on page 64
• Erase Certificate on page 66
• Processing Report on page 71
• Error Handling on page 80
Important: Only disks which state is NOT frozen SSDs can be selected for Secure Erase
©
1999 - 2024 LSoft Technologies Inc.

|Usage Scenarios |33
Warning:
In case if SSD which state is Frozen has been selected for Secure Erase the following message
appears:
Figure 21: Frozen SSD Warning
You have options either to eject and insert back the SSD, or send PC to Sleep mode and resume
it back to get full access to the disk and proceed with a Secure Erase.
4. Start secure erase
Click Start button to reach the final step before erasing disk data completely without any possibility to
be recovered. Confirm Secure Erase action by typing a predefined keyphrase.
Click OK button to confirm erase and start erase process.
5. Observe progress
There is no progress indicator and Stop action available for the Secure Erase. The feature is implemented
inside SSD controller.
The only time elapsed is available and can be displayed.
After Secure Erase process is completed the Processing Summary dialog appears:
©
1999 - 2024 LSoft Technologies Inc.

|Usage Scenarios |34
Figure 22: Secure Erase Processing Summary
Now you may Print and Open Erase Certificate and work with XML Reports.
If there are any errors they will be reported.
Related information
Secure Erase on page 64
Processing Summary on page 34
Certificates, Labels and Reports on page 37
Secure Erase (SSD) on page 124
Secure Erase Concepts on page 92
Secure Erase (ANSI ATA, SE) on page 100
Processing Summary
Once KillDisk finishes processing tasks such as Disk Erase, Secure Erase or Disk Wipe, a Processing
Summary dialog appears. It contains all of the information regarding to the operation(s). For example,
information which disks were erased, status of erasure, logs and associated certificates and reports.
©
1999 - 2024 LSoft Technologies Inc.

|Usage Scenarios |35
Figure 23: Example of Processing Summary
Results Overview
Tab contains the following information:
Title
All the devices processed are displayed with their erase status
Status
An actual erase status (success/fail)
Errors
Displayed number of errors detected (if any)
Label
Volume or partition description
Method
Erase/Wipe sanitizing method being used
Erase Passes
Number of overwriting passes performed
Started at
Time & date of operation's start
Duration
Duration of the operation.
Processing Attributes
Tab contains detailed information about operation status and processing attributes:
©
1999 - 2024 LSoft Technologies Inc.

|Usage Scenarios |36
Figure 24: Processing Attributes Sample
Log
Tab shows actual processing log:
Figure 25: Log Sample
Note:
The Wipe operation will produce a similar processing summary for the Disk Wipe.
Additional actions
Additional processing options and actions are:
©
1999 - 2024 LSoft Technologies Inc.

|Usage Scenarios |37
Disk Certificate
Status of the saved PDF certificate. Allows user to print certificate ( Print button), browse certificate
directory with a file browser ( Browse button) or examine certificate ( Open button).
Print Labels
Examine, customize, change options and print Labels by clicking the Print Labels button.
Disk Processing Report
Status of the saved Disk Processing Report. Examine the disk processing report .xml file (click Browse
button to navigate to the containing folder) or preview the report ( Open button).
Related information
Certificates, Labels and Reports on page 37
Certificates, Labels and Reports
KillDisk maintains the highest standards in disk erasure and provides extensive documentation options for
its operations through Reports , Labels and Certificates.
Erase Certificates
KillDisk provides PDF certificates upon the completion of Disk Erase, Secure Erase or Disk Wipe. These
certificates can be customized to include company-specific information and hardware/procedure
description. Configuring custom settings is described in the Certificate Preferences section of this guide.
Certificate Elements
Company logo
Company logo can be placed to the certificate instead of the default KillDisk's logo at the top right
corner.
Barcode
A barcode in selected format with encoded tags and attributes for scanning using a barcode scanner.
Company information
Displays all company information provided in the preferences. The user in the sample above only
provided a business name. But other company information may also be included in the certificate.
Technician information
Displays the technician information provided in the preferences. This section is for the name of the
operator and any notes they may want to include in the certificate report.
Erasure results information
Displays information pertaining to the erasure procedure conducted on the hard drive(s). Type of erasure
algorithm, custom settings, date and time started and duration of the erasure are all listed here.
Disk information
Uniquely identifies the disk being erased. Includes information like Name, Serial Number, Size and
Partitioning Scheme.
System information
Provides details on the system used to run KillDisk such as Operating System and Architecture type.
Hardware information
Provides details on the hardware used to run KillDisk such as Manufacturer, Number of Processors, etc.
Note:
The system information here only applies to the system running KillDisk, not the system that was
erased by the application!
Storing Certificate to PDF
There are options for storing a certificate to file in PDF format as well as encrypting with passwords and
digitally signing output PDFs. You can re-print stored to PDF certificates later on, as well as you can validate
their integrity and validity.
©
1999 - 2024 LSoft Technologies Inc.

|Usage Scenarios |38
Certificate location
Save erase certificate as a file in PDF format to the specific location.
File name template
Specify the template for the certificate file name. See the tags available in Appendix tags section.
Encrypt with password
If password field is not empty, output certificate (PDF file) will be encrypted and protected with specified
password. This password needs to be typed in any PDF viewer the next time user opens a certificate for
reviewing or printing.
Sign certificate with digital signature
Certificate file (PDF) can be signed with a default digital signature (supplied KillDisk.pfx certificate) or
with your custom digital signature (.PFX file). Digital signature can be verified later on. If Adobe Reader
successfully verified PDF document, it is guaranteed that its content hasn't been modified since issue.
If custom digital signature is required, please issue a certificate and specify full path to the custom
certificate (.PFX file), as well as .PFX open password (if any) in the related fields.
Display digital signature
Digital signature can be displayed as an overlay text on the first page of certificate. After turning this
option on, you can specify overlay text using tags (see tags section), its position on the first page,
rectangle dimensions and text size.
Note: Encrypting certificates with a password and digital signing options are not available when
running KillDisk under 32-bit Operating Systems. Only 64-bit platforms supported.
Sample of Erase Certificate
Figure 26: Erase Certificate - 1-st Page
©
1999 - 2024 LSoft Technologies Inc.

|Usage Scenarios |39
Figure 27: Erase Certificate - 2-nd Page
©
1999 - 2024 LSoft Technologies Inc.

|Usage Scenarios |40
Figure 28: Erase Certificate - 3-rd Page
Figure 29: Erase Certificate - Last Page
©
1999 - 2024 LSoft Technologies Inc.

|Usage Scenarios |41
Sample of Secure Erase Certificate
Figure 30: Secure Erase Certificate - 1-st Page
Related information
Disk Labels on page 41
XML Reports on page 44
Disk Labels
Along with the PDF certificate KillDisk allows you to print Disk Labels to attach to the disks being erased.
Disk Labels with erase status and essential disk information could be issued for any disk processing (such
as Disk Erase Secure Erase and Disk Wipe). These labels may be completely customizable to print on label
tape or on sheet with any dimensions. Simply specify the parameters and KillDisk will prepare the printable
labels for you.
Print Labels Option
Upon the completion of a major KillDisk operation you will see a report dialog. In the list of completed
tasks you will see the Print Labels button. Click it to open the Print Labels Dialog.
©
1999 - 2024 LSoft Technologies Inc.

|Usage Scenarios |42
Figure 31: Print Labels from Processing Summary
Print Labels Dialog
This dialog allows you to configure the labels and prepare them for printing. The top of the dialog shows a
list of the drives that will have labels generated for them. At any point in the operation a sample of the label
is shown in the Preview window on the left side. The right side of the dialog has the styling and template
configuration options.
©
1999 - 2024 LSoft Technologies Inc.

|Usage Scenarios |43
Figure 32: Print Labels Dialog
Page template options
The print label dialog gives you an access to a number of predefined standard presets and custom
templates you may create. These templates may be easily selected without opening any additional dialogs.
All the details of the selected template will be displayed below the selection box.
Print start position
The print start position section of the dialogue allows you to select what label on the page start printing
from. The labels won't always start from the 1x1 position so you can adjust this setting accordingly.
Print preview and actual printing
Once all the settings are configured you may see the Print Preview by clicking the Continue button. The
Preview displays what the print is going to look like and from here the print job can be sent to a printer that
is configured in the system .
Skip Print Preview
Disables system Print Preview dialog and prints labels immediately.
©
1999 - 2024 LSoft Technologies Inc.

|Usage Scenarios |44
Figure 33: Example of Print Preview
Related information
Erase Certificates on page 37
Disk Label Presets on page 74
XML Reports
KillDisk gives you the option to store XML reports for any major operation it performs (Disk Erase Secure
Erase and Disk Wipe ) on a disk.
Configure Processing Report Preferences in order to get XML reports generated and saved to particular
location.
These reports may include detailed information regarding erase processes, such as:
©
1999 - 2024 LSoft Technologies Inc.

|Usage Scenarios |45
Company Information
• Name
• License
• Location
• Phone
• Disclaimer
Technician Information
• Name
• Comments
System & Hardware Info
• OS version
• Architecture
• Kernel
• Processors
• Manufacturer
Erase Attributes
• Erase Verify
• Passes
• Method
• Verification Passes
Error Handling Attributes
• Errors Terminate
• Skip Interval
• Number of Retries
• Source Lock
• Ignore Write Error
• Ignore Read Error
• Ignore Lock Error
Disks
• Device Size
• Device Type
• Serial Number
• Revision
• Product Number
• Name
• Geometric Information
• Partitioning Scheme
Batches
• Name
• Disks
• Time
Additional Attributes
• Fingerprint Information
• Initialization
Erase Result
• Bay
• Time and Date Started
• Disk Information
• Status
• Result
• Time Elapsed
• Errors
• Name of Operation
©
1999 - 2024 LSoft Technologies Inc.

|Usage Scenarios |46
Figure 34: XML Report Sample
Helper Features
KillDisk has a number of extra features to ensure the most complete sanitation operations, flexibility to
meet the most strict requirements and compatibility with a wide range of systems. This section outlines
these features.
Map Network Shares
Map Network Shares is very useful feature when running application under Boot Disk and in Batch Mode.
This feature creates a specific local drive letter for remote locations to save logs and certificates to, as well
as provides a central location for erase reports to be stored.
To map a network share:
1. Open Mapping Dialog
Navigate to File > Map Network Share... from the main menu.
©
1999 - 2024 LSoft Technologies Inc.

|Usage Scenarios |47
2. Configure Mapping
Assign a drive letter, type a network folder location or click Browse button to browse local network and
select a proper network share. If sharing policy requires, type user name and password:
Figure 35: Mapping a Network Drive
If you want to save configured mapping for future use, make sure Map automatically on program start
up is marked.
Note:
KillDisk will identify all connected network drives, so you may use the drop-down list to select
the one you'd like to use
3. Attach a Network Share
Click OK to attach a network share mapped to the local drive letter.
After your network drive is configured, you may select it as a destination for certificates and reports in
Preferences.
Set Disk Serial Number
If you notice that disk serial number displayed in KillDisk does not match the number displayed on the
label attached to the physical disk, KillDisk let you option to change it manually. To access this feature
right-click the disk and select Set Serial Number from the context menu.
©
1999 - 2024 LSoft Technologies Inc.
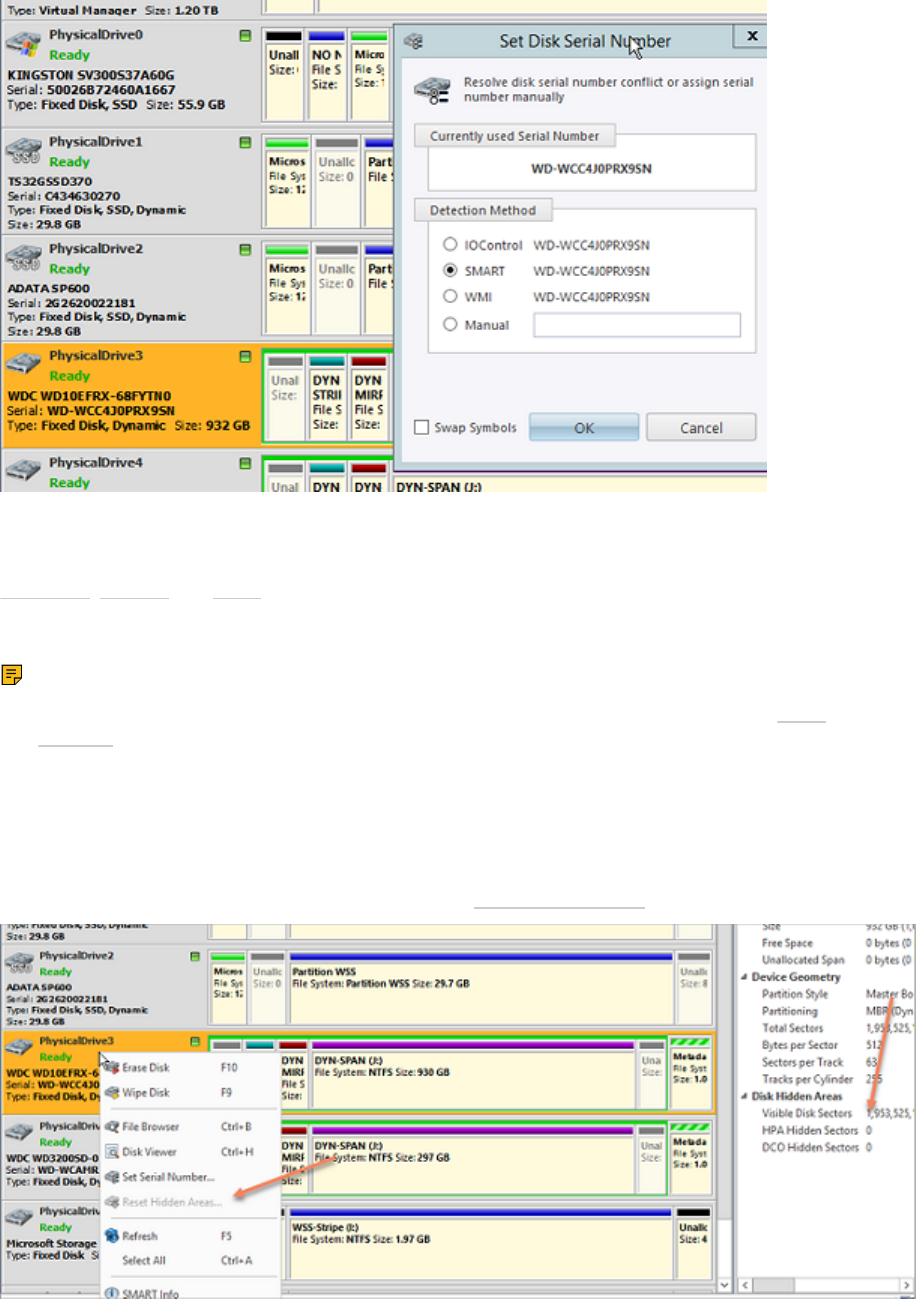
|Usage Scenarios |48
Figure 36: Set Disk Serial Number
There are several methods of disk serial number detection, application pulls it from various sources:
IOControl , SMART and WMI (some of them can be disabled and grayed out, depending on Operating
System support). Click the different options to apply different serial number detection method for the
particular disk. Default serial number detection method applied to all disks can be set up in Preferences.
Note:
If you don't see your serial number in any of the detection methods try marking the Swap
Symbols check box. If this doesn't help you can input disk serial number manually to be printed on
certificates properly (ultimate option).
Reset Hidden Areas
KillDisk is able to perform erasing of a disk's hidden zones: HPA and DCO.
To perform this task, right click on the disk and select Reset Hidden Areas from the context menu:
Figure 37: Disk Hidden Areas Reset
©
1999 - 2024 LSoft Technologies Inc.

|Usage Scenarios |49
When related context menu item is disabled, this means that there are no hidden areas on the disk has
been detected, so nothing to reset for the particular disk.
Related information
Disk Hidden Zones on page 116
Property Views
To show detailed information about any subject of an application (such as disk, partition, volume, file etc.)
KillDisk uses information views. When displayed these views show information about the object being
selected in the Disk Explorer. If selected object is changed, displayed information refreshes.
Property View
To open Property View for selected item do one of the following:
• Click View > Windows > Properties from the main menu
• Press F4 (keyboard shortcut)
• Click Properties command from object's context menu
Figure 38: Property View Example
Besides displaying a valuable data it also allows you to copy that information into a clipboard by using
context menu commands.
Context menu commands:
Copy Value
Copy Value of selected field to the clipboard (value only)
Copy Field
Copy formatted Name and Value pair to the clipboard
Copy All
Copy all information as formatted set of Name and Value pairs
©
1999 - 2024 LSoft Technologies Inc.

|Usage Scenarios |50
Figure 39: Copied Information Example
S.M.A.R.T. Information
Another informational view displays S.M.A.R.T. (Self Monitoring, Analysis and Reporting Technology) data
for the selected disk (if the device supports it).
To show this view do one of the following:
• Click View > Windows > SMART Info from the main menu
• Use SMART Info context menu command for the selected disk
©
1999 - 2024 LSoft Technologies Inc.

|Usage Scenarios |51
Figure 40: SMART Information View Example
S.M.A.R.T. data can be used to detect problem disks as long as important disk information has been
reflected such as Power-on Hours, Reallocated Sectors and Current Pending Sectors.
Note:
When Current Pending Sectors parameter differs from zero, this means the disk has bad sectors. It
will cause problems in the future. Dispose these disks as soon as possible.
Related information
Preferences on page 60
©
1999 - 2024 LSoft Technologies Inc.

|Usage Scenarios |52
Command Line and Batch Mode
KillDisk can be executed with some predefined settings when started from a command prompt with
specific command line parameters.
KillDisk can be also launched in fully automated mode (Batch Mode) which requires no user interaction.
KillDisk execution behavior depends on either command line parameters (highest priority), settings
configured in interactive mode and stored in settings file (lower priority) or default values (lowest priority).
Command Line Mode
To run KillDisk in command line mode just open a command prompt and go to installation directory.
At the command prompt start KillDisk (Windows version) by typing:
KILLDISK.EXE -?
In Linux environment, type:
./KillDisk -?
A list of parameters appears. Their description is in the table below:
Table 1: Command Line Parameters
Parameter Short Default Options
no parameter With no parameter an interactive screen will appear
-erasemethod=[0-23] -em= 2 0 - One pass zeroes (quick, low security)
1 - One pass random (quick, low security)
2 - US DoD 5220.22-M (slow, high security)
3 - US DoD 5220.22-M (ECE) (slow, high security)
4 - Canadian OPS-II (slow, high security)
5 - British HMG IS5 Baseline (1 pass, quick)
6 - British HMG IS5 Enhanced (slow, high security)
7 - Russian GOST p50739-95(slow, high security)
8 - US Army AR380-19 (slow, high security)
9 - US Air Force 5020 (slow, high security)
10 - NAVSO P-5329-26 RL (slow, high security)
11 - NAVSO P-5329-26 MFM (slow, high security)
12 - NCSC-TG-025 (slow, high security)
13 - NSA 130-2 (slow, high security)
14 - German VSITR (slow, high security)
15 - Bruce Schneier (slow, high security)
16 - Peter Gutmann (very slow, highest security)
©
1999 - 2024 LSoft Technologies Inc.

|Usage Scenarios |53
Parameter Short Default Options
17 - User Defined Method. Number of passes and
overwrite pattern supplied separately
18 - NIST 800-88 (1 pass zeroes, quick)
19 - NIST 800-88 (1 pass random, quick)
20 - NIST 800-88 (3 pass zeroes, slow, high security)
21 - Canadian CSEC ITSG-06 (3 passes, verify, slow, high
security)
22 - US DoE M205.1-2 (3 passes, verify)
23 - Australian ISM-6.2.93 (1 pass random, verify, quick)
-passes=[1-99] -p= 3 Number of times the write heads will pass over a disk area
to overwrite data with User Defined Pattern. Valid for User
Defined Method only
-verification=[1-100] -v= 10 Set the amount of area the utility reads to verify that the
actions performed by the write head comply with the
chosen erase method (reading 10% of the area by default).
Verification is a long process. Set the verification to the
level that works best for you
-retryattempts=[1-99] -ra= 2 Set the number of times that the utility will try to rewrite in
the sector when the drive write head encounters an error
-erasehdd=[0,1..63] -eh= Number in BIOS of the disk to be erased. First physical disk
has a zero number. In Linux first disk usually named /dev/
sda. In Windows Disk Manager first disk is usually named
Disk 0. On older systems (DOS, Windows 9x) first disk is
usually named 80h (obsolete syntax is still supported in the
parameter)
-eraseallhdds -ea Erase all detected disks
-excluderemovable -xr Exclude all removable disks from erasing when erase all
disks selected
-excludefixed -xf Exclude all fixed disks from erasing when erase all disks
option selected
-excludedisk=[0,1..63] -xd= Exclude disk from erasing when erase all disks option
selected
-ignoreerrors -ie Do not stop erasing each time a disk error is encountered.
When you use this parameter, all errors are ignored and
just placed to the application log
-initdisk -id Initialize disk(s) after erase
-fingerprint -fp Initialize disk(s) and write fingerprint to the disk’s first
sector
-computerid=[1,2] -ci= 1 - Display BIOS ID on the certificate
2 - Display Motherboard ID on the certificate
©
1999 - 2024 LSoft Technologies Inc.

|Usage Scenarios |54
Parameter Short Default Options
-clearlog -cl Use this parameter to clear the log file before recording
new activity. When a drive is erased, a log file is kept. By
default, new data is appended to this log for each erasing
process. By default the log file is stored in the same folder
where the software is located
-exportlog -el Export a log file as XML report
-logpath=[“fullpath”] -lp= Path to save application log file. Can be either directory
name or full file name. Use quotes if path contains spaces
-certpath=[“fullpath”] -cp= Path to save erase/wipe certificate. Use quotes if path
contains spaces
-inipath=[“fullpath”] -ip= Path to the configuration file (KILLDISK.INI) for loading the
advanced settings.
-noconfirmation -nc Skip confirmation steps before erasing starts. By default
confirmation steps will appear in command line mode for
each hard drive
-beep -bp Beep after erasing is complete
-wipeallhdds -wa Wipe out unallocated space on all recognized volumes
located on all detected disks
-wipehdd=[0,1…63] -wh= Wipe out unallocated space on the disk specified by BIOS
number
-test=["fullpath"] If you are having difficulty with KillDisk use this parameter
to create a hardware information file to be sent to our
technical support specialists. You must specify the name of
the file where to store technical information
-batchmode -bm Execute in batch mode based on command line parameters
and INI file settings (without user interaction, all operations
being stored to log file)
-userpattern=[“path”] -u= File to get user-defined pattern from. Applied to User
Defined erase method. Each line in the file corresponds to
the particular pass pattern
-shutdown -sd Save log file and shutdown PC after completion
-nostop -ns Prevent erase/wipe stop action
-help or -? Display this list of parameters
Note: Parameters -test and -help must be used alone. They cannot be used with other parameters.
Note: Commands –erasehdd, -eraseallhdds, -wipehdd and -wipeallhdds cannot be combined.
Type the command and parameters into the command prompt console. Here is an example for Windows :
killdisk.exe -eh=80h -bm
The same in Linux:
./KillDisk -eh=0 -bm
©
1999 - 2024 LSoft Technologies Inc.

|Usage Scenarios |55
In this example data on device 80h will be erased using the default method (US DoD 5220.22-M) without
user confirmation and application quits (control returns to the command prompt) when complete.
Here is another Windows example:
killdisk.exe -eh=80h -nc -em=2
The same in Linux:
./KillDisk -eh=0 -nc -em=2
In this example all data on the first detected disk (which has 'zero' number or 80h) will be erased using US
DoD 5220.22-M method without confirmation. After erase completes, processing summary report will be
displayed.
Note: In Linux environment to detect and work with physical disks properly KillDisk must be
launched under Super User account. So, if you are not a Super User, you should type a prefix sudo ,
or su (for different Linux versions) before each command.
After you have typed KillDisk and added command line parameters press Enter to complete the command
and start the process.
Information on how drives have been erased is displayed on the screen when the operation has completed
successfully. KillDisk execution behavior depends on either command line parameters (highest priority),
settings configured in interactive mode and stored in the settings file (lower priority), or default values
(lowest priority).
Related information
Batch Mode on page 55
Batch Mode
Note: This feature is intended for advanced users only
Batch Mode allows KillDisk to be executed in fully automated mode without any user interaction. All events
and errors (if any) are placed to the log file. This allows system administrators and technicians to automate
erase/wipe tasks by creating scripts (*.CMD, *.BAT files) for different scenarios that can be executed later on
in different environments.
To start KillDisk in batch mode just add the –bm (or -batchmode) command line parameter to the other
parameters and execute KillDisk either from the command prompt or from a custom script.
Here is an example of Batch Mode execution with the wipe command:
KillDisk -wa -bm -em=16
This command will wipe all deleted data and unused clusters on all attached physical disks without any
confirmations using most secure Peter Gutmann's method and control returns to the command prompt
when erase completes.
If –ns (-nostop) command line parameter is specified no user interaction is possible after erase/wipe
action started. So user cannot cancel the command being executed.
After command execution completed, application returns the following exit codes to the Operating System.
Return codes:
0 (Zero)
KillDisk returns Zero when all disks erased successfully
1 (One)
©
1999 - 2024 LSoft Technologies Inc.

|Advanced Tools|56
KillDisk returns One if errors occurred or nothing has been erased/wiped
2 (Two)
KillDisk returns Two if erase/wipe has been completed, but minor warnings occurred
Related information
Command Line Mode on page 52
Advanced Tools
KillDisk offers a number of advanced tools to work in conjunction with the software to make operations
easier to perform and the disks easier to explore. KillDisk makes it possible to explore disks both on a file
level (in file Browser) and on a low level (in Hexadecimal Viewer). Disk health analysis can be performed
with S.M.A.R.T. monitor. Logs and reports export to the external SQL databases is fully supported in KillDisk
Industrial version.
This section describes these features:
• File Browser
• Hexadecimal Viewer
File Browser
KillDisk includes a built-in File Browser to examine disks' surface for verification purposes, for proper disk
selection for the erase, and for deleted files validation after wipe. File Browser is able to preview volumes
and display files and folders located on all existing file systems used in Windows, Linux, Unix or Mac OS.
Note:
KillDisk detects existing files as well as files that have been deleted but NOT sanitized. They appear
in Gray color and indicate deleted files with a high probability of being recovered with a special file
recovery tools.
Browse Disk View
To browse the contents of a specific disk simply select the disk and click Open in File Browser from the
Action menu or select the related command from the context menu.
Another way is to use a keyboard shortcut which is Ctrl-B . This will open the File Browser window:
©
1999 - 2024 LSoft Technologies Inc.

|Advanced Tools|57
Figure 41: File Browser Window
The File Browser tab displays files and folders on the disk being selected. Browsing over the folders tree
performed the same way as in Windows Explorer.
Figure 42: Deleted Files in File Browser
Grey files indicate deleted files have not been sanitized. These files are recoverable. Running KillDisk's Wipe
operation ensures these files are unrecoverable and make these gray files disappear from the File Browser.
Note:
Found deleted files appear in their original directory (before they were deleted). The ! Lost &
Found ! folder is a virtual directory created for deleted files which are found without directory
information.
Disk Viewer
Disk Viewer allows users to view the contents of connected drives on a sector's level in a hexadecimal, ASCII
and Unicode representations. Disk Viewer for the selected disk can be launched from the main view as well
as through the main menu bar. Shortcut is Ctrl-H .
©
1999 - 2024 LSoft Technologies Inc.

|Advanced Tools|58
Figure 43: NTFS Volume in Disk Viewer
Templates
KillDisk also offers a list of templates to help display volume structure on the disk by colored sections.
Example above displays what happens when NTFS volume is opened in the Disk Viewer. In this case NTFS
Boot Sector template has been attached automatically. Below is NTFS Boot Sector template details in
Templates view.
Figure 44: NTFS Boot Sector Template View
©
1999 - 2024 LSoft Technologies Inc.

|Advanced Tools|59
Low-level Search
Disk Viewer has an advanced search feature for locating specific data in sectors while low-level disk scan.
Click Find toolbar button to open Find Text dialog.
Find what
Input the characters you are searching for in ANSI, Hex or Unicode
Search direction
If you have an idea of where the data may be located specify where to search
Not
Search for characters that do not correspond to the Find what parameter
Ignore case
Disables case-sensitivity in text search
Use
Switch between Regular Expressions and Wildcards
Per block search
if you are familiar with the location of the data in the data block you can specify a search with an offset of
the object to speed up the search process
Figure 45: Find Text Dialog
Navigation
Disk Viewer's Navigate options simplify navigation on the disk. Click Navigate toolbar button to access
these options, which are:
©
1999 - 2024 LSoft Technologies Inc.

|Preferences|60
Go to offset
Jumps to the particular offset that needs to be entered manually in a decimal or hexadecimal form
Go to sector
Jumps to the particular sector or cluster on the disk
Partition table
Jumps to the sector where partition table is located
Particular partition
Lists all partitions and allows to jump to the boot sectors, to the beginning and to the end of any
available partition
Figure 46: Disk Viewer Navigation Options
Preferences
KillDisk Preferences dialog is the central location where KillDisk features and settings can be configured.
To open Preferences dialog:
• From main menu choose Tools > Preferences...
or
• Press F2 keyboard shortcut at any time
Preferences dialog divided into several sections:
• General Settings
• Disk Erase
• Secure Erase
• Disk Wipe
• Erase Certificate
• Company Information
• Technical Information
• Processing Report
• Processing CSV Log
• Disk Label Presets
• Disk Viewer
• Error Handling
• E-Mail Notifications
©
1999 - 2024 LSoft Technologies Inc.

|Preferences|61
Preferences allow to configure all the settings needed for the application proper operation.
General Settings
The General Settings section allows to configure general preferences as well as the applications' visual and
sound representation.
Device Control Layout
These settings control visual disk behavior in Disk Explorer and allow to Show or Hide a System Disk and
devices which are not ready (offline).
Default serial number detection method
Select how KillDisk retrieves the disk serial number by default. Values are: SMART , IOControl &
WMI .
Local devices initialization
Select which types of devices appear in KillDisk by default: Dynamic Disks, Fixed disks , Removable
disks , CD/DVD/BD and Floppies .
Computer ID
Configure how the KillDisk workstation is identified in logs & reports. Values are: None , BIOS Serial
Number , Motherboard Serial Number .
Application Log File Settings
These settings apply to the log file generated by the application. All operations performed in a KillDisk
session will be saved in this log.
Log file location
©
1999 - 2024 LSoft Technologies Inc.

|Preferences|62
Allows the user to specify where the application log file is saved. By default this is set to a KillDisk
installation directory.
Application log detail level
Manipulate the amount of details included in the logs. Options are: Minimum and Maximum .
Initialize application log when application starts
This setting configures whether KillDisk generates a new log file for every session (erasing the log
of the previous session) or appends new sessions to one log file. Moreover, logs can be placed to the
files being named using naming pattern specified.
Environment
These are configurable options pertaining to the applications user interface and user experience.
Application style
Configures the color scheme used in the application. Values are: Blue , Olive , None (Use OS default) ,
Silver and Dark .
Default toolbars style
Configures how icons are shown in the toolbar. Values are: Large icons, no text ; Large icons, with text
beside icon ; Large icons, with text under icon ; Small icons, with text beside icon; Small icons, no text.
Default help source
If available, user can select help documentation source to be addressed when requested. Values are:
PDF , Context Help and On-line web help.
Show notification dialog after process complete
Show or hides final process confirmation dialog.
Reset all dialogs
Resets all the settings to the default state.
Sound Notifications
These are configurable options related to application sounds: you can use either predefined values or
assign your own sounds (User defined sound file).
Use Sound Notifications
Toggles sound tones being used for notifying the user of the completion of a task, errors and
notification during an operation: Success , With Warnings , With Errors , Failure .
Action Triggers
Configure actions performed while application is running.
Automatically check for software updates
If this option set, application will check for a new update after every start up.
Action after all processes complete
©
1999 - 2024 LSoft Technologies Inc.

|Preferences|63
Select either None , Hibernate , Shutdown or Restart system after all running processes completed.
CAUTION:
You will have 30 seconds to abort system hibernation, restart or shutdown.
Export erase certificates and application log to all detected removable media
Upon erase completion all certificates and logs will be automatically exported to attached USB disks
(all detected media of removable type).
Disk Erase
The Disk Erase section provides settings' configuration for the KillDisk erase procedures.
Erase method
Choose one of more than 20 sanitizing methods including many international standards and custom
patterns.
Erase verification
Percentage of disk to be verified after disk erasure. The large percentage, the more time it takes to
verify written data.
Note:
In some erase methods such as the US DoD 5220.22-M this option is mandatory. After the
erase operation has completed this feature will scan the entire drive evenly and verify the
integrity of the erase operation. This option is the percent of the sectors to check across the
disk. Most standards specify 10% as an accurate sample size for the verification.
Initialize disk(s) after erase
©
1999 - 2024 LSoft Technologies Inc.

|Preferences|64
Writes proper MBR to disk's first sector after erasure complete. This is needed for disk to be visible
and accessible by most Operating Systems.
Write fingerprint to first sector
This feature writes the specified fingerprint to the first sector of the erased drive. If erased disk is
plugged into the system and system boots from this disk the user will see a message on the screen
about the disk being erased by KillDisk.
Print erase labels
This feature prints erase label automatically after erase completion using specific Disk Label
configuration.
Erase confirmation
As a safety precaution to prevent accidental removal of disks' data KillDisk uses the user-typed
keyphrase mechanism just before the erase procedure is initiated (see below). By default this
precaution mechanism is initialized with the key phrase ERASE-ALL-DATA . The key phrase can be
modified, configured as a randomly generated set of characters or disabled. The keyphrase should
be typed correctly in order to start the erase procedure.
Related information
Erase Methods on page 99
Erase Disk Concepts on page 90
Disk Label Presets on page 74
Secure Erase
The Secure Erase section provides settings' configuration for the Solid State Drive (SSD) specific erase
procedures.
Verify erasure
Percentage of disk to be verified after Secure Erase completes.
Initialize disk(s) after erase
©
1999 - 2024 LSoft Technologies Inc.

|Preferences|65
Writes proper MBR to disk's first sector after erasure complete. This is needed for disk to be visible
and properly accessible by most Operating Systems.
Write fingerprint to first sector
This feature writes the specified fingerprint to the first sector of the erased drive. If erased disk is
plugged into the system and system boots from this disk the user will see a message on the screen
about the disk being erased by KillDisk.
Erase confirmation
As a safety precaution to prevent accidental removal of disks' data KillDisk uses the user-typed
keyphrase mechanism just before the erase procedure is initiated (see below). By default this
precaution mechanism is initialized with the key phrase ERASE-ALL-DATA . The key phrase can be
modified, configured as a randomly generated set of characters or disabled. The keyphrase should
be typed correctly in order to start the erase procedure.
Related tasks
Secure Erase on page 32
Related information
Secure Erase (SSD) on page 124
Secure Erase Concepts on page 92
Secure Erase (ANSI ATA, SE) on page 100
Disk Wipe
The Disk Wipe section provides settings' configuration for Wipe procedure and allows you to specify the
erase method to use, verification and a few additional wipe-specific options.
Erase method
Choose one of more than 20 sanitizing methods including many international standards and custom
patterns.
Verify erasure
Percentage of disk to be verified after wiping out unused disks' clusters.
Wipe unused clusters
©
1999 - 2024 LSoft Technologies Inc.

|Preferences|66
Erase areas of the hard drive that are not formatted and not currently used by the Operating System
(data has not been recently written there unless this is a recently deleted partition).
Wipe metadata and system files area
Erase areas on the disk containing information about previous files on the volume. Wiping prevents
recovery of files using their remained directory records.
Wipe slack space in file clusters
Erase slack space within files. Because files are usually never exactly the size of the space allocated to
them there may be unused space within a file that may contain traces of data stored there previously.
This algorithm wipes that space to remove these data traces.
Print wipe labels
This feature prints wipe labels automatically after wipe is completed using a specific Disk Label
configuration.
Related information
Erase Methods on page 99
Wipe Disk Concepts on page 94
Disk Label Presets on page 74
Erase Certificate
Erase Certificates section configures options for appearance and storage of certificates in PDF format. If
Use Erase Certificate check box is selected, PDF certificates will be created and available for the immediate
printing and storage for future use. Certificates can be customized with Company Information, Technician
Information and other information.
©
1999 - 2024 LSoft Technologies Inc.

|Preferences|67
Include company information
Use this option to include company's information section to the certificate.
Include technician information
Use this option to include technician's information section to the certificate.
Show KillDisk logo on certificate
Use this option to display a default KillDisk logo at the top right corner of the first page.
Include system info
Ensures that the Operating System specific information for the workstation used for erasure is saved
to the certificate, such as:
• Operating system
• Kernel version
• Architecture
Include hardware info
Ensures that the Chassis-specific information for the workstation used for erasure is saved to the
certificate, such as:
• Motherboard manufacturer
• Motherboard description
• Number of processors
Include disk SMART information
Use this option to include S.M.A.R.T. information section for the disk being erased.
Print Options
Always print certificate after disk erase
Prints erase certificate after erase completion automatically.
Skip print preview
Prints erase certificate skipping certificate preview step.
Default printer
Select a default printer for printing erase certificates.
Barcode
If Include Barcode check box is selected, a barcode section has been added to the certificate in desired
format. Barcode section includes the following options:
Barcode data
Is a string of available tags and attributes concatenated by ^ (CARET) delimiter. User is able to
compose a custom string with selected values from drop-down list or by simple typing.
©
1999 - 2024 LSoft Technologies Inc.

|Preferences|68
Preview
Shows the composed data representation. Barcode data encoded to the actual barcode.
Barcode format
There is a drop-down list of available barcode formats.
Encoding
There is a drop-down list of available encoding schemes for the particular barcode format. The
selected encoding is used to encode the barcode data.
Error correction level (0-8)
Affects a size of the barcode. Increasing the level value provides a better scanner readability. Values
depend on the barcode format selected.
Save to PDF Options
Section Save to PDF offers options for storing a certificate to file in PDF format as well as encrypting it with
a password.
Certificate location
Use this option to save erase certificate as a file in PDF format to the selected location.
File name template
Specify the template composed of different tags for the Erase Certificate. See the tags available in
Appendix tags section.
Encrypt with password
If password field is not empty, output certificate (PDF file) will be encrypted and protected with
specified password. This password needs to be typed in any PDF viewer next time user opens a
certificate for printing or previewing.
Sign Certificate
Section Sign Certificate offers options for signing an output PDF certificate with digital signature.
©
1999 - 2024 LSoft Technologies Inc.

|Preferences|69
Sign certificate with digital signature
Certificate file (PDF) can be signed with a default Digital Signature (supplied KillDisk.pfx ) or with
your custom Digital Signature (*.PFX) and can be verified later on. If Adobe Reader successfully
verified PDF document, it is guaranteed that its content hasn't been modified since issue.
If custom Digital Signature is required, please issue a certificate and specify full path to the custom
certificate (*.PFX file) as well as its open password in the related fields below ( Digital Signature and
Use password to open )
Display digital signature
Digital Signature can be displayed as an overlay text on the first page of the certificate. After you
turn this option on, you can specify overlay text using tags (see tags section) and configure signature
position on the first page, rectangle dimensions and text size.
Related information
Name Tags on page 113
Company Information
Company Information section allows to configure business specific information for Erase Certificates,
Processing Reports and Disk Labels.
©
1999 - 2024 LSoft Technologies Inc.

|Preferences|70
To specify a Company Logo image use the Set button. Select a desired logo image file. Most of the image
formats are supported: JPEG, TIFF, BMP and PNG. The logo is previewed in the Company Logo space.
Tip:
It is recommended to use company logo with resolution suitable for printing (300dpi) with a side
not exceeding 300px.
Add company's information to the related fields: Licensed to , Business name , Location , Phone , Disclaimer .
When the Add company supervisor signature field to certificate check box is marked the related field is
added to the certificate.
Related information
Erase Certificate on page 66
Processing Report on page 71
Technician Information
Technician Information section allows to configure a specific technician information for Erase Certificates,
Processing Reports and Disk Labels.
Type Operator name and Comments to the related fields.
When the Add technician (operator) signature field to certificate check box is marked the related field is
added to the certificate.
Related information
Erase Certificate on page 66
©
1999 - 2024 LSoft Technologies Inc.

|Preferences|71
Processing Report on page 71
Processing Report
Processing Report section allows to configure the XML reports generated by KillDisk after operation is
complete.
Report location
Configure where XML erasure reports will be stored. You can use mapped network resource as a
storage target.
File name template
Define a template for the file name for the reports. The main tags available are:
Available element: Tag:
Serial ID {Serial ID}
Erasure Status {Status}
Date of Erasure {Date(YYYY-MM-DD)}
Time of Erasure {Time(HH-mm-ss)}
More tags are available, see the tags section in Appendix.
Include company information
Adds the company information (defined in Company Information) into the XML erasure report.
Include technician information
Adds the technician information (defined in Technician Information) into the XML erasure report.
©
1999 - 2024 LSoft Technologies Inc.

|Preferences|72
Include system info
Ensures that the system-specific information is saved in the XML report, such as:
• Operating system
• Kernel version
• Architecture (x86, x64)
Include hardware info
Ensures that the system-specific information is saved in the XML report, such as:
• Motherboard manufacturer
• Motherboard description
• Host (name, domain)
• CPU (logical, physical)
• Memory
Include SMART information for each disk
Adds the information about disk health based on S.M.A.R.T. attributes into the XML erasure report.
The KillDisk XML report contains the following parts:
Type of Information Specific data
NameTechnician Information
Note
Name
Licensed
Location
Phone
Company Information
Disclaimer
OS version
Platform
System Information
Kernel
Motherboard Manufacturer
Motherboard Description
Hardware Information
Number of Processors
Erase Verify
Passes
Method
Erase Attributes
Verification Passes
Error Handling Attributes Errors Terminate
©
1999 - 2024 LSoft Technologies Inc.

|Preferences|73
Type of Information Specific data
Skip interval
Number of Retries
Lock
Source?
Ignore Write?
Read?
Lock?
Device Size
Device Type
Serial Number
Revision
Product Number
Name
Geometric Information
Disks
Partitioning Scheme
Fingerprint InformationAdditional Report Attributes
Initialize disk?
Bay
Time and Date Started
Disk Information
Status
Result
Time Elapsed
Errors
Results
Name of operation
Conclusion Overall result of the operation
Note:
If internal tag <task> is present, Results are appeared inside.
Related information
Name Tags on page 113
Processing CSV Log
Processing CSV Log section allows to configure CSV (Comma-separated values) log file generated by
KillDisk and appending there erase results. First line in CSV log file stores column names: Start Time, Device
Name and Serial, Erase Result, etc.
©
1999 - 2024 LSoft Technologies Inc.

|Preferences|74
Report log file name
Configure location where CSV log file will be stored. You can use mapped network resource as a
storage target.
Save to removable media
Exports CSV log file to all detected removable media (USB Flash Disks).
Record pattern
Define a template for each line in CSV log file. The main tags available are:
Available element: Tag:
Disk Serial Number {SerialNumber}
Disk Name {ProductID}
Erase Method {Method}
Start Date {DateStarted}
Start Time {TimeStarted}
Time Elapsed {TimeElapsed}
Erase Result (Success/Failure) {Status}
More tags are available, see the tags section in Appendix.
Related information
Name Tags on page 113
Disk Label Presets
Disk Label Presets section allows to adjust label settings for the KillDisk. Labels can be formatted for any
printer, page or label type using KillDisk highly customizable labels' formatting features.
©
1999 - 2024 LSoft Technologies Inc.

|Preferences|75
Label preset
Displays and let you select a default Label Preset or create a new one. Click Add New Label Preset button
to create a custom label preset with your own specifications. Click Delete button to delete the
selected label preset .
Label title
Sets a title to be printed (in bold) at the top of the labels. It can be a company name, batch name or any
other descriptors you may consider useful to identify the operation. Static text can be typed in or any
dynamic attributes (tags) can be inserted at current cursor's position. Click Insert Name Tag button to
insert predefined tag from the drop-down list.
Label area
Label's content for the preset. Static text can be typed in or any dynamic attributes (tags) can be inserted at
current cursor's position. Click Insert Name Tag button to insert predefined tag from the drop-down
list. Click Clear Pattern button to empty all label's area.
Label attributes
You can use RTF formatting and set Word Wrapping behavior using related check boxes.
Add signature line
©
1999 - 2024 LSoft Technologies Inc.

|Preferences|76
Adds a line at the bottom of the label for the technician to sign off on upon completion of the
operation.
Add certificate logo
Includes the logo used in the certificate as a label's watermark background.
Label preview
Displays a preview of the label with the current input settings. Refreshes automatically when any
adjustments are made to the settings.
Barcode options
Selecting Append barcode check-box will print QR Code or Barcode on the label to be able to be scanned
thereafter for third party inventory database
Barcode data
String including essential erase parameters to be encoded and transformed to QR Code or Barcode.
Static text can be typed in or any dynamic attributes (tags) can be inserted at current cursor's
position. Click Insert Name Tag button to insert predefined tag from the drop-down list.
Preview
Displays a preview of encoded string with the current input settings. Refreshes when any
adjustments are made to the settings.
Format
List of supported QR Code and Barcode formats. Currently supported: Aztec 2D barcode , Code 39
1D , Code 93 1D , Code 128 1D , QR Code . Note that different types of Barcodes can accept different
size of encoded string.
Encoding
If barcode string contains symbols other than English letters, you can specify encoding (code page)
for the particular language.
Error correction level
The lower the error correction level, the less dense the QR code image is, which improves minimum
printing size. The higher the error correction level, the more damage it can sustain before it becomes
unreadable.
Size, mm
Size in millimeters for the Barcode/QR Code to be printed on the label.
Print options
Define options for label printing including special label printers (Brother QL-700, etc):
Default printer
Define printer to be used exclusively to print labels from the list of installed printers.
©
1999 - 2024 LSoft Technologies Inc.

|Preferences|77
Print output adjustments
The print output adjustments section of the dialogue allows you to vertically or horizontally displace
the position measured in specific print units to adjust to different printers.
Print test label command let you print Disk Label sample to verify your settings and selected layout
attributes.
Disk Label Templates
Disk Label Templates section defines set of predefined label templates for usage in different scenarios.
Disk Label Templates dialog gives you an access to a number of predefined standard templates and to any
custom templates you can create. These templates may be easily selected without opening any additional
dialogs. The details of the selected template are displayed below the selection box. If your custom labels
differ from any of the templates available, the button allows you to create a custom template with your
own specifications. Additionally, the button allows you to modify an existing template and the
button deletes the selected template.
Print Start Position
The Print Start Position section of the dialogue allows you to select the starting position of the label on
the page to print from. The printing won't always start from the 1x1 position, so you can adjust this setting
accordingly.
Creating a New Template
To open a Template Editor, click the button on the Disk Label Templates dialog .
©
1999 - 2024 LSoft Technologies Inc.
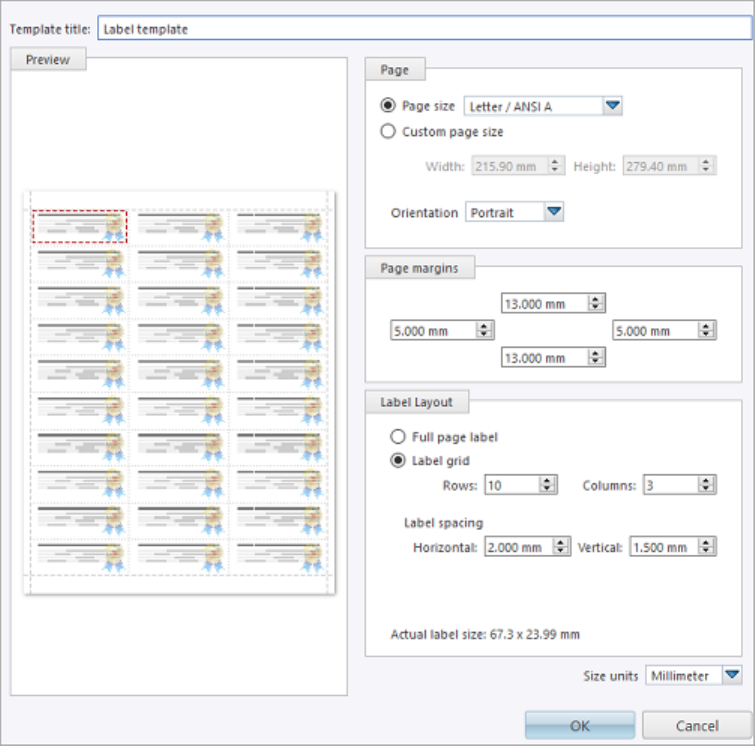
|Preferences|78
Figure 47: Erase Labels Page Template
Template title
Sets a custom title for your template. This is the name to refer this template when selecting it in the
Print Label dialog.
Page
Specify the dimensions of the page being used to print the labels. Select page size from the list of
standard sizes or define custom size using exact measurements. Define page orientation.
Page margins
Page margins are defined for the top, bottom, left and right sides of the page.
Label layout
Define how the labels appear on the page. Define the spacing in between labels on the page and the
dimensions of the label grid. Once you entered the proper measurements, KillDisk takes care of all
formatting.
Size units
©
1999 - 2024 LSoft Technologies Inc.

|Preferences|79
The units of measurement may vary between millimeters, inches, pixels and points. If a value is
entered in one measurement and then size unit is changed, the appropriate conversion takes place.
Related information
Name Tags on page 113
Disk Viewer
Disk Viewer section allows to set hexadecimal view settings, font and user interaction parameters.
Hexadecimal offsets
Toggles offset format between decimal and hexadecimal.
Lines to scroll
Number of lines to scroll for a single mouse wheel sweep.
Pages to scroll
Number of pages to skip for a single Page Up or Page Down .
Show ASCII column
Toggles display content in ASCII format.
Show UNICODE column
Toggles display content in UNICODE format.
Bytes per line
Defines amount of bytes per line in hexadecimal display.
Font name
Select any mono-space font from the list of available ones for better view experience.
Font size
Font size to be used in hexadecimal display.
©
1999 - 2024 LSoft Technologies Inc.

|Preferences|80
Error Handling
Error Handling section has the advanced settings to configure error handling while erasing or cloning the
data.
Error handling attributes
KillDisk allows to select one of ways to handle Read/Write Errors:
Abort entire group processing
If erase Batch is in progress and one of the disks has errors, the erase process for ALL the disks in the
Batch will be terminated.
Abort only failed disk from group processing
This is the default setting. Failed disks return an error and terminate the erase process. Other disks in the
Batch will continue current operation.
Ignore error for group processing
Ignores the read/write error and continues erasing whatever is possible on the disk. None active or forth
going operations will be terminated.
Terminate process after number of errors
Sets the error threshold to a certain amount before the disk operation is terminated and deemed
unsuccessful.
Number of read/write attempts
Sets the number of attempts KillDisk makes to perform an operation when an error is encountered
before it stops execution.
Use disk lock
Locks disks from being used by any other applications while operation is in progress.
Ignore disk lock errors
Errors encountered with KillDisk not being able to access locked disks will be ignored.
Ignore read/write errors
Toggle whether read errors or write errors will be just ignored.
E-mail Notifications
E-mail Notifications sections allows to configure how client can be notified after operation is complete.
KillDisk can deliver results of its sanitation process (certificates, reports, logs) by e-mail.
©
1999 - 2024 LSoft Technologies Inc.

|Preferences|81
Send to
Type e-mail address where erasing/wiping reports will be sent to.
E-mail attachments
Certificate, XML Report or Log File can be emailed, just mark the related check box.
Note:
E-mail notifications feature is accessible in commercial packages only.
When you mark Use E-Mail Notifications check box, the SMTP Server Settings section becomes accessible
for the configuration.
SMTP Server Settings
These settings allow to configure mailer settings for delivering erasing/wiping reports to user's mailbox.
Simple Mail Transport Protocol (SMTP) is responsible for transmitting e-mail messages and SMTP Server
settings need to be configured properly.
Account type
KillDisk offers you a free SMTP account located on www.smtp-server.com that can be used for
sending reports out. By default all the required parameters are filled up and configured properly.
If your corporate policy does not allow using services other than its own you need to switch this
option to the Custom Account and configure all the settings manually. Ask your system/network
administrator to get these parameters.
From
Type e-mail address which you expect these reports to come from.
©
1999 - 2024 LSoft Technologies Inc.

|Troubleshooting|82
Connection type
Select encryption type to use: No encryption , SSL or TLS .
SMTP server
KillDisk offers you the use of smtp-server.com for a free SMTP account. This account is pre-
configured for KillDisk users. Ask your system/network administrator to get the proper SMTP server
domain to be used.
SMTP port
For the free SMTP account KillDisk allows you to use smtp-server.com on port 80. This is a standard
port being used by all web browsers to access the Internet. This port most likely is open on a
corporate and home networks. Other ports can be filtered by and restricted by a network firewall.
Ask your system/network administrator to set up a proper SMTP port for the custom SMTP server.
SMTP server authorization
To avoid spam and other security issues some SMTP servers require each user to be authorized
before sending e-mails. In this case proper Username and Password required to be typed. Ask your
system/network administrator to get proper authorization settings.
Troubleshooting
In the events of technical difficulties with KillDisk you may choose to either troubleshoot the system
yourself or, within an active maintenance period (you receive 1 year free with your purchase), you can
contact our support team. Attach your application log and hardware configuration (hardware diagnostic
file) with your support request.
Common Tips
Common Problems
Disk data can not be erased
Ensure that disk is fully functional (no physically damages) and is accessible by Operating System.
Ensure you are not erasing the system disk or the disk KillDisk launched from (application won't let
you erase these disks).
Data still found after a Wipe operation
The Wipe operation sanitizes the only data that has already been deleted and not visible by
Operating System. To sanitize ALL the data including existing files and the Operating System itself,
use the Erase Disk operation.
Erased the wrong disk
Stop erase operation as soon as possible. Once the data completely sanitized, it won't longer be
accessible. Use a tool like Active@ File Recovery (https://www.file-recovery.com) to recover remains
of data that has not been sanitized yet.
©
1999 - 2024 LSoft Technologies Inc.

|Troubleshooting|83
Boot Disk Creator Problems
All the Operating Systems options are grayed out
Make sure you have KillDisk and Boot Disk Creator is registered and activated. You should see your
registered name at bottom of the dialog.
Image file not found
Most likely you have activated the freeware package that does not have the Boot Disk image you
wish to create (it does have the only tiny Console bootable image). Download a commercial package
using the link provided after the purchase and reinstall the software.
Issues formatting USB drive
This may happen occasionally when the file system causes conflicts in Windows. Launch the KillDisk
application and erase the first few megabytes of the USB drive you wish to use. Unplug and plug
again USB disk, then try again. In most cases this solves the problem.
Issues booting from the boot disk
Make sure the boot disk device is set at the top of your boot priority in BIOS.
Make sure your system time in the BIOS is accurate.
Make sure you are not booting a 64-bit Boot Disk on an old 32-bit PC. In case of old hardware create
and use a Console-based boot disk.
Application Log
Application Log View reflects every action taken by the application and displays messages, notifications
and other service information. Use these messages to observe and analyze erase processes.
To open Application Log View do one of the following:
• Click Tools > Application Log from the main menu
• Press F8 keyboard shortcut
©
1999 - 2024 LSoft Technologies Inc.

|Troubleshooting|84
Once Application Log View is open and active, you can use toolbar buttons and the context menu to
perform the following tasks:
Save log as
Opens a standard Save As dialog. Save the actual application log file to the local disk Default is .LOG
file extension.
Save hardware info as
Opens a standard Save As dialog. Save the disk diagnostic file to the local disk. Default is .XML file
extension.
Log entry filter
Shows or hides specific entry types in Log View:
Minimum details
Shows non-critical warning entries.
Maximum details
Shows advanced entries related to the application behavior and data analysis.
Text size
Changes text size to Large, Normal or Small.
Expand All
©
1999 - 2024 LSoft Technologies Inc.

|Troubleshooting|85
Expands all collapsed log nodes.
Collapse All
Collapses all log nodes.
Clear
Clear the log for the current application session.
Tip:
We recommend that you attach a copy of the log file to all requests made to our technical support
group. The entries in this file will help us to resolve certain issues.
Hardware Diagnostic File
If you want to contact our technical support a file that contains a summary of your local devices and
hardware configuration is very helpful and it is required to submit it for the proper problem investigation.
KillDisk allows you to create a hardware summary file in XML format. This data format is “human-readable”
and can help our technical support staff to analyze your computer configuration or point out disk failures
or abnormal behavior.
To create a hardware diagnostic file, click Save Hardware Info as from the File menu .
Note:
To save time on initial contact with our technical support staff we highly recommend that you
submit a hardware diagnostic file, otherwise, most likely, it will be requested from you by our
support team later on.
Related information
Application Log on page 83
©
1999 - 2024 LSoft Technologies Inc.

|Appendix|86
Appendix
How Fast Erasing Occurs?
An actual erase speed depends on many factors:
• HDD/SSD/NVMe disk speed: RPM and SATA/SCSI/SAS/NVMe type - the most important factors
• Disk Controller speed: SAS (6 Gbps/12 Gbps), SATA III (6Gbps), (SATA II 3 Gbps), SATA I (1.5 Gbps)
• Computer overall performance (CPU, RAM) and workload (how many parallel erases occur)
For most modern computers and disks manufactured within last years SATA III standard is supported, so
erase speed is limited by HDD throughput (disk write speed) only.
Our tests give the results: 10 GB per minute (in average) per pass with decent computer configuration
and disks with age of up to 5 years old.
For example, 2 TB Toshiba disk has been erased on Windows platform with one pass within 3 hours and 32
minutes, 14 TB Western Digital disk - within 18 hours 53 minutes.
The following snapshots are real-test certificates for erasing of:
1) 2 TB Toshiba (manufactured in 2015) SATA III (6 GBps) 7200 rpm disk with One Pass Zeros and US DoD
5220.22-M (3 passes + verification) showing the average speed of 9 GB/min per pass
©
1999 - 2024 LSoft Technologies Inc.

|Appendix|87
©
1999 - 2024 LSoft Technologies Inc.


|Appendix|89
©
1999 - 2024 LSoft Technologies Inc.

|Appendix|90
Erase Disk Concepts
Erasing Confidential Data
Modern methods of data encryption are deterring network attackers from extracting sensitive data from
stored database files.
Attackers (who want to retrieve confidential data) become more resourceful and look for places where
data might be stored temporarily. For example, the Windows DELETE command merely changes the files
attributes and location so that the operating system will not look for the file located on FAT/exFAT volumes.
The situation with NTFS file system is similar.
One avenue of attack is the recovery of data from residual data on a discarded hard drive. When deleting
confidential data from hard drives, removable disks or USB devices, it is important to extract all traces of the
data so that recovery is not possible.
©
1999 - 2024 LSoft Technologies Inc.

|Appendix|91
Most official guidelines regarding the disposal of confidential magnetic data do not take into account the
depth of today's recording densities nor the methods used by the OS when removing data.
Removal of confidential personal information or company trade secrets in the past might have been
performed using the FORMAT command or the FDISK command. Using these procedures gives users a
sense of confidence that the data has been completely removed.
When using the FORMAT command Windows displays a message like this: Formatting a disk
removes all information from the disk.
Actually the FORMAT utility creates new empty directories at the root area, leaving all previous data on the
disk untouched. Moreover, an image of the replaced FAT tables is stored so that the UNFORMAT command
can be used to restore them.
FDISK merely cleans the Partition Table (located in the drive's first sector) and does not touch anything else.
Moreover, most of hard disks contain hidden zones (disk areas that cannot be accessed and addressed on a
logical access level). KillDisk is able to detect and reset these zones, cleaning up the information inside.
Sanitization Types
NIST 800-88 international security standard (Guidelines for Media Sanitization) defines different types of
sanitization.
Regarding sanitization, the principal concern is ensuring that data is not unintentionally released. Data is
stored on media, which is connected to a system. Simply data sanitization applied to a representation of the
data as stored on a specific media type.
When media is re-purposed or reaches end of life, the organization executes the system life cycle
sanitization decision for the information on the media. For example, a mass-produced commercial software
program contained on a DVD in an unopened package is unlikely to contain confidential data. Therefore,
the decision may be made to simply dispose of the media without applying any sanitization technique.
Alternatively, an organization is substantially more likely to decide that a hard drive from a system that
processed Personally Identifiable Information (PII) needs sanitization prior to Disposal.
Disposal without sanitization should be considered only if information disclosure would have no impact
on organizational mission, would not result in damage to organizational assets, and would not result in
financial loss or harm to any individuals. The security categorization of the information, along with internal
environmental factors, should drive the decisions on how to deal with the media. The key is to first think
in terms of information confidentiality, then apply considerations based on media type. In organizations,
information exists that is not associated with any categorized system. Sanitization is a process to render
access to target data (the data subject to the sanitization technique) on the media infeasible for a given
level of recovery effort. The level of effort applied when attempting to retrieve data may range widely. NIST
SP 800-88 Rev. 1 Guidelines for Media Sanitization Clear, Purge, and Destroy are actions that can be taken
to sanitize media. The categories of sanitization are defined as follows:
Clear
Clear applies logical techniques to sanitize data in all user-addressable storage locations for protection
against simple non-invasive data recovery techniques; typically applied through the standard Read and
Write commands to the storage device, such as by rewriting with a new value or using a menu option to
reset the device to the factory state (where rewriting is not supported).
For HDD/SSD/SCSI/USB media this means overwrite media by using organizationally approved and
validated overwriting technologies/methods/tools. The Clear pattern should be at least a single write
pass with a fixed data value, such as all zeros. Multiple write passes or more complex values may
optionally be used.
KillDisk supports Clear sanitization type through the Disk Erase command for all R/W magnetic types of
media, more than 20 international sanitation methods including custom patterns implemented and can
be used.
©
1999 - 2024 LSoft Technologies Inc.

|Appendix|92
Purge
Purge applies physical or logical techniques that render Target Data recovery infeasible using state of the
art laboratory techniques.
For HDD/SSD/SCSI/USB media this means ATA SECURE ERASE UNIT, ATA CRYPTO SCRAMBLE EXT, ATA
EXT OVERWRITE, ATA/SCSI SANITIZE and other low-level direct controller commands.
KillDisk supports Purge sanitization type through the Secure Erase command only for media types
supporting ATA extensions.
Destroy
Destroy renders Target Data recovery infeasible using state of the art laboratory techniques and results in
the subsequent inability to use the media for storage of data due to physical damages.
For HDD/SSD/SCSI media this means Shred, Disintegrate, Pulverize, or Incinerate by burning the device in
a licensed incinerator.
It is suggested that the user categorize the information, assess the nature of the medium on which it
is recorded, assess the risk to confidentiality, and determine the future plans for the media. Then, the
organization can choose the appropriate type(s) of sanitization. The selected type(s) should be assessed
as to cost, environmental impact, etc., and a decision should be made that best mitigates the risk to
confidentiality and best satisfies other constraints imposed on the process.
Advanced Data Recovery Systems
Advances in data recovery have been made such that data can be reclaimed in many cases from hard drives
that have been wiped and disassembled. Security agencies use advanced applications to find cybercrime
related evidence. Also there are established industrial spy agencies using sophisticated channel coding
techniques such as PRML (Partial Response Maximum Likelihood), a technique used to reconstruct the
data on magnetic disks. Other methods include the use of magnetic force microscopy and recovery of data
based on patterns in erase bands.
Although there are very sophisticated data recovery systems available at a high price. Almost all the data
can also be easily restored with an off-the-shelf data recovery utility like Active@ File Recovery, making
your erased confidential data quite accessible.
Using KillDisk all data on your hard drive or removable device can be destroyed without the possibility
of future recovery. After using KillDisk the process of disposal, recycling, selling or donating your storage
device can be done with peace of mind.
International Standards in Data Removal
KillDisk conforms to more than 20 international standards for clearing and sanitizing data (US DoD
5220.22-M, Gutmann and others). You can be sure that sensitive information is destroyed forever once you
erase a disk with KillDisk.
KillDisk is a professional security application that destroys data permanently on any computer that can be
started using a bootable CD/DVD/BD or USB Flash Disk. Access to the drive's data is made on the physical
level via the BIOS (Basic Input-Output System) bypassing the operating system’s logical drive structure
organization. Regardless of the operating system, file systems, or type of machine, this utility can destroy all
the data on all storage devices. It does not matter which operating systems or file systems are located on
the machine.
Secure Erase Concepts
Secure Erase for SSD is used to permanently delete data from the media and to restore the drive’s speed
if it starts to drop to noticeably lower performance than stated (at the same time, we don’t consider SLC-
caching and other "official" reasons for speed reduction since it’s hardware drive features).
The essence of the problem that Secure Erase can solve: drive began to work slowly (writing and reading
data). There can be a lot of reasons, some of them are related to the hardware component and some to
the software component. SSDs are very different in service from classic HDDs, therefore, simply deleting
data or formatting the drive does not really mean resetting the cell - you need to clear it before recording,
©
1999 - 2024 LSoft Technologies Inc.

|Appendix|93
which slows down the process of recording new data. In theory, there shouldn’t be such problems, because
TRIM exists - a command to clear the data marked for deletion in cells. This command only works with
2.5” and M.2 SATA drives. For drives connected to the PCIe bus (M.2 or PCIe on the motherboard) there is
an analogue - Deallocate. But it happens that these functions are disabled for some reason - an OS error,
a user error in setting up a disk through third-party software, or the use of non-standard OS assemblies
with unknown software components. So, the disk starts to work noticeably slower and it is quite noticeable
without any benchmark performance measurements.
SSDs use a number of mapping layers that hide the physical layout of the flash-based memory, as well as
help in managing how flash memory data integrity and lifetime are managed. Collectively, these layers are
referred to as the Flash Translation Layer (FTL).
SSDs are also over-provisioned: they contain a bit more flash memory than what they’re rated for. This extra
memory is used internally by the FTL as empty data blocks, used when data needs to be rewritten, and as
out-of-band sections for use in the logical to physical mapping.
The mapping layers, and how the flash controller manages memory allocation, pretty much ensure that
either erasing or performing a conventional hard drive type of secure erase won’t ensure all data is
overwritten, or even erased at all.
One example of how data gets left behind intact is due to how data is managed in an SSD. When you edit a
document and save the changes, the saved changes don’t overwrite the original data (an in-place update).
Instead, SSDs write the new content to an empty data block and then update the logical to physical map
to point to the new location. This leaves the space the original data occupied on the SSD marked as free,
but the actual data is left intact. In time, the data marked as free will be reclaimed by the SSD’s garbage
collection system, but until then, the data could be recovered.
A conventional Secure Erase, as used with hard drives, is unable to access all of the SSD’s memory location,
due to the FTL and how an SSD actually writes data, which could lead to intact data being left behind.
SSD manufacturers understand the need for an easy way to sanitize an SSD, and most have implemented
the ATA command, Secure Erase Unit (used with SATA-based SSDs), or the NVMe command, Format NVM
(used with PCIe-based SSDs) as a fast and effective method of securely erasing an SSD.
So, SSD drives have a non-trivial system of work, therefore, the scheme for the complete destruction of
data should also not be the easiest. But in reality, this is not so at all. Any SSD has a controller that is the
"brain" of the drive. He not only tells the system where to write data, but also encrypts the information
passing through it and stores the key with himself. If you remove (or rather replace) a given key, then all the
information will turn into a random set of 1 and 0 - it will be impossible to decrypt it in any way. Just one
simple action by the user can solve the problem of safe data erasure. This method is the fastest and most
effective.
Note:
To protect information that is critical, both for serious organizations that are concerned about
the safety of data and for public sector enterprises working with information classified as state
secrets, information systems should usually use certified sanitation algorithms (US DoD 5220.22-M,
Canadian OPS-II, NSA 130-2 etc.).
If you combine these two methods (replacing the key and resetting the cells), you get the perfect algorithm
for obtaining a completely sterile disk in the state of its maximum performance. This, firstly, solves the
problem that we raised at the very beginning, and, secondly, it can help us answer the question about the
degree of drive wear.
It is important to note that some drives with built-in encryption can receive only one algorithm upon
receipt of a safe erase command - it depends on the controller settings by the manufacturer. If you "reset"
your SSD and compare the actual performance with the declared one, you will get the answer to this
question. This procedure does not affect disk wear (which is very important). Note that these actions are
designed specifically for analyzing the state of the disk, but it will not be possible to achieve a long-term
increase in the read/write speed due to the peculiarities of the operation of SSD disks - the situation may
©
1999 - 2024 LSoft Technologies Inc.

|Appendix|94
depend on both the drive model and the controller firmware. And it must be noted that not all drives
support encryption. In this case, the controller simply resets the cells.
Wipe Disk Concepts
Wiping Unoccupied Disk's Space
You may have confidential data on your hard drive in spaces where data may have been stored temporarily.
You may also have deleted files by using the Windows Recycle Bin and then emptying it. While you are still
using your local hard drive, there may be confidential information available in these unoccupied spaces.
Wiping the logical drive's deleted data does not delete existing files and folders. It processes all unoccupied
drive space so that recovery of previously deleted files becomes impossible.
Installed applications and existing data are not touched by this process. When you wipe unoccupied drive
space, the process is run from the bootable CD/DVD operating system. As a result, the wipe or erase
process uses an operating system that is outside the local hard drive and is not impeded by Windows
system caching. This means that deleted Windows system records can be wiped clean.
KillDisk wipes unused data residue from file slack space, unused sectors, and unused space in MTF records
or directory records.
Wiping drive space can take a long time, so do this when the system is not being otherwise utilized. For
example, this can be done overnight.
Wipe Algorithms
The process of deleting files does not eliminate them from the hard drive. Unwanted information may still
be left available for recovery on the computer. A majority of software that advertises itself as performing
reliable deletions simply wipes out free clusters. Deleted information may be kept in additional areas of a
drive. KillDisk therefore offers different wipe algorithms to ensure secure deletion: overwriting with zeros,
overwriting with random values, overwriting with multiple passes using different patterns and much more.
KillDisk supports more than 20 international data sanitizing standards, including US DoD 5220.22M and
the most secure Gutmann's method overwriting with 35 passes.
Figure 48: Disk Free Space and Allocated Clusters
Wiping File Slack Space
This relates to any regular files located on any file system. Free space to be wiped is found in the "tail"
end of a file because disk space is usually allocated in 4 Kb clusters. Most files have sizes that are not 4 Kb
increments and thus have slack space at their end.
©
1999 - 2024 LSoft Technologies Inc.

|Appendix|95
Figure 49: File Slack Space and Allocated Clusters
Specifics of Wiping Microsoft NTFS File System
NTFS Compressed Files
Wiping free space inside a file: The algorithm NTFS uses to "compress" a file operates by separating the file
into compressed blocks (usually 64 Kb long). After it is processed, each of these blocks has been allocated a
certain amount of space on the volume. If the compressed information takes up less space than the source
file, then the rest of the space is labeled as sparse space and no space on the volume is allocated to it.
Because the compressed data often doesn't have a size exactly that of the cluster, the end of each of these
blocks stays as unusable space of significant size. Our algorithm goes through each of these blocks in a
compressed file and wipes the unusable space, erasing previously deleted information that was kept in
those areas.
Figure 50: Compressed File Structure
The MFT (Master File Table) Area
Wiping the system information:
©
1999 - 2024 LSoft Technologies Inc.
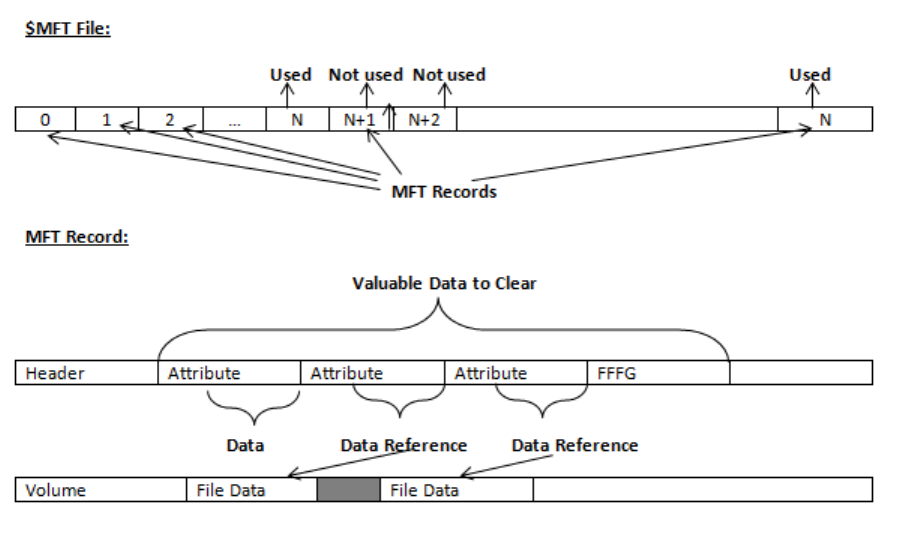
|Appendix|96
The MFT file contains records, describing every file on the volume. During the deletion of these files,
the records of their deletion are left untouched - they are simply recorded as "deleted". Therefore file
recovery software can use this information to recover anything from the name of the file and the structure
of the deleted directories down to files smaller than 1Kb that are able to be saved in the MFT directly.
The algorithm used by KillDisk wipes all of the unused information out of the MFT records and wipes the
unusable space, making a recovery process impossible.
Figure 51: MFT Structure
Specifics of Wiping Microsoft FAT File System
Wiping Directory Areas
Each directory on a FAT/FAT32 or an exFAT volume can be considered as a specific file, describing the
contents of the directory. Inside this descriptor there are many 32-byte records, describing every file and
other inner folders.
When you delete files this data is not being fully erased. It is just marked as deleted (hex symbol 0xE5).
That's why data recovery software can detect and use these records to restore file names and full directory
structures.
In some cases dependent on whether a space where item located has been overwritten yet or not, files and
folders can be fully or partially recovered..
KillDisk makes data recovery impossible by using an algorithm that wipes out all unused information from
directory descriptors. KillDisk not only removes unused information, but also defragments Directory Areas,
thus speeding up directory access.
©
1999 - 2024 LSoft Technologies Inc.

|Appendix|97
In this example red rectangles display deleted records.
Figure 52: FAT Directory before Wipe
In this example all deleted records removed and root folder defragmented.
Figure 53: FAT Directory after Wipe
Specifics of Wiping Apple HFS+ File System
HFS+ B-tree
A B-tree file is divided up into fixed-size nodes, each of which contains records consisting of a key and
some data.
©
1999 - 2024 LSoft Technologies Inc.

|Appendix|98
Figure 54: B-tree Structure
In the event of the deletion of a file or folder, there is a possibility of recovering the metadata of the file,
(such as its name and attributes), as well as the actual data that the file consists of. KillDisk's Wipe method
clears out all of this free space in the system files.
Figure 55: HFS+ System Table
Specifics of Wiping Linux Ext2/Ext3/Ext4 File Systems
A Linux Ext file system (Ext2/Ext3/Ext4) volume has a global descriptors table. Descriptors table records are
called group descriptors and describe each blocks group. Each blocks group has an equal number of data
blocks.
A data block is the smallest allocation unit: size vary from 1024 bytes to 4096 bytes. Each group descriptor
has a blocks allocation bitmap. Each bit of the bitmap shows whether the block is allocated (1) or available
(0). KillDisk software enumerates all groups, and for each and every block within the group on the volume
checks the related bitmap to define its availability. If the Block is available, KillDisk wipes it using the
method supplied by the user.
©
1999 - 2024 LSoft Technologies Inc.

|Appendix|99
Figure 56: Ext2/Ext3/Ext4 Descriptors Table
Erase Methods
One Pass Zeros or One Pass Random
When using One Pass Zeros or One Pass Random standard, the number of passes is fixed and cannot be
changed. When the write head passes through a sector, it writes only zeros or a series of random characters.
US DoD 5220.22-M
The write head passes over each sector three times. The first time with zeros 0x00, second time with 0xFF
and the third time with random characters. There is one final pass to verify random characters by reading.
Canadian CSEC ITSG-06
The write head passes over each sector, writing a random character. On the next pass, writes the
compliment of previously written character. Final pass is random, proceeded by a verify.
Canadian OPS-II
The write head passes over each sector seven times (0x00, 0xFF, 0x00, 0xFF, 0x00, 0xFF, random). There is
one final pass to verify random characters by reading.
British HMG IS5 Baseline
Baseline method overwrites disk's surface with just zeros 0x00. There is one final pass to verify random
characters by reading.
British HMG IS5 Enhanced
Enhanced method - the write head passes over each sector three times. The first time with zeros 0x00,
second time with 0xFF and the third time with random characters. There is one final pass to verify random
characters by reading.
Russian GOST p50739-95
The write head passes over each sector two times: 0x00, Random. There is one final pass to verify random
characters by reading.
©
1999 - 2024 LSoft Technologies Inc.
|Appendix|100
US Army AR380-19
The write head passes over each sector three times. The first time with 0xFF, second time with zeros 0x00
and the third time with random characters. There is one final pass to verify random characters by reading.
US Air Force 5020
The write head passes over each sector three times. The first time with random characters, second time with
zeros 0x00 and the third time with 0xFF. There is one final pass to verify random characters by reading.
NAVSO P-5329-26 RL
RL method - the write head passes over each sector three times: 0x01, 0x27FFFFFF, Random. There is one
final pass to verify random characters by reading.
NCSC-TG-025
The write head passes over each sector three times: 0x00, 0xFF, Random. There is one final pass to verify
random characters by reading.
NSA 130-2
The write head passes over each sector two times: Random, Random. There is one final pass to verify
random characters by reading.
NIST 800-88
Supported three NIST 800-88 media sanitation standards:
• 1. The write head passes over each sector one time (0x00).
• 2. The write head passes over each sector one time (Random).
• 3. The write head passes over each sector three times (0x00, 0xFF, Random).
For details about this,the most secure data clearing standard, you can read the original article at the link
below: http://csrc.nist.gov/publications/nistpubs/800-88/NISTSP800-88_with-errata.pdf
German VSITR
The write head passes over each sector seven times.
Bruce Schneier
The write head passes over each sector seven times: 0xFF, 0x00, Random, Random, Random, Random,
Random. There is one final pass to verify random characters by reading.
Peter Gutmann
The write head passes over each sector 35 times. For details about this, the most secure data clearing
standard, you can read the original article: http://www.cs.auckland.ac.nz/%7Epgut001/pubs/se
%0Acure_del.html
Australian ISM-6.2.93
The write head passes over each sector once with random characters. There is one final pass to verify
random characters by reading.
Secure Erase (ANSI ATA, SE)
According to National Institute of Standards and Technology (NIST) Special Publication 800-88: Guidelines
for Media Sanitation, Secure Erase is "An overwrite technology using firmware based process to overwrite a
hard drive. Is a drive command defined in the ANSI ATA and SCSI disk drive interface specifications, which
runs inside drive hardware. It completes in about 1/8 the time of 5220 block erasure." The guidelines also
state that "degaussing and executing the firmware Secure Erase command (for ATA drives only) are acceptable
methods for purging." ATA Secure Erase (SE) is designed for SSD controllers. The SSD controller resets
©
1999 - 2024 LSoft Technologies Inc.

|Appendix|101
all memory cells making them empty. In fact, this method restores the SSD to the factory state, not only
deleting data but also returning the original performance. When implemented correctly, this standard
processes all memory, including service areas and protected sectors.
User Defined
User indicates the number of times the write head passes over each sector. Each overwriting pass is
performed with a buffer containing user-defined or random characters. User Defined method allows to
define any kind of new erase algorithms based on user requirements.
KillDisk and PXE
How to place a registered Active@ KillDisk into a WinPE image for use in a network PXE boot
environment
Note:
To modify WinPE image (WIM) you need to have Windows ADK installed.
1. Start the Boot Disk Creator form Windows Start menu and prepare a bootable media. For KillDisk
settings fill in the data on App Config page.
Let's assume that the Boot Disk media has an F: letter in our environment.
2. Run Command Prompt as an Administrator.
3. Create an empty directory C:\MOUNT and mount BOOT.WIM file using the DISM tool:
Command: Dism /mount-image /imagefile:F:\sources\boot.wim /index:1 /mountdir:C:\mount
4. Replace BOOTDISK.KEY in C:\MOUNT directory with BOOTDISK.KEY located at the root of Boot Disk
media (F:\ BOOTDISK.KEY). This file is required and contains user's registration information.
5. Copy your company logo file from Boot Disk media (located F:\_kd\images1.jpg) to C:\MOUNT directory.
©
1999 - 2024 LSoft Technologies Inc.

|Appendix|102
6. Open settings.xml file on Boot Disk media (F:\_kd\settings.xml) for edit using Notepad. Change path for
your company logo file to X:\
Copy modified settings.xml to C:\MOUNT\PROGRAM FILES\BOOTDISK\.
7. Create folder BootDisk_Scripts in C:\MOUNT\PROGRAM FILES\BOOTDISK\. In any text editor (Notepad)
create script file and copy it to the newly created folder BootDisk_Scripts. For example:
cd x:\program files\bootdisk\
call killdisk.exe -em=0 -p=1 -v=11 -eh=5 -id -fp -bp
8. Dismount the BOOT.WIM image and commit the changes you applied:
Command: Dism /Unmount-Image /MountDir:C:\mount /commit
9. Use prepared F:\SOURCES\BOOT.WIM as a network PXE boot environment.
How to load Active@ KillDisk over the network via PXE environment on Windows Server platform
1. Add roles Windows Deployment Services.
2. Configure the WDS server, but don’t add images in WDS Configuration Wizard.
3. Add Windows PE image with Active@ KillDisk software Boot.wim in Boot Images on WDS server.
4. In properties of WDS server in Boot tab add our image as default boot image for x64 architecture.
5. Configure the DHCP server for work with WDS server.
For more detailed instructions, read Microsoft TechNet official documentation.
How to load Active@ KillDisk over the network via PXE environment on a Windows 10 computer
There are several steps required to do this: configuring the WinPE WIM, Boot Manager and PXE Server.
For the configuration steps, let's assume that inserted Boot Disk has a F: letter in our configuration
environment.
Step 1: Copy WinPE Source Files onto the PXE Server
• Map a network connection to the root TFTP directory on the PXE/TFTP server and create a \BOOT
folder there. We will assign this network drive the Y: letter.
Note:
You can the ‘Easy access’ feature in the Windows Explorer to do this. Make sure to enable
read/write permissions in the sharing and folder options.
• Copy the PXE boot files from the mounted \BOOT folder of the Active@ Boot Disk boot.wim to the
\BOOT folder on PXE/TFTP server. For example:
Command: copy C:\mount\windows\boot\pxe\*.* y:\boot
Note:
©
1999 - 2024 LSoft Technologies Inc.
|Appendix|103
To mount/dismount the boot.wim file, see section “How to place a registered Active@
KillDisk into a Windows PE image for use in a network PXE boot environment”.
• After dismounting the boot.wim, copy the bootable Windows PE image (F:\ Sources\boot.wim) to
the \BOOT folder on PXE/TFTP server.
• Copy the file boot.sdi (F:\Boot\boot.sdi) to the \BOOT folder on PXE/TFTP server.
Step 2: Configure boot configuration
• On a Windows 10 computer or in a Windows PE environment, create a BCD store using the
BCDEdit tool.
• In the BCD store, configure the RAMDISK, BOOTMGR and OS Loader settings for the Windows PE
image.
• Copy the BCD file to the \BOOT folder on PXE/TFTP server.
• Configure your PXE/TFTP server and DHCP server to point PXE clients to download PXEBoot.com or
PXEBoot.n12.
These are a few of the files that were copied over to the server in Step 1
For more details, see “Creating a BCD file for PXE boot” below.
Step 3: Deployment process
Boot the client machine through PXE, connected to the network. After pressing initializing the PXE boot, the
system should handle the rest. Here’s what will happen:
• The client is directed (by using DHCP Options or the PXE Server response) to download
PXEBoot.com.
• PXEBoot.com downloads Bootmgr.exe and the BCD store. The BCD store must reside in a \BOOT
directory in the TFTP root folder. Additionally, the BCD store must be called BCD.
• Bootmgr.exe reads the BCD operating system entries and downloads boot.sdi and the Windows PE
image.
• Bootmgr.exe begins booting Windows PE by running Winload.exe within the Windows PE image.
For more detailed instructions, read the Microsoft TechNet official documentation.
Configuring a PXE Server
Configuring a TFTP server is made simple with a tool called Serva. You can download it here.
This tool is an “Automated PXE Server Solution Accelerator” that supports a variety of server protocols. The
ones we will be configuring are TFTP and DHCP.
• Click the logo in the top left to access the Settings.
©
1999 - 2024 LSoft Technologies Inc.

|Appendix|104
• Configure your DHCP settings. You may copy the ones below, just make sure the address it binds to
is a static IP address from your router. Under IP Pool 1st addr, input the first available IP address in
your routers IP pool settings.
Figure 57: DHCP Configuration
©
1999 - 2024 LSoft Technologies Inc.

|Appendix|105
• Configure your TFTP settings. You may also copy the setting below. Again, make sure the IP address
is your router’s static IP and the TFTP server root directory is the one you configured in Step 1.
Figure 58: TFTP Configuration
Once the settings are configured, reset the application and your PXE server should be fully operational!
Creating a BCD file for PXE boot:
This entire process is done in Command Prompt. Be sure to run it as Administrator.
1. Create a BCD store using bcdedit.exe:
bcdedit /createstore c:\BCD
2. Configure RAMDISK settings:
bcdedit /store c:\BCD /create {ramdiskoptions} /d "Ramdisk options"
bcdedit /store c:\BCD /set {ramdiskoptions} ramdisksdidevice boot
bcdedit /store c:\BCD /set {ramdiskoptions} ramdisksdipath \boot\boot.sdi
bcdedit /store c:\BCD /create /d "winpe boot image" /application osloader
The last command will return a GUID, for example:
The entry { bb254249-93e9-11e7-84cb-6c71d9da760e } was successfully created.
Copy this GUID for use in the next set of commands. In each command shown, replace "GUID1" with
your GUID.
3. Create a new boot application entry for the Windows PE image:
bcdedit /store c:\BCD /set {bb254249-93e9-11e7-84cb-6c71d9da760e} device ramdisk=[boot]\Boot\boot.wim,{ramdiskoptions}
bcdedit /store c:\BCD /set {bb254249-93e9-11e7-84cb-6c71d9da760e} path \windows\system32\winload.exe
bcdedit /store c:\BCD /set {bb254249-93e9-11e7-84cb-6c71d9da760e} osdevice ramdisk=[boot]\Boot\boot.wim,{ramdiskoptions}
bcdedit /store c:\BCD /set {bb254249-93e9-11e7-84cb-6c71d9da760e} systemroot \windows
©
1999 - 2024 LSoft Technologies Inc.

|Appendix|106
bcdedit /store c:\BCD /set {bb254249-93e9-11e7-84cb-6c71d9da760e} detecthal Yes
bcdedit /store c:\BCD /set {bb254249-93e9-11e7-84cb-6c71d9da760e} winpe Yes
4. Configure BOOTMGR settings (remember to replace GUID1 in the third command with your GUID):
bcdedit /store c:\BCD /create {bootmgr} /d "boot manager"
bcdedit /store c:\BCD /set {bootmgr} timeout 30
bcdedit /store c:\BCD -displayorder {bb254249-93e9-11e7-84cb-6c71d9da760e} -addlast
5. Copy the BCD file to your TFTP server:
copy c:\BCD \\PXE-1\TFTP\Boot\BCD
6. Your PXE/TFTP server is now configured. You can view the BCD settings that have been configured using
the command:
bcdedit /store <BCD file location> /enum all
Example of BCD settings:
C:\>bcdedit /store C:\BCD /enum all
Windows Boot Manager
--------------------
identifier {bootmgr}
description boot manager
displayorder {bb254249-93e9-11e7-84cb-6c71d9da760e}
timeout 30
Windows Boot Loader
-------------------
identifier {bb254249-93e9-11e7-84cb-6c71d9da760e}
device ramdisk=[boot]\boot\boot.wim,{ramdiskoptions}
description winpe boot image
osdevice ramdisk=[boot]\boot\boot.wim,{ramdiskoptions}
systemroot \Windows
detecthal Yes
winpe Yes
Setup Ramdisk Options
---------------------
identifier {ramdiskoptions}
description ramdisk options
ramdisksdidevice boot
ramdisksdipath \boot\boot.sdi
Note:
Your GUID will be different than the one shown above.
Config File KILLDISK.INI
KILLDISK.INI is a text file with the list of parameter names and values. All KillDisk settings are stored in the
[General] section. The latest version of KillDisk still supports settings stored by previous versions. However,
on first run KillDisk exports all settings to SETTINGS.XML file and works with this file thereafter. Structure of
SETTINGS.XML file is similar to KILLDISK.INI file, however advanced XML file format being used.
When KillDisk changes its settings (erase method, certificate options, etc…) all the current values are
saved to the SETTINGS.XML file (older versions support KILLDISK.INI only) at the location where KillDisk
executable resides. These settings used as default values when KillDisk runs the next time.
For the parameter storage the syntax being used:
Parameter=value
Here is an example of an INI file:
[General]
excludeSystemDisk=false
initHD=true
initRD=true
initCD=false
initFD=false
©
1999 - 2024 LSoft Technologies Inc.
|Appendix|107
defaultSerialDetectionMethod=2
clearLog=false
logPath=C:\\Program Files\\LSoft Technologies\\Active@ KillDisk\\
logName=killdisk.log
logging=0
shutDown=false
saveToRemovable=false
showCert=true
killMethod=0
killVerification=false
killVerificationPercent=10
initDevice=true
fingerPrint=false
autoEject=false
skipConfirmation=false
wipeMethod=0
wipeVerification=false
wipeVerificationPercent=10
wipeUnusedCluster=true
wipeUnusedBlocks=false
wipeFileSlackSpace=false
wipeInHex=false
wipeUserPattern=Erased by Active@ KillDisk
wipeUserPasses=3
eraseInHex=false
killUserPattern=Erased by Active@ KillDisk
killUserPasses=3
accessDeniedCount=10
retryAtt=3
ignoreErrors=true
saveCert=true
certPath=C:\\Users\\UserName\\certificates\\
hideDefaultLogo=false
computerIDSource=0
showLogo=false
logoFile=
clientName=
companyName=
©
1999 - 2024 LSoft Technologies Inc.

|Appendix|108
companyAddress=
companyPhone=
logComments=I hereby state that the data erasure has been carried out in
accordance with the instructions given by software provider.
technicianName=Technician
sendSMTP=false
attachCert=true
useDefaultAccount=true
fromSMTP=
toSMTP=
nameSMTP=
portSMTP=2525
authorizeSMTP=false
usernameSMTP= password
SMTP=
mapName=
mapPath=
mapUser=
mapPass=
When KillDisk is running in interactive mode all these parameters can be configured in Preferences on
page 60 accessed by clicking the Preferences menu item from Tools menu or by pressing F2 shortcut.
Settings can be changed manually by editing the SETTINGS.XML (or KILLDISK.INI) file in any text editor
(such as Notepad etc).
Here is an explanation of all settings supported:
Parameter Default Options
defaultSerialDetectionMethod= 2 1 - use operating system’s DeviceIOControl method
2 - use S.M.A.R.T. information, if device supports it
3 – use Windows Management Instrumentation (WMI), if
operating system supports it
showCert= true true/false – option of displaying the Erase/Wipe Certificate for
printing after completion
saveCert= false true/false – option of saving the Erase/Wipe Certificate after
completion
certPath= Full path to the location where Erase/Wipe Certificate will be
saved. This is a directory name
logPath= Full path to the location where log file will be saved. This is a
directory name
logName= Name of the log file where event log will be saved to
skipConfirmation= false true/false – whether to display or skip Erase/Wipe confirmation
dialog
©
1999 - 2024 LSoft Technologies Inc.

|Appendix|109
Parameter Default Options
ignoreErrors= false true/false – whether to display disk writing errors (bad sectors),
or ignore them (just place them to the log file)
clearLog= false true/false – whether to truncate log file content before writing
new sessions or not (append to existing content)
initDevice= true true/false – whether to initialize disks after erasing complete or
no
fingerPrint= false true/false – whether to initialize disk(s) and write fingerprint to
the disk’s first sector or no
hideDefaultLogo false true/false – whether to hide default KillDisk logo at the top-left
corner of the certificate or no
computerIDSource= 0 0 - Disables showing the computer ID on the certificate
1 - Shows BIOS ID in the certificate
2 - Shows Motherboard ID in the certificate
shutDown= false true/false – whether to shutdown PC after Erase/Wipe
execution complete or no
sendSMTP= false true/false – to send e-mail report by email via SMTP
attachCert= false true/false – to attach a PDF certificate to e-mail report being
sent
useDefaultAccount= true true/false – use pre-defined Free SMTP account for sending e-
mail reports
fromSMTP= E-mail address you’ll get a report from, for example:
reports@killdisk.com
toSMTP= E-mail address the report will be sent to
nameSMTP= SMTP server (relay service) being used for sending e-mail
reports, for example: www.smtp-server.com
portSMTP= 25 TCP/IP port SMTP service will be connected on. The standard
SMTP port is 25. Some internet providers block it on a firewall
authorizeSMTP= false true/false – use SMTP authorization for sending e-mail reports
(Username and Password must be defined as well)
usernameSMTP= In case if SMTP service requires authorization, this is SMTP
Username
passwordSMTP= In case if SMTP service requires authorization, this is SMTP
Password
showLogo= false true/false – whether to display custom Logo (image) on a
Certificate or no
logoFile= Full path to the file location where Logo image is stored
clientName= Client Name - custom text to be displayed on a Certificate
technicianName= Technician Name - custom text to be displayed on a Certificate
companyName= Company Name - custom text to be displayed on a Certificate
©
1999 - 2024 LSoft Technologies Inc.

|Appendix|110
Parameter Default Options
companyAddress= Company Address - custom text to be displayed on a
Certificate
companyPhone= Company Phone - custom text to be displayed on a Certificate
logComments= Any Comments - custom text to be displayed on a Certificate
killMethod= 2 [0-23] – Erase method to use for disk/volume erasing. See table
of Erase Methods available. DoD 5220.22-M by default
killVerification= true true/false – whether to use data verification after erase or no
killVerificationPercent= 10 [1-100] – verification percent, in case if data verification is used
killUserPattern= ASCII text to be used for User Defined erase method as a
custom pattern
killUserPasses= [1-99] – number of overwrites to be used for User Defined
erase method
wipeMethod= 2 [0-23] – Wipe method to use for volume wiping. See table of
Erase Methods available. DoD 5220.22-M by default
wipeVerification= true true/false – whether to use data verification after wipe or no
wipeVerificationPercent= 10 [1-100] – verification percent, in case if data verification is used
wipeUserPattern= ASCII text to be used for User Defined wipe method as a
custom pattern
wipeUserPasses= [1-99] – number of overwrites to be used for User Defined
wipe method
wipeUnusedCluster= True true/false – whether to wipe out all unused clusters on a
volume or no
wipeUnusedBlocks= False rue/false – whether to wipe out all unused blocks in system
records or no
wipeFileSlackSpace= False true/false – whether to wipe out all file slack space (in last file
cluster) or no
When you start KillDisk with or without command line parameters its execution behavior depends on either
command line settings (highest priority), settings configured in interactive mode and stored in the settings
file (lower priority) or default values (lowest priority).
Default value means that if the settings file is absent or exists, but contains no required parameter, the
predefined (default) value is used.
Related information
Preferences on page 60
Customizing Boot Disk
Note:
To customize Boot Disk image file you need basic skills in Command Line Scripts writing.
Example below shows how to customize a Boot Disk (WinPE image) containing KillDisk to change a default
Erase Method and to add a Company Logo.
©
1999 - 2024 LSoft Technologies Inc.

|Appendix|111
1. Create settings file
Create custom KILLDISK.INI file using documented parameters (Application Settings).
Here is an example of an INI file which uses US DoD 5220.22-M (ECE) erase method with 10%
verification, stores logs, reports and certificates to X:\\ location (X: virtual drive is the only known drive
with guaranteed letter when boot disks starts), specifies Company Name and Logo Image file:
[General]
killMethod=3
killVerification=true
killVerificationPercent=10
logName=X:\\killdisk.log
showCert=true
saveCert=true
certPath=X:\\
showLogo=true
logoFile=X:\\MyCompanyLogo.png
companyName=LSoft.NET
2. Create start up script
Create KillDisk start up script which uses Command Line parameters.
Here is an example of an CMD file which enumerates all drive letters, searches KILLDISK.INI file in
User_Files folder, defines Drive Letter where Settings and Logo stored, copies Company Logo image file
to known location and starts KillDisk with custom KILLDISK.INI file:
@ECHO OFF
FOR %%i IN (c d e f g h i j k l m n o p q r s t u v w y z) DO (IF EXIST %%i:\user_files\KILLDISK.INI ( SET
CDROM=%%i:&& GOTO END ))
:END
copy %CDROM%\user_files\MyCompanyLogo.png X:\
KillDisk.exe -ip="%CDROM%\user_files"
©
1999 - 2024 LSoft Technologies Inc.

|Appendix|112
3. Configure Boot Disk start up settings
Start Active@ Boot Disk Creator to configure Boot Disk start up settings:
Start Active@ Boot Disk Creator
Click Windows Start menu and launch Active@ Boot Disk Creator from KillDisk folder.
Select a Target
Select a media for Boot Disk to be created on (CD/DVD/BD ROM, ISO image or USB drive) and click
Next .
Select Windows-based Boot Disk
Make sure Windows-based Boot Disk check box is selected on a Target tab.
Disable Default Application Auto-start
Switch to System Boot Settings tab and select OFF for Default Application Start option.
Add KILLDISK.INI file and Company Logo
Switch to User's Files tab and click Add File(s) button to add your custom settings file KILLDISK.INI
and Company Logo Image file (JPG, PNG, BMP formats). After files being added, application should
look like:
Add Custom Start up Script
Switch to Startup Scripts tab and click Add File(s) button to add your custom script (CMD file) where
you launch KillDisk with custom Command Line parameters. After file being added, application
should look like:
Click Next button to complete Boot Disk creation.
©
1999 - 2024 LSoft Technologies Inc.

|Appendix|113
Finalize Boot Disk
Click Create button to burn CD/DVD/BD, or store Boot Disk to ISO file, or write Boot Disk to USB
disk, depending on Target option selected on the first step.
Related tasks
Create a Boot Disk on page 21
Related information
Config File KILLDISK.INI on page 106
Command Line Mode on page 52
Name Tags
Name Tags Idea
Name tags used in different scenarios to form meaningful File Names, Label or Barcode data and more.
Predefined constant value in brackets, for example {SerialNumber} , will be replaced with actual disk's Serial
Number when Label or Barcode is formed and printed out.
Figure 59: Name Tags in Labels and Barcodes
Below is description of different Name Tags grouped by sections.
General
{Computer ID}
Workstation (computer) ID
©
1999 - 2024 LSoft Technologies Inc.
|Appendix|114
{OS}
Operating System name
{AppName}
Application name
{AppVersion}
Application full version
{KernelVersion}
Kernel version
{UniqueID}
Generated unique 8 symbols ID
Date & Time
Tags to represent current date in different formats:
{Date(YYYYMMDD)}
Complete date in full form without delimiters
{Date(YYYY-MM-DD)}
Complete date in full form with delimiters
{Date(YYMMDD)}
Complete date in short form without delimiters
{Date(YYYY)}
Year in full form
{Date(YY)}
Year in short form
{Date(Month)}
Full month name as literal
{Date(MM)}
Month as digital with leading zero
{Date(DD)}
Day of month with leading zero
{Time(HHmmss)}
Time with hours, minutes and seconds without delimiters
{Time(HH-mm-ss)}
Time with hours, minutes and seconds with delimiters
{Time(HH)}
Hours with leading zero
{Time(mm)}
Minutes with leading zero
{Time(ss)}
Seconds with leading zero
Disk
Values for these name tags retrieved from the context device:
{Serial ID}
Disk serial number, retrieved from OS or from S.M.A.R.T. attributes
{Platform ID}
Disk platform identification (may be vary due to OS format)
{Product ID}
Disk manufacturer Id
{Model}
Disk model name (if available)
{Size}
Disk size in gigabytes
{Sectors}
Disk size in sectors
©
1999 - 2024 LSoft Technologies Inc.

|Appendix|115
Processing attributes
Disk processing attributes based on execution conditions:
{Method}
Erase method
{Passes}
Erases passes description
{Verified}
Verification attribute
{DateStarted}
Process start date
{TimeStarted}
Process start time
{TimeElapsed}
Process elapsed time
{Status}
Overall completion status for group processing or separate disk processing status.
{StatusCode}
Overall process result digital code
Item processing attributes
Item processing attributes based on execution conditions:
{ProcessType}
Process type name
{ProcessedAs}
Process short name
{Range}
Processed disk range
Virtual Disks
KillDisk provides full support for Virtual Disks - dynamic disks created and managed by:
• Logical Disk Manager (LDM on Windows)
• Logical Volume Manager (LVM on Linux)
• Windows Storage Spaces (WSS on Windows)
Virtual Disks are virtual devices which look like regular physical disks to all applications. These virtual
devices are stored on one or more physical disks and emulate different types of volumes and RAID disk
arrays not on a hardware level (inside disk controller), but on Operating System level (software emulation).
Virtual devices are fully supported by the KillDisk. These disks will appear in Local Devices view like any
other regular disks. When you launch an erase for the virtual disk, the progress is displayed in the same
color on all components of the composite virtual drive.
©
1999 - 2024 LSoft Technologies Inc.

|Appendix|116
Figure 60: Erasing a Virtual Drive (Striped Disk Array)
Note: By default Virtual Disks are not being displayed in the list of devices. To display Virtual Disks
go to Preferences > General Settings and turn on Initialize virtual disks option.
Disk Hidden Zones
KillDisk is able to detect and reset Disk's Hidden Zones: HPA and DCO.
HPA - Host Protected Area
The Host Protected Area (HPA) is an area of a hard drive or solid-state drive that is not normally visible to
an operating system. It was first introduced in the ATA-4 standard CXV (T13) in 2001.
How it works:
The IDE controller has registers that contain data that can be queried using ATA commands. The data
returned gives information about the drive attached to the controller. There are three ATA commands
involved in creating and using a host protected area. The commands are:
• IDENTIFY DEVICE
• SET MAX ADDRESS
• READ NATIVE MAX ADDRESS
Operating systems use the IDENTIFY DEVICE command to find out the addressable space of a hard drive.
The IDENTIFY DEVICE command queries a particular register on the IDE controller to establish the size of a
drive.
©
1999 - 2024 LSoft Technologies Inc.

|Appendix|117
This register however can be changed using the SET MAX ADDRESS ATA command. If the value in the
register is set to less than the actual hard drive size then effectively a host protected area is created. It is
protected because the OS will work with only the value in the register that is returned by the IDENTIFY
DEVICE command and thus will normally be unable to address the parts of the drive that lie within the HPA.
The HPA is useful only if other software or firmware (e.g. BIOS) is able to use it. Software and firmware
that are able to use the HPA are referred to as 'HPA aware'. The ATA command that these entities use is
called READ NATIVE MAX ADDRESS. This command accesses a register that contains the true size of the
hard drive. To use the area, the controlling HPA-aware program changes the value of the register read by
IDENTIFY DEVICE to that found in the register read by READ NATIVE MAX ADDRESS. When its operations
are complete, the register read by IDENTIFY DEVICE is returned to its original fake value.
Figure 61: Creation of an HPA
The diagram shows how a host protected area (HPA) is created:
1. IDENTIFY DEVICE returns the true size of the hard drive. READ NATIVE MAX ADDRESS returns the true
size of the hard drive.
2. SET MAX ADDRESS reduces the reported size of the hard drive. READ NATIVE MAX ADDRESS returns the
true size of the hard drive. An HPA has been created.
3. IDENTIFY DEVICE returns the now fake size of the hard drive. READ NATIVE MAX ADDRESS returns the
true size of the hard drive, the HPA is in existence.
Usage:
• At the time HPA was first implemented on hard-disk firmware, some BIOS had difficulty booting
with large hard disks. An initial HPA could then be set (by some jumpers on the hard disk) to limit
the number of cylinder to 4095 or 4096 so that older BIOS would start. It was then the job of the
boot loader to reset the HPA so that the operating system would see the full hard-disk storage
space.
• HPA can be used by various booting and diagnostic utilities, normally in conjunction with the
BIOS. An example of this implementation is the Phoenix First BIOS, which uses Boot Engineering
Extension Record (BEER) and Protected Area Run Time Interface Extension Services (PARTIES).
Another example is the Gujin installer which can install the bootloader in BEER, naming that
pseudo-partition /dev/hda0 or /dev/sdb0; then only cold boots (from power-down) will succeed
because warm boots (from Ctrl-Alt-Delete) will not be able to read the HPA.
©
1999 - 2024 LSoft Technologies Inc.

|Appendix|118
• Computer manufacturers may use the area to contain a preloaded OS for install and recovery
purposes (instead of providing DVD or CD media).
• Dell notebooks hide Dell MediaDirect utility in HPA. IBM ThinkPad and LG notebooks hide system
restore software in HPA.
• HPA is also used by various theft recovery and monitoring service vendors. For example, the laptop
security firm Computrace use the HPA to load software that reports to their servers whenever the
machine is booted on a network. HPA is useful to them because even when a stolen laptop has its
hard drive formatted the HPA remains untouched.
• HPA can also be used to store data that is deemed illegal and is thus of interest to government and
police.
• Some vendor-specific external drive enclosures (Maxtor) are known to use HPA to limit the capacity
of unknown replacement hard drives installed into the enclosure. When this occurs, the drive may
appear to be limited in size (e.g. 128 GB), which can look like a BIOS or dynamic drive overlay
(DDO) problem. In this case, one must use software utilities (see below) that use READ NATIVE MAX
ADDRESS and SET MAX ADDRESS to change the drive's reported size back to its native size, and
avoid using the external enclosure again with the affected drive.
• Some rootkits hide in the HPA to avoid being detected by anti-rootkit and antivirus software.
• Some NSA exploits use the HPA for application persistence.
DCO - Device Configuration Overlay
Device Configuration Overlay (DCO) is a hidden area on many of today’s hard disk drives (HDDs). Usually
when information is stored in either the DCO or host protected area (HPA), it is not accessible by the
BIOS, OS, or the user. However, certain tools can be used to modify the HPA or DCO. The system uses the
IDENTIFY_DEVICE command to determine the supported features of a given hard drive, but the DCO can
report to this command that supported features are nonexistent or that the drive is smaller than it actually
is. To determine the actual size and features of a disk, the DEVICE_CONFIGURATION_IDENTIFY command
is used, and the output of this command can be compared to the output of IDENTIFY_DEVICE to see if a
DCO is present on a given hard drive. Most major tools will remove the DCO in order to fully image a hard
drive, using the DEVICE_CONFIGURATION_RESET command. This permanently alters the disk, unlike with
the (HPA), which can be temporarily removed for a power cycle.
Usage:
The Device Configuration Overlay (DCO), which was first introduced in the ATA-6 standard, "allows system
vendors to purchase HDDs from different manufacturers with potentially different sizes, and then configure
all HDDs to have the same number of sectors. An example of this would be using DCO to make an 80-
gigabyte HDD appear as a 60-gigabyte HDD to both the (OS) and the BIOS.... Given the potential to place
data in these hidden areas, this is an area of concern for computer forensics investigators. An additional
issue for forensic investigators is imaging the HDD that has the HPA and/or DCO on it. While certain
vendors claim that their tools are able to both properly detect and image the HPA, they are either silent on
the handling of the DCO or indicate that this is beyond the capabilities of their tool.
Glossary
BIOS Settings
Basic Input Output Subsystem is the program a personal computer's microprocessor uses to get the
computer system started after you turn it on. It also manages data flow between the computer's operating
system and attached devices such as the hard disk, video adapter, keyboard, mouse and printer. A typical
method to access the BIOS settings screen is to press Delete / F1 / F2 / F8 / F10 or Esc during the boot
sequence.
©
1999 - 2024 LSoft Technologies Inc.
|Appendix|119
BCD
Boot Configuration Data. Firmware-independent database for boot-time configuration data. It is used by
Microsoft's new Windows Boot Manager and replaces the boot.ini that was used by NTLDR.
Boot Priority
BIOS settings allow you to run a boot sequence from a floppy drive, a hard drive, a CD/DVD/BD drive or a
USB device. You may configure the order that your computer searches these physical devices for the boot
sequence. The first device in the order list has the first boot priority. For example, to boot from a CD/DVD/
BD drive instead of a hard drive, place the CD/DVD/BD drive ahead of the hard drive in priority.
Boot Record
See MBR for Master Boot Record - located in the physical disk's first sector. Each volume on the disk has its
own Boot Record called Volume or Partition Boot Sector, the content is file system specific.
Boot Sector
The boot sector continues the process of loading the operating system into computer memory. It can be
either the MBR or the Partition Boot Sector.
Compressed Cluster
When you set a file or folder property to compress data, the file or folder uses less disk space. While
the size of the file is smaller, it must use a whole cluster in order to exist on the hard drive. As a result,
compressed clusters contain file slack space. This space may contain residual confidential data from the file
that previously occupied this space. KillDisk can wipe out the residual data without touching the existing
data.
CSV File
A comma-separated values (CSV) file is a delimited text file that uses a comma to separate values. Each line
of the file is a data record. Each record consists of one or more fields, separated by commas. The use of the
comma as a field separator is the source of the name for this file format. A CSV-file typically stores tabular
data (numbers and text) in plain text, in which case each line will have the same number of fields.
Data Cluster
A cluster or allocation unit is a unit of disk space allocation for files and directories. To reduce the overhead
of managing on-disk data structures, the file system does not allocate individual disk sectors by default,
but contiguous groups of sectors, called clusters. A cluster is the smallest logical amount of disk space that
can be allocated to hold a file. Storing small files on a file system with large clusters will therefore waste
disk space; such wasted disk space is called slack space. For cluster sizes which are small versus the average
file size, the wasted space per file will be statistically about half of the cluster size; for large cluster sizes,
the wasted space will become greater. However, a larger cluster size reduces bookkeeping overhead and
fragmentation, which may improve reading and writing speed overall. Typical cluster sizes range from 1
sector (512 B) to 128 sectors (64 Kb). The operating system keeps track of clusters in the hard disk's root
records or MFT records, see Lost Cluster.
Device Node
Device node in the Local System Devices list is a physical device containing logical drives. The first physical
device on older versions of Operating Systems is named 80h, now more typical name is PhysicalDrive0.
Exclusive Access
Lock is applied to a partition for exclusive writing access. For example, while recovering deleted or
damaged files or folders, the recovery application must have exclusive access to the target partition while
recovering files. If another application or the operating system are using the target partition - the processes
could interfere, so user/process must close all applications or system processes that may be using the
target partition before locking it.
©
1999 - 2024 LSoft Technologies Inc.
|Appendix|120
FAT
File Allocation Table. Area that contains the records of every other file and directory in a FAT-formatted disk
drive. The operating system needs this information to access the files. There are FAT32, FAT16 and exFAT
versions. FAT file systems are still commonly found on flash disks and other memory cards and modules
(including USB flash drives), as well as many portable and embedded devices. FAT is the standard file
system for digital cameras per the DCF specification.
FTP
File Transfer Protocol. This is a standard network protocol used for the transfer of computer files between a
Client and Server on a computer network. FTP is built on a client-server model architecture using separate
control and data connections between the client and the server. FTP users may authenticate themselves
with a clear-text sign-in protocol, normally in the form of a username and password, but can connect
anonymously if the server is configured to allow it. For secure transmission that protects the username and
password, and encrypts the content, FTP is often secured with SSL/TLS (FTPS) or replaced with SSH File
Transfer Protocol (SFTP). The first FTP client applications were command-line programs developed before
operating systems had graphical user interfaces, and are still shipped with most Windows, Unix, and Linux
operating systems. Many FTP clients and automation utilities have since been developed for desktops,
servers, mobile devices, and hardware, and FTP has been incorporated into productivity applications, such
as HTML editors.
File Slack Space
The smallest file (and even an empty folder) takes up an entire cluster. A 10-byte file will take up 2,048 bytes
if that is the cluster size. File slack space is the unused portion of a cluster. This space may contain residual
confidential data from the file that previously occupied this space. KillDisk can wipe out the residual data
without touching the existing data.
Free Cluster
A cluster that is not occupied by a file. This space may contain residual confidential data from the file that
previously occupied this space. KillDisk can wipe out the residual data.
FreeDOS
A free operating system for PC compatible computers. It intends to provide a complete DOS-compatible
environment for running legacy software and supporting embedded systems. FreeDOS can be booted from
a floppy disk or USB flash drive. It is designed to run well under virtualization or x86 emulation. Unlike most
versions of MS-DOS, FreeDOS is composed of free and open-source software, licensed under the terms of
the GNU General Public License.
Deleted Boot Records
All disks and partitions start with a boot sector. For a damaged disk and volumes (where the location of
the boot records known) the partition table can be reconstructed. The boot record contains a file system
identifier.
iSCSI
Internet Small Computer Systems Interface. iSCSI is a transport layer protocol that works on top of the
Transport Control Protocol (TCP). It enables block-level SCSI data transport between the iSCSI initiator and
the storage target over TCP/IP networks.
ISO
An International Organization for Standardization ISO-9660 file system is a standard CD-ROM file system
that allows you to read the same CD-ROM whether you're on a PC, Mac, or other major computer platform.
Disk images of ISO-9660 file systems (ISO images) are a common way to electronically transfer the contents
of CD-ROMs. They often have the file name extension .ISO (though not necessarily), and are commonly
referred to as "ISO".
©
1999 - 2024 LSoft Technologies Inc.
|Appendix|121
Logical Drive
A partition is a logical drive because it does not affect the physical hard disk other than the defined space
that it occupies, yet it behaves like a separate disk drive.
Lost Cluster
A cluster that has an assigned number in the file allocation table, even though it is not assigned to any file.
You can free up disk space by reassigning lost clusters. In DOS and Windows you can find lost clusters with
the ScanDisk utility.
MBR
Master Boot Record. All physical disks start with MBR. When you start the computer, the code in the MBR
executes before the operating system is started. The location of the MBR is always track (cylinder) 0, side
(head) 0, and sector 1. The MBR contains a partition table with file system identifiers.
MFT Records
Master File Table. A file that contains the records of every other file and directory in the NTFS-formatted
volume. The operating system needs this information to access the files.
Named Streams
NTFS supports multiple data streams where the stream name identifies a new data attribute on the file. A
handle can be opened to each data stream. A data stream, then, is a unique set of file attributes. Streams
have separate opportunistic locks, file locks, and sizes, but common permissions.
NTFS
New Technology File System (developed by Microsoft) is the file system that the Windows NT operating
system uses for storing and retrieving files on a hard disk. NTFS is the Windows NT equivalent of the
Windows 95 file allocation table (FAT) and the OS/2 High Performance File System (HPFS). All the latest
Windows Operating Systems (Windows Vista, Windows 7, Windows 10) still use NTFS as a default file
system.
NTLDR
Aka NT loader is the boot loader for all releases of Windows NT operating system up to and including
Windows XP and Windows Server 2003. NTLDR is typically run from the primary hard disk drive, but it can
also run from portable storage devices such as a CD/DVD or USB flash drive.
OpenSUSE
A Linux distribution. It is widely used throughout the world. The focus of its development is creating usable
open-source tools for software developers and system administrators, while providing a user-friendly
desktop and feature-rich server environment.
Partition
A section of the hard disk isolated for a specific purpose. Each partition can behave like a separate disk
drive .
Partition Boot Sector
On NTFS or FAT file systems, the partition boot sector is a small program that is executed when the
operating system tries to access a particular partition. On personal computers, the Master Boot Record uses
the partition boot sector on the system partition to determine file system type, cluster size, etc., and to load
the operating system kernel files. Partition boot sector is usually the first sector of the partition.
©
1999 - 2024 LSoft Technologies Inc.
|Appendix|122
Physical Device
A piece of hardware that is attached to your computer by screws or wires. A hard disk drive is a physical
device. It is also referred to as a physical drive.
RAID
RAID ("Redundant Array of Inexpensive Disks" or "Redundant Array of Independent Disks") is a data
storage virtualization technology that combines multiple physical disk drive components into one or more
logical units for the purposes of data redundancy, performance improvement, or both. Data is distributed
across the drives in one of several ways, referred to as RAID levels, depending on the required level of
redundancy and performance. The different schemes, or data distribution layouts, are named by the
word "RAID" followed by a number, for example RAID 0 or RAID 1. Each scheme, or RAID level, provides a
different balance among the key goals: reliability, availability, performance, and capacity. RAID levels greater
than RAID 0 provide protection against unrecoverable sector read errors, as well as against failures of whole
physical drives.
RAID 0
RAID 0 consists of striping, but no mirroring or parity. Compared to a spanned volume, the capacity
of a RAID 0 volume is the same; it is the sum of the capacities of the drives in the set. But because
striping distributes the contents of each file among all drives in the set, the failure of any drive
causes the entire RAID 0 volume and all files to be lost. In comparison, a spanned volume preserves
the files on the unfailing drives. The benefit of RAID 0 is that the throughput of read and write
operations to any file is multiplied by the number of drives because, unlike spanned volumes, reads
and writes are done concurrently. The cost is increased vulnerability to drive failures—since any drive
in a RAID 0 setup failing causes the entire volume to be lost, the average failure rate of the volume
rises with the number of attached drives.
RAID 1
RAID 1 consists of data mirroring, without parity or striping. Data is written identically to two or more
drives, thereby producing a "mirrored set" of drives. Thus, any read request can be serviced by any
drive in the set. If a request is broadcast to every drive in the set, it can be serviced by the drive that
accesses the data first (depending on its seek time and rotational latency), improving performance.
Sustained read throughput, if the controller or software is optimized for it, approaches the sum of
throughputs of every drive in the set, just as for RAID 0. Actual read throughput of most RAID 1
implementations is slower than the fastest drive. Write throughput is always slower because every
drive must be updated, and the slowest drive limits the write performance. The array continues to
operate as long as at least one drive is functioning.
RAID 2
RAID 2 consists of bit-level striping with dedicated Hamming-code parity. All disk spindle rotation is
synchronized and data is striped such that each sequential bit is on a different drive. Hamming-code
parity is calculated across corresponding bits and stored on at least one parity drive. This level is of
historical significance only; although it was used on some early machines (for example, the Thinking
Machines CM-2), as of 2014 it is not used by any commercially available system.
RAID 3
RAID 3 consists of byte-level striping with dedicated parity. All disk spindle rotation is synchronized
and data is striped such that each sequential byte is on a different drive. Parity is calculated across
corresponding bytes and stored on a dedicated parity drive. Although implementations exist, RAID 3
is not commonly used in practice.
RAID 4
©
1999 - 2024 LSoft Technologies Inc.
|Appendix|123
RAID 4 consists of block-level striping with dedicated parity. This level was previously used by
NetApp, but has now been largely replaced by a proprietary implementation of RAID 4 with two
parity disks, called RAID-DP. The main advantage of RAID 4 over RAID 2 and 3 is I/O parallelism: in
RAID 2 and 3, a single read I/O operation requires reading the whole group of data drives, while in
RAID 4 one I/O read operation does not have to spread across all data drives. As a result, more I/O
operations can be executed in parallel, improving the performance of small transfers.
RAID 5
RAID 5 consists of block-level striping with distributed parity. Unlike RAID 4, parity information is
distributed among the drives, requiring all drives but one to be present to operate. Upon failure of a
single drive, subsequent reads can be calculated from the distributed parity such that no data is lost.
RAID 5 requires at least three disks. Like all single-parity concepts, large RAID 5 implementations are
susceptible to system failures because of trends regarding array rebuild time and the chance of drive
failure during rebuild. Rebuilding an array requires reading all data from all disks, opening a chance
for a second drive failure and the loss of the entire array.
RAID 6
RAID 6 consists of block-level striping with double distributed parity. Double parity provides fault
tolerance up to two failed drives. This makes larger RAID groups more practical, especially for high-
availability systems, as large-capacity drives take longer to restore. RAID 6 requires a minimum of
four disks. As with RAID 5, a single drive failure results in reduced performance of the entire array
until the failed drive has been replaced. With a RAID 6 array, using drives from multiple sources and
manufacturers, it is possible to mitigate most of the problems associated with RAID 5. The larger
the drive capacities and the larger the array size, the more important it becomes to choose RAID 6
instead of RAID 5. RAID 10 (see Nested RAID levels) also minimizes these problems
PXE
Preboot EXecution Environment. In computing the Preboot Execution Environment specification describes
a standardized client-server environment that boots a software assembly, retrieved from a network, on PXE-
enabled clients. On the client side it requires only a PXE-capable network interface controller, and uses a
small set of industry-standard network protocols such as DHCP and TFTP.
RAS
Remote Access Service. Is any combination of hardware and software to enable the remote access tools
or information that typically reside on a network of IT devices. A remote access service connects a client to
a host computer, known as a remote access server. The most common approach to this service is remote
control of a computer by using another device which needs internet or any other network connection.
Registry Hive
Highest level of organization in the Windows registry. It is a logical group of keys, subkeys, and values in the
registry that has a set of supporting files loaded into memory when Windows is started or an user logs in.
Root Records
Used in FAT file system. A table that contains the records of every other file and directory in a FAT-
formatted hard disk drive. The operating system needs this information to access the files. There are FAT32,
FAT16 and FAT versions.
SAM
Security Account Manager. Database file that stores users' passwords in a hashed format. Since a hash
function is one-way, this provides some measure of security for the storage of the passwords. It can be used
to authenticate local and remote users. Beginning with Windows 2000 SP4, Active Directory authenticates
remote users.
©
1999 - 2024 LSoft Technologies Inc.
|Appendix|124
Sector
The smallest unit that can be accessed on a disk. Typically sector size is 512 or 4096 bytes.
SCSI
Small Computer System Interface. A set of standards for physically connecting and transferring data
between computers and peripheral devices. The SCSI standards define commands, protocols, electrical,
optical and logical interfaces. SCSI is most commonly used for hard disk drives and tape drives, but it
can connect a wide range of other devices, including scanners and CD drives, although not all controllers
can handle all devices. The SCSI standard defines command sets for specific peripheral device types; the
presence of "unknown" as one of these types means that in theory it can be used as an interface to almost
any device, but the standard is highly pragmatic and addressed toward commercial requirements.
Secure Erase (SSD)
The ATA Secure Erase command is designed to remove all user data from a drive. With an SSD without
integrated encryption, this command will put the drive back to its original out-of-box state. This will
initially restore its performance to the highest possible level and the best (lowest number) possible
write amplification, but as soon as the drive starts garbage collecting again the performance and write
amplification will start returning to the former levels. Drives which encrypt all writes on the fly can
implement ATA Secure Erase in another way. They simply zeroize and generate a new random encryption
key each time a secure erase is done. In this way the old data cannot be read anymore, as it cannot be
decrypted. Some drives with an integrated encryption will physically clear all blocks after that as well, while
other drives may require a TRIM command to be sent to the drive to put the drive back to its original out-
of-box state (as otherwise their performance may not be maximized).
Secure Erase (Frozen State)
SSD disk is blocked (frozen) by BIOS. The reasons can differ. Modern ATA hard drives and SSDs offer
security options that help user to control access and reliably destroy data if necessary. Brand new HDD
or SSD from a store have all the security features initially disabled... BIOS of many motherboards run the
SECURITY_FREEZE_LOCK ATA command when booting to provide protection against manipulation.
Signature Files
File types are recognized by specific patterns that may serve as a reference for file recovery. When a file
header is damaged, the type of file may be determined by examining patterns in the damaged file and
comparing these patterns to known file type templates.
Span Array
A series of dynamic drives linked together to make one contiguous spanned volume.
S.M.A.R.T.
S.M.A.R.T. (Self-Monitoring, Analysis and Reporting Technology; often written as SMART) is a monitoring
system included in computer hard disk drives (HDDs), solid-state drives (SSDs) and embedded
MultiMediaCards (eMMC) drives. Its primary function is to detect and report various indicators of drive
reliability with the intent of anticipating imminent hardware failures. When SMART data indicates a possible
imminent drive failure, software running on the host system may notify the user so preventative action can
be taken to prevent data loss and the failing drive can be replaced and data integrity maintained.
Templates (Patterns)
File types are recognized by specific patterns that may serve as a reference for file recovery. When a file
header is damaged, the type of file may be determined by examining patterns in the damaged file and
comparing these patterns to known file type templates. This same pattern-matching process can be applied
to deleted or damaged partitions. Using FAT or NTFS templates, recovery software can assume that a
particular sector is a FAT or NTFS boot sector because parts of it match a known pattern.
©
1999 - 2024 LSoft Technologies Inc.
|Appendix|125
Tiny Core Linux
A minimal Linux kernel based operating system focusing on providing a base system functionality. The
distribution is notable for its small size (11 to 16 MB) and minimalism; additional functions are provided by
extensions. Tiny Core Linux is free and open source software and is licensed under the GNU General Public
License version 2.
Track
Tracks are concentric circles around the disk and the sectors are segments within each circle.
Unallocated Space
Space on a hard disk where no partition exists. A partition may have been deleted or damaged or a
partition may not have been created.
UEFI
Unified Extensible Firmware Interface is a specification for a software program that connects a computer's
firmware to its operating system (OS). UEFI is expected to eventually replace BIOS. Like BIOS, UEFI is
installed at the time of manufacturing and is the first program that runs when a computer is turned on.
Unused Space in MFT-records
Applicable to NTFS file system on Windows. The performance of the computer system depends a lot on
the performance of the MFT. When you delete files, the MFT entry for that file is not deleted, it is marked
as deleted. This is called unused space in the MFT. If unused space is not removed from the MFT, the size
of the table could grow to a point where it becomes fragmented, affecting the performance of the MFT
and possibly the performance of the computer. This space may also contain residual confidential data (file
names, file attributes, resident file data) from the files that previously occupied these spaces. KillDisk can
wipe out the residual data without touching the existing data.
Volume
A fixed amount of storage on a hard disk. A physical device may contain a number of volumes. It is also
possible for a single volume to span to a number of physical devices.
Volume Shadow Copy
Shadow Copy (also known as Volume Snapshot Service, Volume Shadow Copy Service or VSS) is a
technology included in Microsoft Windows that can create backup copies or snapshots of computer files
or volumes, even when they are in use. It is implemented as a Windows service called the Volume Shadow
Copy service.
Windows System Caching
Windows reserves a specified amount of volatile memory for file system operations. This is done in RAM
because it is the quickest way to do these repetitive tasks.
Windows System Records
The Windows logs keeps track of almost everything that happens in Windows OS. This enhances
performance of the computer when doing repetitive tasks. Over time, these records can take up a lot of
space.
WinPE
WinPE is a compact Windows-based operating system used as a recovery environment to install, deploy,
and repair Windows Desktop Editions, Windows Server, and other Windows operating systems. After boot
to WinPE, user can:
• Set up a hard drive before installing Windows.
• Install Windows by using apps or scripts from a network or a local drive.
©
1999 - 2024 LSoft Technologies Inc.

|Legal Statement|126
• Capture and apply Windows images.
• Modify the Windows operating system while it's not running.
• Set up automatic recovery tools.
• Recover data from unbootable devices.
• Add a custom shell or GUI to automate these kinds of tasks.
Legal Statement
Copyright
©
2023, LSOFT TECHNOLOGIES INC. All rights reserved. No part of this documentation may
be reproduced in any form or by any means or used to make any derivative work (such as translation,
transformation, or adaptation) without written permission from LSOFT TECHNOLOGIES INC.
LSOFT TECHNOLOGIES INC reserves the right to revise this documentation and to make changes in content
from time to time without obligation on the part of LSOFT TECHNOLOGIES INC. to provide notification of
such revision or change.
LSOFT TECHNOLOGIES INC provides this documentation without warranty of any kind, either implied
or expressed, including, but not limited to, the implied warranties of merchantability and fitness for a
particular purpose. LSOFT may make improvements or changes in the product(s) and/or the program(s)
described in this documentation at any time.
All technical data and computer software is commercial in nature and developed solely at private expense.
As the User, or Installer/Administrator of this software, you agree not to remove or deface any portion
of any legend provided on any licensed program or documentation contained in, or delivered to you in
conjunction with, this User Guide.
Active@ KillDisk, the Active@ KillDisk logo, KillDisk, KillDisk for Industrial Systems, KillDisk System,
KillDisk Desktop are trademarks of LSOFT TECHNOLOGIES INC.
LSOFT.NET logo is a trademark of LSOFT TECHNOLOGIES INC.
Other brand and product names may be registered trademarks or trademarks of their respective holders.
©
1999 - 2024 LSoft Technologies Inc.
